Wednesday, November 11, 2009

French Toast

French Toast

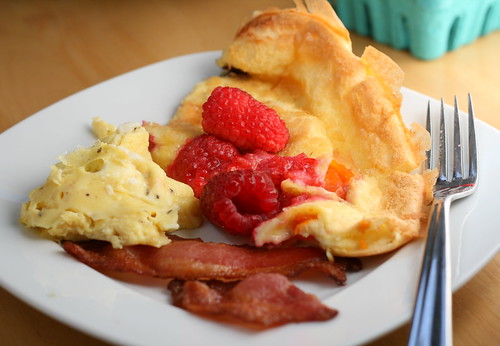
Breakfast is the one meal where I don't feel guilty about eating a lot. After all, it's the most important meal of the day, right? When I have time to make a big, sit-down breakfast, I like to go all out and hit my major food groups--meat, eggs, carbs, and coffee. Yup, I think that just about covers it.

The last time I made French toast was before I started med school so I had aallll the time in the world to make everything fancy and gourmet. I even baked my own bread. If I hadn't gotten accepted, I would probably be making my own Nutella and grinding my own powdered sugar in a mortar and pestle. Luckily, nowadays, I doing something a little more productive with my time. The raisin bread I bought from Safeway makes for some pretty darn good French toast, and I don't even like raisins. Maybe it's the power of butter and maple syrup. Other than PB&J's I can't think of any other good uses for this bread, so it looks like I'll be making a few more servings of French toast with the rest of the loaf. Oh, I guess I could make bread pudding!

As for the rest of the breakfast...
Steven and I both love hash brown patties and prefer them over the more homemade shredded potato variety. I'd like to blame McDonald's for getting us hooked on deep fried processed potato in patty form.

Then, we have our breakfast sausage, taking the place of bacon, the usual suspect. What can I say, living on the edge today.

And finally, one of my personal favorites. A fried egg over medium with soy sauce and a sprinkling of furitake flakes. It's way better than plain old salt and pepper, trust me.
French Toast
6 slices of bread (something soft like sandwich bread, challah, or brioche)
1 large egg
1/2 C milk or half and half
1 Tbsp granulated sugar
1 Tbsp flour
1 tsp vanilla extract
pinch of salt

In a bowl whisk the egg, flour, and sugar together until there are no lumps of flour remaining. Add the milk, vanilla, and salt and mix until smooth. Pour into a pie plate or small tray.

Melt a half to one tablespoon of butter in a skillet or griddle, depending on the size of your pan. Dip a slice of bread into the batter and let each side of the bread soak for approximately 3 seconds. Make sure there are no dry spots on the bread. Soak only enough slices that you can cook in your pan at one time. Fry each side on medium low heat for 3 - 4 minutes, or until the bottom is a crisp golden brown. Flip and cook the second side until crisp and golden brown. Repeat for the remaining bread slices.

Serve with powdered sugar or maple syrup.

Saturday, October 10, 2009

Guest Post! Shanghai Drunken Chicken

Drunken ChickenShanghai Drunken Chicken at Rasa Malaysia

Yes, I'm still here. No, I haven't forgotten about this blog. I know the crickets have been chirping here more than I've been posting. If only I have more free time because right now it's virtually non-existent.

I can't remember the last time I've been sick but a bug was bound to get me sooner or later. I woke up this morning with the whole nine yards--fever, sore throat, cough, and aches all over. I tried to catch up on my reading but that wasn't happening. I should have known reading about urine and kidneys gets nowhere when you're sleep-deprived and feverish. So, instead of studying, I resigned myself to spending the day in my pajamas with chicken noodle soup, catching up on food blogs and many issues of Bon Appetit (au revoir Gourmet, you will be missed!).

This is long overdue but check out my guest post on Rasa Malaysia! I was torn between drunken chicken or crab cakes; drunken chicken won but I did make some crab cakes after Bee got me thinking about them. This project was 3 months in the making due to a combination of my hectic schedule and perfectionism. The recipe was far more seasonally appropriate when I started it in July. Bee, thank you for being a great host and for being so understanding about my numerous delays in getting this done.

Saturday, September 12, 2009

Heirloom Tomatoes and Bacon

BLT
The sandwich of summer, the BLT.

I think my laptop caught me drooling over the shiny new Macbooks because it decided to die last week, two days before classes started. Awesome. After running every recovery, repair, and restore program, the consensus was that the hard drive irreparably failed. I've noticed that Dell computers start having problems after a year, suspiciously only a few days after the one year warranty expires. Luckily, I purchased a four year warranty with this computer but that means three more years before I can finally make the switch over to Macs.

Absolutely everything was on that hard drive-a year of schoolwork, previous work files, blog stuff-everything! And stupid, stupid, stupid me didn't back anything up! Before I launched into a full-blown panic attack once I realized I had lost all of my beloved wedding photos and invaluable lecture notes, Steven was able to salvage everything. Whew! Crisis averted! But boy did I learned my lesson. Always back up on an external drive!

Because I was able to get all my files, I'm taking this as an opportunity to post some old recipes and photos I never got around to. These heirloom tomato photos are from summer 2008. This blog has seen three summers now and there isn't a single post about heirlooms. That's just criminal! Well to be fair, most of the time I eat them plain, no salt, no balsamic-not terribly exciting. I don't cook much with them but they are fantastic in sandwiches, especially the BLT. With so few ingredients, there is absolutely no excuse to use subpar tomatoes in a BLT. I'm one of those people that will add as much as I can to a sandwich (Thanksgiving is the best time for that). I try to show more restraint with the BLT because it's a treasured classic, but more often than not, the BLT evolves into a BLAT (avocado), then that turns into a BLATT (turkey). I always stop myself there otherwise I'll start adding cornichons and furitake flakes.

Heirloom Tomatoes
I love all the funky colors and names of heirlooms.

This really isn't a recipe because who needs one for a BLT anyway? If you're a purist, go with white bread and mayo. I like whole wheat and Dijon instead. Or if I'm feeling extra fancy, some homemade brioche, a rare treat. The bacon weave is no longer groundbreaking but it does make for an extra bacony BLT and who care argue with that?
Bacon Weave
I'm sure someone will make one blanket-sized one, if it hasn't been done already. Mmm tasty.

Summer is coming to an end and school starting again was quite the rude awakening. I don't think I fully adjusted to being a first-year medical student and now you're telling me I'm a second-year? And I have to study all weekend when it's sunny and 80 degrees outside because I have a test on Monday? Welcome back to med school I guess.

Mr. Bunnington
If only I could sleep in the sun all day like Mr. Bunnington.

Tuesday, August 25, 2009

Macarons, macarons, macarons!

Pierre Herme macarons

I have the best friend who brought me the best souvenirs! After a month-long honeymoon hopping across Eurasia from Russia to France, E.’s final destination was Paris. The morning before her flight back to Seattle, she rushed over to Pierre Hermé to buy one of every macaron available that day. After a trans-Atlantic flight with a brief layover in Iceland, a collision in the X-ray machine (the macarons, not the people), 90 degree weather in Seattle, E. and husband E., and a dozen of the prettiest macarons made it back home, well-traveled, tired, and a little sweaty.

That night, we hung out, drank French wine, ate French almond cakes and French rum cakes. Before Steven and I overstayed our welcome, we left the weary travelers and drove home with twelve macarons nestled in my lap and an obligatory mini Eiffel Tower.

ohhh yess...
I am one lucky gal! Just look at those beautiful colors!

I saved the Pierre Hermé plastic bag, Pierre Hermé decorative paper bag, the two macaron guides, and yes, even the napkin (unused!). Obsessed? Maybe.

First up
set 1
Top: CELESTE: Strawberry, Passionfruit, & Rhubarb
passionfruit cream mousse with rhubarb and strawberry compote

Bottom: Grapefruit
grapefruit and Campari cream with candied grapefruit pieces
A seasonal flavor I believe. Very grapefruit-y without being overly bitter.

Right: MONTEBELLO: Pistachio & Raspberry
pistachio cream with raspberry compote

Fast forward through eyes rolling back and guttural moans to the second set.
set 2
Top: MOGADOR: Passionfruit & Chocolate
passionfruit and chocolate ganache
This one was E.'s favorite and definitely one our favorites as well. The combo of passionfruit and chocolate is eye-opening.

Middle: Olive Oil & Vanilla
olive oil and vanilla bean cream
This one did not tolerate the heat very well. It started looking a little greasy but surprisingly didn't taste greasy at all. We were a little skeptical about this one but the flavor was very delicate.

Bottom: ARABESQUE: Apricot & Pistachio
apricot cream with praline and pistachio
This was probably my favorite. Both the apricot and pistachio flavors were so strong!

set 3
Left: Blackcurrant
Blackcurrant cream

Middle: Chocolate
pure origin chocolate from Venezuela ganache

Back: Rose
rose cream
Another one of my favorites, I can only imagine how delicious the Ispahan is (wasn't available that day).

By now Steven and I were faced with a dilemma. We were absolutely stuffed and couldn't eat another macaron. But what if they didn't keep well in the fridge?! The last thing we wanted was to wake up the next morning to find our beloved, flown-in from Paris macarons soggy! We probably could have googled for proper macaron storage but after spending a night in the fridge, they were as good as new.

set 4

Right: Fleur de Sel Caramel
caramel macaron with grains of Fleur de sel, salted butter caramel cream
Oh my god, it tastes like I died and went to heaven. I didn't want to part with this one but I had to give Steven his half. The things the French can do with sugar, butter, and salt amaze me.

Middle: Chocolate

Left: Fresh Mint
mint macaron, fresh mint creme
I'm normally not a fan of mint flavored sweets, which usually taste disturbingly like toothpaste. But this was totally different - it tasted minty and green (like fresh peas). It tasted just like how my Aerogarden mint smells.

Steven and I are two very happy people right now. Even though the macarons had rich fillings, they all tasted luscious without being heavy. Each flavor tasted as delicious as they sounded. Pierre Hermé is a friggin magician.

Macarons

Yes, I specifically requested the mini Eiffel Tower.


Tuesday, August 18, 2009

Crab Cakes

Ginger Lime Dungeness Crab CakeMmm mm! 4 oz. crab cake with Israeli couscous (our current obsession) cooked in crab stock.

I’m back! I spent the last month working at a clinic in the coastal fishing town of Westport, WA. I had some of the best seafood ever while I was down there – crab, salmon, tuna, spot prawns all fresh off the fishing boats. Before heading back to Seattle, K., the gal I was staying with, hooked me up with 6 Dungeness crabs to take home. Whoohoo! I also had the clams we dug up the day before, salmon a neighbor brought over from his fishing, and blueberries I picked from the shrubs outside the house. It was some seriously sweet loot to take home.

My dad is in town and Dungeness crab is his favorite. We feasted on steamed crab with fresh ginger spiked black Zhejiang vinegar for dipping. I cleaned and picked out the meat from the leftover crabs for crab cakes. Dungeness crab is one of the meatiest crabs but even so, it took two very large crabs to yield one pound of crab meat. Jumbo lump Dungeness crab meat goes for around $25 a pound at my local fish market. Pretty darn steep in my book but it takes about three to four pounds of whole crab to yield a pound of crab meat and then factor in the time spent to get the crab out of the shell, the price is understandable.

Too many recipes out there have all sorts of fillers added to the crab – onion, bell pepper, even celery (blech), and calls for way, way too much bread crumbs. You end up with an onion flavored hockey puck. No thank you! The best crab cake in my book is made with as much crab meat as possible, no veggies, and minimal bread crumbs. I use panko because it’s light and airy and won’t weigh the crab down. Don’t even think about using the stale stuff that comes in a cardboard canister. The most important step is to thoroughly chill the cakes for at least an hour so they get a chance to set up in the fridge, otherwise the cakes will fall apart in the pan.


Ginger Lime Dungeness Crabcake

Ginger Lime Crab Cakes
1 lb jumbo lump crab meat
1 egg
2 Tbsp mayonnaise
2 Tbsp chopped green onions, green parts only (approx 3 green onion tops)
2 Tbsp chopped parsley
1 Tbsp juice (approx from half a small lime)
1 Tbsp sweet relish
1 tsp Dijon mustard
1/2 tsp grated fresh ginger
1/2 tsp lime zest (approx from half a small lime)
1/4 tsp smoked paprika
1/4 tsp black pepper
Optional: dash of fish sauce
1/4 C panko bread crumbs and more to bread

Vegetable oil to fry 4 – 5 minutes on medium heat


Pick over the crab meat and discard any pieces of shell. Drain the crab meat on a few sheets of paper towels to soak up any excess moisture. You may have to gently squeeze the crab meat to remove excess liquid (you don't want to go overboard and have it end up bone dry either).

In a small bowl, whisk all of the ingredients together except for the panko and crab meat and mix into a smooth sauce. Pour over the crab meat and add the panko bread crumbs. Gently fold together the crab, sauce, and bread crumbs. Try to keep the large crab meat pieces intact while mixing.

Divide the mix into 4 and squeeze the mixture tightly together to form a 3 – 4 inch patty that’s roughly 3/4 inch thick. Put the crab cakes on a plate and cover with plastic wrap. Chill for at least an hour, up to overnight.

Pour some panko onto a plate and bread both sides of the crab cake with the bread crumbs.

Heat 2 tablespoons of vegetable oil in a nonstick skillet over medium heat. Fry the crab cakes 4 – 5 minutes on one side then carefully flip and continue to cook for an additional 4 – 5 minutes. If the crust is browning too fast, turn the heat down. Frying the crab cakes slowly ensures that they are heated through by the time the crust get crisp and golden brown. Resist the urge to flip the cakes more than once because they are more likely to fall apart with repeated flipping.

Serve with dipping sauce of your choice.

Sriracha Mayonnaise
2 Tbsp mayonnaise
2 tsp Sriracha
1 tsp lime juice
1/4 tsp brown sugar
1/4 tsp fish sauce

Whisk all of the ingredients together in a bowl.


Saturday, July 25, 2009

Extra Virgin Olive Oil

Olive Oil
A few weeks ago I was asked by Gaea if I'd be interested in reviewing some of their products. I am by no means an olive oil expert but I thought, heck why not, tasting products is always fun. Gaea specializes in extra virgin olive oil but they also make Greek food products like cooking sauces and tapenades. They sent me a free 17oz. bottle of their extra virgin olive oil and a bottle of their Myconos (tuna and kalamata olives) sauce.

By now, I’m sure everyone has heard that olive oil is good for you so I won't bore you with those details. An "extra virgin" olive oil is the highest quality and means that it has not been chemically treated or heated in the process of extracting the oil from olives. This is the kind you want to look for because it has the highest vitamins and antioxidant content and the most health benefits. "Cold pressed", olive oil obtained without the use of heat, is ideal but the term is unregulated and is used mainly as a marketing tool. "First press" is an obsolete misnomer also used for marketing because there is no second press nowadays. If it says something like pomace-olive oil it means that chemical solvents were used to extract the last bit of oil left in the olive paste (pomace) after extracting the oil mechanically. In Europe, the International Olive Oil Council (IOOC) regulates quality and authenticity of olive oils. However,the US is not part of the IOOC and the USDA has its own murky guidelines but we do have the nonprofit California Olive Oil Council. Their seal guarantees extra virgin olive oils that are mechanically extracted without chemicals or excess heat, less than 0.5% acidity aka free oleic acids (which is a measure of how much the oil has degraded, higher number = bad).

Unfortunately, none of the olive oils I list below are on the list of COOC certified olive oils. I bet the certified olive oils are expensive and possibly harder to find than bigger name brands. Olive oils can get pretty darn pricey. The price per ounce of extra virgin olive oils range from 20 cents up to well over a dollar an ounce.

After some online research, 3 brands came out on top in many reviews (prices are rough estimates):
Colavita: $9 for 16.9-oz. bottle, 53 cents an ounce
Columela: $16 for 17-oz. bottle 94cents an ounce
Whole Foods 365: $5 for 17.9-oz. bottle 28 cents an ounce
Kirkland Signature by Costco (don’t have the size or price but I imagine this is the cheapest)

I compared the Gaea extra virgin olive oil with the oil I currently have in my pantry, Trader Joe's Kalamata extra virgin, a decent oil in my opinion. First, I tasted the oils on its own and then with a small piece of bread. I wasn't hardcore enough to take a sip of oil by itself. The color of an olive oil doesn't correlate with the taste but just for kicks I compared the two side by side and the Gaea oil was slightly greener. The Kalamata oil smelled peppery, whereas the Gaea oil smelled very grassy. The flavor of the Kalamata oil was upfront, one note, and peppery just like it smelled. On the other hand the Gaea oil was milder, took longer to develop in the mouth, and much grassier, and slightly peppery. Of the two, Steven and I both preferred the Gaea but this tasting is far from thorough so take it with a grain of salt. I haven’t compared it with any of the recommended oils listed above, because frankly I don't have the time or money to spend on getting 4 different olive oils. I may switch to the Kirkland signature brand or Whole Foods 365 in the near future and compare with those.

As a side note, I wonder if companies who want food bloggers to review their products should provide some competing products along with their own.

When I buy an olive oil, I look for one that not only tastes good but is also budget friendly, which is why I bought the Trader Joe's kalamata oil. The 17 oz. bottle of the regular, nonorganic, Gaea runs for $10 (59 cents an ounce) and the D.O.P (Protected Designation of Origin) and organic Gaea oils will cost you around $15 (88 cents an ounce). At this point in my life (mired in student loans), I can’t justify spending that much on olive oil. While it’s great that Gaea is a carbon neutral company, it's too bad their olive oils are not the most budget friendly.

If anyone has tried the Gaea oil and would like to weigh in on that oil or offer their opinions about olive oils in general, please leave a comment. I'd love to hear what you think. What's your favorite extra virgin olive oil?

Pasta
I added a chopped roasted red bell pepper and minced parsley

As for the cooking sauce, the tuna and kalamata sauce over pasta tasted like a puttanesca sans capers. It's made with real ingredients (tuna, olives, basil) without any funky flavorings, preservatives, or colorings. But the jar is pretty small so you will probably get one meal for 4 out of it.

Grapefruit and Dill Salad

Grapefruit Vinaigrette
1/4 C ruby red grapefruit juice (preferably fresh with no sugar added)
2 tsp Dijon mustard
1/4 C olive oil
salt and pepper

If you can't get a grapefruit for freshly squeezed juice, use something like Simply Grapefruit with no added sugar. Sweetened grapefruit juice is too sweet in a dressing.

Blend or whisk the juice with the mustard and a pinch of salt and pepper. Slowly drizzle the olive oil and blend until emulsified.

This dressing is great in a salad with fresh dill, grapefruit segments, and toasted almonds.


Tuesday, July 21, 2009

German Pancake/Dutch Baby with Apricot and Raspberry

German Pancake
Steven and I bought a half flat of the biggest raspberries we'd ever seen from our local berry stand. We're lucky enough to live blocks away from the only Seattle location of the Spooner Farms berry stand. One more reason why I love our neighborhood. Raspberry season is coming to a close in Washington state and they will eventually be replaced by blueberries and blackberries. If you live in the North Seattle area or close to any of the other locations, I recommend you check out Spooner Farms and stock up on these amazing raspberries while you still can.

Spooner Berry Farm RaspberriesBetween the car ride home and breakfast, we polished off one half pint. Any suggestions for what I should do with the remaining 5 half pints?

Steven and I aren’t big breakfast people but when I do make breakfast, I go all out. Bacon and eggs usually make an appearance, sometimes I do waffles, sometimes pancakes, and sometimes I get crazy and put everything together. The German pancake, also called Dutch Baby, is like a crepe crossed with a popover. It's ridiculously easy to make (the batter is made in under 2 minutes in a blender) and is always a crowd pleaser. Watching the pancake puff up before your very eyes is always entertaining. You can add fresh fruit to the batter, add it on top after baking ,or go crazy and do both! Then you have the option of topping it with the more traditional squeeze of fresh lemon juice and powdered sugar or simply drizzle on the maple syrup, for the syrup lovers.

If you're using a cast iron skillet, you'll need to preheat it longer than a cake pan. Put the skillet into the oven before turning it on and let it preheat in the oven for a good 20 minutes. This will give you enough time to make some coffee, get your ingredients together, and set up the blender.

German Pancake

German Pancake with Raspberries and Apricot
3 eggs
1 Tbsp sugar
1/2 C all purpose flour
1/2 C milk
3 Tbsp butter
Optional: 1 apricot sliced up and 1/3 C raspberries

Preheat the oven to 425 degrees F and put a cast iron skillet (if using) into the oven to heat up.

After about 15 - 20 minutes (or longer if your oven is slow), the skillet should be hot. Add the butter to the skillet and return it to the oven. If you're using a cake pan, add the butter to the cake pan and put it into the oven.

Add 3 eggs and the sugar to blender and blend on low speed for 1 minutes. The eggs should be light colored and bubbly. Then add the flour and milk and blend for 10 seconds, until evenly mixed.

Take the skillet or cake pan out of the oven and make sure the butter has completely melted. Pour the batter into the hot skillet or pan and scatter the fruit on top of the batter if using.

Bake at 425 degrees F for 18 - 22 minutes, or until the sides and middle have puffed up and browned.

Serve with fresh fruit and a lemon slice and powdered sugar or maple syrup.

Sunday, July 5, 2009

Duck Noodle Soup

Duck Somen

I walked into the Asian market only needing some tofu but walked out with over $80 of groceries and a whole roast duck. $1.28/lb white peaches, heck yeah! 99c/lb bok choy, yeah I need that too. Whoa, fish sauce is on sale?! Well, I still have some at home but it doesn’t hurt to have a backup right? As for the tofu I needed? Well, I got 2 shapes of deep fried tofu, a pack of pressed, firm, and silken. I had to restrain myself from those damn cute tofu knots.

The roast duck, which was also on sale so how could I not get it, was the highlight of the trip. I brushed the sweet plum sauce on the skin and reheated it in the toaster oven to restore the skin to its original crispness. I asked to keep the head and neck so I could turn it into duck stock. Then, putting that 99c bok choy to good use, I added it to the stock for a simple but perfect lunch - somen, roast duck, bok choy, in a simple duck soup. It's comfort food, Chinese style.

Roast Duck
Simple Roast Duck Stock
1 roast duck head and neck and other bony pieces from the duck
3 dried shiitake mushrooms, rehydrated and washed
2 thin slices of fresh ginger
3 green onions, roughly chopped
6 C water
salt and white pepper

Cover the mushrooms with some hot water for 5 minutes, then rinse them under running water to wash off any dirt hiding in the mushroom gills.

Rinse the duck pieces with some cold running water.

Put everything in a large saucepan and simmer for 2 – 3 hours and skim off any scum that rises to the surface. Season with salt and pepper.

Duck Noodle Soup
Noodles of choice, I chose somen (I do 2 - 3oz. for a serving)
1 bok choy per person, leaves separated and washed, sliced lengthwise
Roast duck
Duck stock

If the roast duck came with a sweet, honey colored sauce, brush some of that on the skin. If not, thin some plum sauce or honey with a small amount of water and brush that on the skin. Depending on how hot the broiler element gets in your oven or toaster oven, you can either bake at 450 for 5 – 10 minutes or use the broiler for 5 – 10 minutes. Keep an eye on the duck so it doesn’t burn. My toaster oven broiler is relatively weak, so I reheated the duck using the broil function.

Cook your noodle of choice according to package instructions. Rinse under cold water, drain, divide, into bowls and set aside.

Bring the duck soup to a simmer, add the bok choy and cover, cook for about 1 – 2 minutes. You want the bok choy to be crunchy. Make sure it doesn’t turn translucent because that means it’s overcooked.

Pour the soup on the noodles, add the bok choy and duck on top.

Tuesday, June 30, 2009

Korean Pancake - Pa Jeon/Pa Jun

Korean Pancake - Pa Jeonupdated from archives

A few years ago when I was visiting Steven's parents, his mom made some Korean pancakes for us. They were so good, I just had to ask her for the recipe. Then I was shocked to see her pull out a packaged mix from the pantry. I always thought that homemade always trumps convenience but that may not be the case with pajeon. After looking at the ingredients in the package, which was mainly flour, I thought I could go home and recreate it. But Steven's mom warned me that she's tried doing that too and the pancakes didn't taste the same. Well, she was right, and with my first attempt, my pancakes were dense and gummy.

After my original post over a year ago, I asked readers to share their pe jeon secrets and you guys offered some pretty good suggestions. I decreased the number of eggs from 2 to 1 and substituted some rice flour for all purpose flour. The resulting pancakes were excellent and the closest I've come to replicating the ones made from a package. But if you have access to an Asian market, I would go for the mix because it's easy and the results are consistent.

Unlike American pancakes, which are fluffy and usually topped with fruit or syrup, Korean pancakes are crispy on the outside, soft and tender on the inside, and packed with delicious morsels of seafood and vegetables. The pancake we ordered at the Korean BBQ restaurant in LA was probably 75% seafood. I used a seafood mix I got from a local Asian market that was a mix of imitation crab meat, octopus, squid, shrimp, and cooked oysters. Trader Joe's carries a seafood mix of squid, scallops, and shrimp or feel free to use only shrimp if that's what's available to you. Omit the seafood entirely and up the veggies for a vegetarian version. A lot of readers also suggested adding kimchi juice for added flavor but I rarely have kimchi around.

Korean Pancake - Pa Jeon

Pa Jeon/Pa Jun - Korean Pancake with Seafood and Vegetables
makes 3 10 inch pancakes

1 1/2 C all-purpose flour
1/2 C rice flour (not glutinous rice flour)
2 C water
1 egg
1/2 tsp kosher salt
8 oz chopped seafood mix or shrimp, peeled, deveined, and chopped
1 carrot, grated
1 zucchini, grated
3 green onions, thinly sliced
or substitute a handful of Chinese chives cut into 2 inches

In a large bowl add the all-purpose flour, rice flour, and salt. Whisk to combine. Add the egg and start with 1 1/2 cups of water. Whisk until smooth. If the batter is looking too thick, add a little more water. The consistency should be like heavy cream, not too watery. Add in the chopped seafood (if using), grated vegetables, and green onions or chives.

Heat a tablespoon and half of vegetable oil in a nonstick or cast iron skillet over medium high heat. Use plenty of oil, enough oil to cover the bottom of the pan, for a crispy pancake. Ladle one third of the mixture into the pan and spread it evenly in the pan. Cook until the bottom is crisp and golden brown. Flip and cook on the second side until crisp and golden brown. Repeat with the rest of the batter.

Cut the pancakes into 8 wedges and serve with dipping sauce.

For the spicy dipping sauce, I mix equal parts chili sauce (sambal oelek) with soy paste which is like a thickened soy sauce, Kim Lan makes our favorite. A more appropriate chili sauce would be gochujang (Korean chili bean paste, the Chinese equivalent is dou ban jiang). Adjust the spiciness according to your own tastes.

Tuesday, June 23, 2009

Braised Lamb Shanks and Saffron Pearl Couscous with Cranberries and Almonds

Braised Lamb Shank
I always feel like I’m committing a culinary faux pas braising in the middle of June. I try my best to keep things seasonal but it just doesn’t happen when lamb shanks are on sale. How can I say no when there's marrow involved? Lamb shanks have to be braised (I honestly can't think of any other way to cook a shank cut) but I refuse to turn on the oven for 4 hours so I put the Le Creuset to good use on the stovetop.

I tied the lamb shanks so they would keep their shape while cooking but it was futile. After about an hour of cooking, the shanks contorted out of the strings entirely. Same thing happened when I made Osso Buco. meh, oh well.

Red Wine Braised Lamb Shank
2 lbs lamb shanks, roughly 2 1/2 to 3 inches thick
1 medium onion, small dice
1 medium carrot, small dice
4 cloves garlic, minced
2 Tbsp tomato paste
3 - 4 large thyme sprigs
2 bay leaves
1 1/2 C dry red wine
Salt and freshly ground black pepper
Olive, vegetable, or canola oil
Water or chicken stock as needed
Chopped parsley or chiffonade basil for garnish

Salt and pepper the lamb shanks. Tie the shanks around the perimeter tightly with a piece of twine.

Heat 1 tablespoon of vegetable oil in a Dutch oven over medium high heat. Brown the lamb shanks on all sides, paying particular attention to the two flat sides. Remove the shanks and set aside.

Turn the heat down to medium and add the diced onion, diced carrots, and a large pinch of salt to the pan. Cook the vegetables, stirring occasionally and scrape up the brown bits, until they are translucent. Then add the tomato paste and minced garlic and cook for 30 seconds to a minute for the tomato paste to slightly caramelize. Return the shanks and any accumulated juices to the pan, and add the red wine, thyme, bay leaf, some more salt and pepper, and enough chicken stock or water to barely cover the shanks. Bring the contents up to a boil first then lower the heat to a bare simmer. Cover and cook for 3 - 4 hours or until the shanks are falling apart soft.

When the shanks have finished cooking, gently take them out of the pan and set aside. Take out the bay leaves and the thyme sprig. Turn the heat up to medium and reduce the sauce by half or until it is thick and syrupy. Serve the sauce on top of the lamb shanks and top with a little chopped basil or parsley if desired.


This was the perfect opportunity to cook up the Israeli or pearl couscous I got from Trader Joes. I hate how expensive (8 oz. for $3) this stuff is because I am seriously hooked! It looks so cute and bubbly and each grain, though it's more like a pasta than a grain, is more distinct and has more chew than regular couscous. While looking for a cheaper source, I found a few items on Amazon but I don't want 12 8oz. boxes or one 22 pound bag of it, so the search continues.

I cooked the couscous in a little chicken stock with saffron and added some cranberries and some toasted almonds but pine nuts would be just as good. Next time, I would chop up the cranberries so they can mingle better with the couscous. Steven was really skeptical about the cranberries with the saffron but it really works. The recipe on the back of the couscous box called for raisins so I didn't see why I couldn't sub some cranberries instead. I've never been a fan of raisins but I can eat dried cranberries by the handful. It's one of the few things I can justify buying at Costco. But if raisins are your thing, by all means use them.

Saffron Israeli Couscous with Cranberries and Almonds
serves 4

8 oz. (about 1 1/3 C) Israeli Couscous
1 3/4 C + more if needed chicken stock
Large pinch of saffron
1/4 C dried cranberries, chopped
1/4 C toasted almond slices or slivers or pine nuts
2 Tbsp chopped chives (or sub with parsley)
2 Tbsp chopped parsley
2 Tbsp butter
Salt and pepper to taste
Olive oil

Steep the saffron threads in 1/4 cup of hot but not boiling chicken stock for 15 - 20 minutes.

Bring the remaining half cup of chicken stock to a boil and set aside.

Heat 2 teaspoons of olive oil in a saucepan over medium heat. Add the couscous and toast until the pasta is golden brown. Turn the heat down to low and add the saffron liquid, hot chicken stock and some salt and pepper and simmer covered until all of the liquid has been absorbed and the couscous is soft with a slight chew, add more stock or water if necessary, about 12 minutes.

Off heat stir in the cranberries, herbs, and tablespoon of butter. Season with more salt and pepper if needed. Top with toasted almonds or pine nuts.


Monday, June 22, 2009

Basil Fried Rice

Basil Fried Rice
Basil fried rice and pan fried salted mackerel

I made a lot of fried rice during the school year. That and ramen (I'm very particular about my ramen)were my staples. The only constants for fried rice is leftover rice, which we always have plenty of, and egg. I would argue you need some sort of herb, which most of the time means green onion, in this case basil, but again that's debatable. If I'm feeling particularly fancy, I'll throw in some seafood (Trader Joe's seafood mix is great for this) or veggies, in an attempt to be healthy. But simple is good too, and fried rice doesn't get simpler than this.

Seafood and XO Sauce Fried RiceThe fancy stuff: Seafood and Veggies Fried Rice with XO Sauce

The basil came from my Aerogarden, a nifty hydroponic tabletop garden. It's pretty sweet but really expensive. If I hadn't gotten it as a gift I would have never considered buying one.

It started as this... (week 2)
Aerogarden week 2
aww, so cute!

Grew into this... (week 3)
Aerogarden Week 3
Then I forgot to keep track...

and it turned into this!
Aerogarden Week "I forgot to keep track"
Ahh! (Mint, Basil, Dill, Thyme, Parsley, Purple Basil, and Chives)

It would have been a smarter move to start the Aerogarden in the fall so I could have fresh herbs in the Winter but I wanted to harvest it for E's wedding. I was delusional in thinking that a tabletop garden could produce enough herbs for dinner for 40. I guess I could be growing this stuff outside with all the lovely weather we've been having in Sea-town, but having everything in the kitchen is pretty convenient.

Some herbs are growing better than others. The parsley is pretty slow but the dill and basil plants are growing like crazy and I'm constantly having to prune them. Short of eating the stuff straight, (I'm not that hardcore), I've been adding basil to everything. It worked out pretty nicely in fried rice (I don't think dill would go over as well).

Basil Fried Rice
serves 2

2 C cooked, cold, leftover rice from day before
2 eggs, beaten
1/2 C basil leaves, chopped right before adding to prevent blackening
1/2 tsp kosher salt
Freshly ground black pepper
1 - 2 Tbsp soy sauce (as desired, more soy sauce = browner rice)
1 Tbsp vegetable or canola oil (sometimes I use bacon fat, mmm!)

Heat the cooking oil over medium high heat in a nonstick skillet or wok. Add the rice and cook for 2 - 3 minutes. Break up any clumps of rice and cook until the rice is steamy hot. Add the salt and some pepper.

Push all the rice to one side to clear an area of the skillet. Add the beaten eggs to the open spot in the pan and stir to cook the eggs. When the eggs are almost fully cooked but still runny, stir it into the rice and add the soy sauce.

Take the pan off heat, roughly chop or tear the basil, and stir it into the rice. Add just seasoning with more salt if necessary.

-or- w/ Green Onions instead of Basil
1 to 2 (depending on the size and your preferences) green onions, thinly sliced

Instead of adding the green onions at the end like with the basil, add the green onions to the cooking oil before adding the rice and cook until it's fragrant, about 30 seconds, then add the rice and proceed with the rest of the recipe.

Friday, June 12, 2009

Raspberry Lemon Cream Tart

Raspberry Lemon Cream TartWhoops! Only had 2 minutes to take pics and forgot to take the tart out of the pan.

Short and sweet recipe post today! I still had some cream cheese leftover from the wedding and the giant 3 pound Costco tub was taking up valuable fridge space. I was trying to do something with it but couldn't manage to use all of it. Then I made way too much filling for one tart shell so now not only is the gargantuan tub still sitting in the fridge, but I also have a container of whipped filling taking up even more room. Crap! Now I'll have to think of something else to use up the whipped filling but honestly I'll probably just end up eating it with some fresh fruit.

Too bad I didn't get a photo of the sliced tart because the hidden layer of raspberry jam is a nice surprise-an idea I took from Dorie Greenspan's Hidden Berry Cheesecake. Speaking of which, I bet this recipe would work just as well with blackberry jam and fresh blackberries.

Raspberry and Lemon Cream Tart
1 Prebaked Sweet Tart Crust
2 oz. cream cheese
3 Tbsp granulated sugar
1/2 C heavy cream or whipping cream
1/4 C lemon curd
1/4 C raspberry jam, preferably seedless
1 C fresh raspberries

I scaled the recipe down to make enough filling for one tart. Depending on the sweetness of your lemon curd, you may want to use less sugar. I was using store-bought lemon curd (Trader Joe's makes a good one) and it's very sweet so I used 2 tablespoons of sugar. Homemade lemon curd is more tangy so you may need to use 3 tablespoons of sugar.

With a whisk attachment, using a stand mixer or hand mixer, beat the cream cheese and sugar on medium high speed until fluffy. Slowly drizzle in the whipping cream and whip until stiff peaks form. Fold in the lemon curd.

Spread the raspberry jam on the bottom of the baked tart shell. Then add the lemon cream cheese mixture. Top with raspberries and chill in the fridge for 30 minutes before serving.

Prebaked Flaky Pate Sucree
for an 8 or 9 inch pan

1 C flour
1/3 C confectioner's sugar
1/4 tsp salt
6 Tbsp cold butter, cut into 6 pieces
1 egg yolk
2 Tbsp cold milk or ice water
1/2 tsp of vanilla

Add the flour, confectioner's sugar, and salt together in a food processor and pulse once or twice to combined. Add the pieces of butter and pulse until the butter pieces are no bigger than a pea. Alternatively use a fork or pastry cutter to cut in the butter, or freeze the butter and coarsely grate it then use your fingers and rub the pieces into the flour. It is very important to keep the butter cold otherwise it will melt and make the crust greasy and you'll lose all the flaky layers.

Mix the egg yolk, milk, and vanilla together. Drizzle the mixture over the butter and flour mix in the food processor. Pulse again until the dough start to form large clumps. If it looks too dry add a little more milk.

Scrape the dough onto a large piece of plastic wrap and press the clumps together to form a disc. Wrap the dough in the plastic wrap and chill at least an hour up to overnight. Or store it in the freezer for as long as you want.

Preheat the oven to 375 degrees F.

Lightly flour a work surface and rolling pin and roll out the dough to into a large circle. Move the crust around often to make sure it doesn't stick to your work surface.

Transfer the dough to an 8 or 9 inch tart pan. To make this easier, drape the dough over the rolling pin and lay it over the pan. Lift the edges of the crust and gently press the dough down into the pan. Roll over the top of the pan with a rolling pin to trim any overhanging dough.

Prick the surface of the dough with a fork. Press a sheet of aluminum foil onto a crust and add pie weights, beans, or clean pennies on top. I like using pennies because they are the best heat conductor. Bake on the middle rack for 25 minutes. Remove the foil and baking weights (be careful the weights will be very hot!) and return the crust to the oven to bake for another 10 or so minutes until it is golden. Cool to room temperature before filling


Thursday, June 11, 2009

I Catered a Wedding Part 2: Wedding Cupcakes

Wedding Cupcake
Tahitian Vanilla Cake with Raspberry Coulis and Matcha Green Tea Frosting

Most of the wedding food was tested repeatedly but none as extensively as the wedding cakes. Even if the food was mediocre, I wanted E.’s cakes to be perfect. In between studying and midterms, I tweaked and adjusted the cake recipes all quarter long. I stopped baking everything else and focused solely on the cake for 2 months. I’ve never spent this long developing and testing a recipe. All that work was worth it because the cupcakes are some of the best things I’ve ever baked.

The Planning
When E. and I first started planning many months ago, we quickly settled on cupcakes instead of a traditional tiered wedding cake. Cupcakes are very trendy right now but we chose them for more practical purposes. A tiered cake would take days to put together and with me doing all of the food, it just wasn’t a feasible option. Cupcakes are also great for quality control. I can taste the cupcakes after baking to make sure it turned out okay and no one will be any the wiser. It would be painfully obvious if a chunk was missing from a large wedding cake.

For variety, we would have both yellow and chocolate flavors. E. loves green tea so that had to be worked in somehow. In addition to frosting the cupcakes would also have a filling, just like a layer cake, because I wanted them to have a little extra something. After all, they're for a wedding!

At first, we planned to make 2 dozen of each flavor but then we upped the number to 3 dozen each in case guests wanted to try both flavors.

Flavor Development & Recipe Testing
I originally planned to make a green tea buttercream but buttercream can be very temperamental. The last thing I wanted was buttercream breaking the night before the wedding, the frosting melting the day of, or hard and dense frosting if the cake was served too chilled. For simplicity sake I went with a cream cheese frosting because it’s easier to make and very stable.

I paired the green tea frosting with the yellow cake and first tried lemon curd as the filling, but in the end, raspberry coulis complemented the tea even better. The yellow, red, and green colors made it the perfect Springtime cupcake. Originally, I planned to make an almond buttermilk cake, but the almond and buttermilk flavors were lost under the raspberry and green tea flavors. I nixed that idea and decided to go with the classic vanilla. Instead of using extract, I used a Tahitian vanilla beans for a rich floral flavor to complement the fruit filling and grassy notes of the matcha.

Wedding Cupcake
I won't be writing about E.'s chocolate cupcake because I'd like to keep that recipe just for her. Out of all the wedding food, I spent the longest time working on this one.

Baking the Cakes
It was Friday morning, the day before the wedding, and I was still working on the yellow cake. My last attempt making a yellow cake led to my desperate cry for help on this blog. I want to give a really a big thank you for everyone who left suggestions. I told E. about my problems and she told me to just follow a recipe in a cookbook. If I was a sensible person I would have taken her advice and stuck to a recipe. But I've confessed before about how I can never follow a recipe. Less than 24 hours before the wedding, it still holds true, I still can’t follow a recipe. I’m pretty sure I have a problem and I need professional help.

But in my defense, after looking at nearly 2 dozen recipes, none of them fit my specifications. Either they called for too many eggs or cake flour or looked too similar to the recipe I tried already. Call me stubborn or just plain stupid, but I went with my gut and decided to give my crazy experimentation another go.

Instead of creaming the butter and beating in eggs, I decided to go with a sponge cake technique, beating egg whites to soft peaks and beating the egg yolks and whole egg separately to ribbon stage. I also added in some baking powder because I wanted as much leavening as possible for the fluffiest cake using all purpose flour instead of cake flour. As the cakes baked in the oven, I crossed my fingers hoping that this recipe worked, because I was running seriously low on time. When the cakes came out, they looked fine, no gross deformities and no cave-ins. I broke one in half to inspect the crumb and was completely blown away at how they turned out. The cake was airy and fluffy and looked like a cake made with cake flour. It was moist and flavorful, and substantial enough to be a cupcake. I simply couldn't believe I could make a cake like that without cake flour. Not to be tooting my own horn or anything but this cake was perfect.

I baked the chocolate cupcakes in the afternoon and was so worried something disastrous would happen. Nothing had happened yet but something bad was bound to happen right? I'm always very pessimistic when it comes to baking for an important event.

I made the frostings later that night and finally finished filling and frosting the cakes at 12pm. Then I successfully managed to fit 6 dozen cupcakes in 2 very large hotel pans in our tiny fridge and hope the fridge didn't decide to give out overnight. If I had more time and more piping experience I would have decorated the cakes more elaborately but I did the best I could after 10 hours of food prep. I’m really glad I bought this cupcake decorating set because the 1M tip is essential for making the large frosting swirl.

The cakes were the pièce de résistance and I was immensely proud of them. The texture of the cakes were perfectly moist and fluffy and the flavors were well balanced and harmonious. I wished I snapped more pics of the process but I was totally pooped.

Thank you Veronica for showing me the gorgeous paper cupcake wrappers. The moment I saw those wrappers on your site I immediately forwarded the link to E. and we both fell in love with them. They completed the cupcakes and were the perfect finishing touch!

Yellow Cake

makes 14 – 16 cupcakes or 2 8 inch cakes

3.5 oz. sifted, all purpose flour
1 oz. cornstarch, sifted
1 tsp baking powder
1/4 tsp salt
1/4 C melted butter
1/4 C vegetable or canola oil
3 large eggs
1/2 vanilla bean, sliced lengthwise and scraped or 1 tsp vanilla extract
3/4 C granulated sugar
1/8 tsp cream of tartar
2 tbsp whole milk

Preheat the oven to 350 degrees F.

Add the sifted flour, cornstarch, baking powder, and salt into a bowl. Whisk it together to evenly mix the ingredients. In a separate bowl, mix the oil and melted butter.

Separate the eggs and put 2 egg whites into a mixing bowl or the bowl of a stand mixer. Make sure the bowl is very clean and dry because any fat or water in the bowl will interfere with the egg whites whipping properly. With a whisk attachment, whip the whites on medium high until they are foamy. Add the cream of tartar and continue whisking. When the mixture starts gaining volume, slowing add 1/4 C of granulated sugar. Whisk until soft peaks form. If you lift up the whisk attachment and the mixture is still shiny and runny and looks like, keep whipping, you’re almost at the soft peaks stage. Scrape the whites into another clean bowl and set aside.

Add the 3 egg yolks, remaining egg white, 1/2 C of granulated sugar, and scraped vanilla bean seeds to the mixing bowl or stand mixer bowl. Whisk this mixture on medium high until the mixture is thick and pale yellow. Lift up the whisk and the mixture should fall back into the bowl like sheets of ribbon. The trail should be visible on the surface for 3 seconds before disappearing.

Sift in half of the flour mixture and carefully fold the flour into the egg mixture. When the flour is nearly almost all folded in, add the milk and half of the oil and butter mix, and continue folding. Make sure to bring up any oil that sinks to the bottom of the batter. Sift the remaining flour mixture into the batter, and continue folding, add the remaining oil and butter mixture and fold a few more times. Before the batter is completely mixed, scrape in 1/3 of the egg whites and continue folding. Then scrape in all of the egg whites and fold until no streaks remain.

Fill the cupcake tin 3/4 of the way full or divide the batter equally between 2 cake pans.

Bake at 350 for 20 – 22 minutes (may need a longer time for cake pans), or until a toothpick inserted into the center of the cake comes out clean and the top springs back when lightly pressed on.

Cool to room temperature before frosting.


I know others were also looking for a good yellow cake recipe. If you try this recipe let me know what you think!

Wednesday, June 10, 2009

I Catered a Wedding

Wedding Peonies

It’s Wednesday now right? A week of studying, 2 finals, 3 days of food prep, a wedding, and 3 days of downtime including much needed sleep brings me to where I am now. I think I’ve finally recovered enough to form coherent thoughts again. A week ago today, I finished my last exam of the quarter and with that, officially finished my first year of medical school! That thought hasn't completely sunk in yet because right after the exam, I started on the wedding food.

Wednesday:
I tried to make a schedule for the next two days and time points for when food should be chopped, cooked, or baked. I knew it wouldn’t be followed but I had to at least try to delude myself into thinking there was going to be some sort of organization.

Thursday:
E. and I hit up Costco, the local veggie stand, Trader Joes, and 2 local grocery stores for all the food. That night, I made seedless blackberry puree for the salad dressing, 6 dozen gougeres, and the Marsala cream sauce.

Friday:
The majority of Friday was devoted to wedding cupcakes, which deserve their own post.

S. came over to help me with the lasagnas. She also had the very important job of helping me keep it together in case I had a complete meltdown. Luckily, no meltdown. And even better, we successfully put together 2 enormous spinach and artichoke lasagnas.

Extra extra large lasagna ingredients
quadruple the ingredients of a 9 x 13 lasagna

Saturday:
AM: Steven and I packed every appliance, gadget, and cooking tool I could possibly need in the trunk. We had to turn around a few times because I nearly forgot a cookie sheet and my camera. The majority of the prep had to be done before the ceremony but luckily I had 3 awesome helpers, S., D., and Steven. In the 2 hours before the ceremony we had to make the orzo salad, blackberry vinaigrette, balsamic vinaigrette, cucumber sandwiches, and prep 5 pounds of vegetables.

We tackled the orzo salad first. A pound of orzo is deceptively small so I mistakenly thought I could cook 3 pounds of it in only 5 quarts of water. Big mistake. After a few minutes, the orzo sucked up all of the water and the contents of the pot turned into a starchy, bubbly, molten pot of deadly pasta lava. There was definitely a struggle in the great Orzo Battle of 2009, but our heroic Steven successfully managed to get all of the orzo strained, rinsed, and drained, without sustaining any 2nd degree burns. And he did it all using only this tiny sieve.

Meanwhile, I worked on the blackberry vinaigrette. I was following my own recipe but it just didn’t taste right. The blackberry puree I made on Thursday was too tart and I didn’t pack any sugar because none of my recipes called for it. Then I had the brilliant idea of...

wait for it...

diluting it with 7-Up!

First, the debacle with the orzo, then, who would have expected that high fructose corn syrup would be the secret ingredient.

Thank goodness there were no other major problems, otherwise my mental health would have been highly questionable. I won't bore you guys with the details of chopping 6 cucumbers, salt, pepper, and flouring 6 pounds of chicken breast, or how we expertly reheated the gougeres to piping hot perfection.

After the prep, I was able to sneak upstairs and take a few pictures. E. was hands down the most ethereal and angelic bride ever. If anyone disagrees with me I will first politely show you picture proof, and then if there is still disagreement, I will take you down. ;) Everything about the ceremony, the decorations, the music, the vows, flawlessly captured the beauty and essence of the couple, as individuals and together as husband and wife. All I can say is it’s hard to hold a camera still while crying. I’m just glad I wore waterproof mascara.

Wedding Peonies
E.'s mom grew all of the flowers, made all of the arrangements, and decorated the venue

With timing being my main concern, my biggest accomplishment of the day was getting all of the food done at the same time so everything was hot and served at peak deliciousness. I had been bracing myself for something catastrophic for the last 2 days, but thankfully there were no disasters in the kitchen. Long story short, no burns, cuts, lost digits, food poisoning, and not a single stain on wedding clothes.

Oh and I seared 6 pounds of chicken in a satin dress and heels. Hell yeah!

Everything came out the way I was hoping it would and exceeded all of my expectations. I can now say that I’ve catered for 50 people. I’ve thought about starting a catering business on the side in the future, keyword being future. Now I know it’s definitely not something I would want to tackle again without enough counterspace, a second fridge, and a dishwasher in our kitchen. Washing everything by hand in a tiny sink is not an experience I would like to repeat. But in the end, it was a great feeling seeing everyone happy, wellfed, and having a good time. Whew!

appetizers included:
Cucumber and Arugula Sandwiches
Parmesan and Chive Gougeres


the menu:
Salad with Balsamic Vinaigrette or Blackberry Vinaigrette
Spinach and Artichoke Lasagna
Spring Vegetables (asparagus, snow peas, fava beans) Sautéed with Mint
Chicken Scallopini with Mushrooms in Marsala Cream Sauce
Orzo Salad with Lemon, Cucumbers, and Dill


I want to say thank you, thank you, thank you to:

D. for being my prep bitch on Saturday and doing all of the grunt work--peeling fava beans, chopping snow peas, bell peppers. etc. I am so grateful. And you did the dishes afterwards. I don’t know how to properly say that you are really kickass.

S. for helping me with lasagnas on Friday and letting those lasagnas hijack your fridge space.

Steven for being the glue that held everything together on Saturday. You know how I work in the kitchen and I couldn’t have done this without you.

Sunday, May 24, 2009

LA Trip and Bibimbap

Korean BBQ in Korea Town LA
Steven and I went on a short, laid back trip down to LA two weekends ago where we didn't do much but eat, our kind of vacation. It's ridiculous how much good food there is down in SoCal.

First stop: xiao long bao. I’d been dying for a fix since my last Vancouver, BC trip. Steven and I were debating if we should visit Din Tai Fung since they’re world renowned and we’d be within 10 minutes of the only North American branch. After asking both Steven’s sister who’s eaten there and Wandering Chopsticks, we heard that the wait is too long, the dumplings are tiny and overpriced so we decided it wasn’t worth it. We love our soup dumplings but we’re also poor students.

Instead, we visited both Mei Long Village and JJ's based on Wandering Chopsticks’ recommendations. The two restaurants are in the same complex, literally 30 feet away. Maybe we went at an off time, but the pork xiao long bao at Mei Longs barely had any soup. I was pretty bummed. The meat and the soup, albeit very little, was flavorful. The crab dumplings were, however, very mediocre just like WC said. We paid our bill and went to JJ’s, 2 shops away. Their pork dumplings had sooo much more soup. In the end it was a tossup for the pork soup dumplings, Steven preferred the flavor of Mei Long's, I preferred JJ. The crab dumplings at JJ were hands down much better, way more crab flavor and soup. Again just echoing what WC wrote in her original posts about the two dumping houses. The crab dumplings are definitely worthwhile but don’t bother with the sheng jian bao. They’re way too bready and have no soup. For sheng jian bao, WC recommended Kang Kang food court, which we went to later that night for shaved ice but didn’t have enough stomach room left for sheng jian bao.

Later that night, we visited SoCal’s famous Pinkberry. The original flavor is definitely the best. The original with raspberries, almonds, and chocolate made our night. Pass on the green tea froyo, it had barely any matcha flavor and it just didn't taste right. We recently tried some froyo at a place near UW campus and it didn’t come anywhere close to the wonders of Pinkberry. I have a feeling I’m gonna need a fix in the near future.

At around 10pm we met up with WC, who took us to her favorite Hong Kong café, Baccali. Milk tea plus condensed milk with endless refills, Malaysian style roast chicken with curried rice, salted fish and chicken fried rice, deep fried chicken wings, and beef chow fun. It was a diverse array of food but the concept works and tastes even better late at night. Steven and I ate so much, we were in pain for a bit. I think it was the free tea refills that did us in.

We started Day 2 off with lunch at In-n-Out. Animal style cheeseburgers and well done fries. The burgers were delicious and ridiculously cheap! I was expecting the “well-done” fries to be extra crispy but still fluffy on the inside, but these were fried all the way through so they just tasted dry and stale. I’ll skip these next time and just get the regular fries.

For dinner, we drove to Koreatown for Korean BBQ at Chung Kiwa. The seafood pancake was chock-full of delicious seafood but way too pricey at $18. The black angus kalbi and spicy pork (daeji bulgogi) were both very tasty. I liked the rice noodle sheets for wrapping the beef but Steven and I were more used to lettuce leaves. The waitstaff are very attentive and continually checked on us and cooked our food, even though we didn’t understand a word of Korean.

It was a delicious, calorie-filled trip but after 2 days of LA smog, it was good to be back home in Seattle. Thank you to Wandering Chopsticks for being our fearless leader at Baccali and Jen of Use Real Butter for your great restaurant list, I wish we had more time to check out all the fantastic places you recommended.

Now for a short recipe.
Bulgogi Bibimbap

I think the most appropriate recipe to follow this trip report would be the bulgogi bibimbap photos I took over a month ago. My favorite is the dolsot bibimbap, bibimbap served in a big hot stone bowl. The crispy rice crust that forms along the side of the bowl is the best part. I have no idea where to buy those cool bowls and it’s probably too much trouble to mess with at home so I’ll leave that to the pros. Bibimbap literally means mixed rice and stirring it up is definitely the best part and looks even more delicious.

Salmon Bibimbap

I normally throw bibimbap together and have no coherent recipe. I made it again yesterday and I’ve come to the conclusion that I probably won’t ever write down an exact recipe because it’s more work to get the exact measurements than to just wing it and throw stuff together. Cooked zucchini, grated carrot, leftover meat or tofu, steamed rice, fried egg, and bibimbap sauce are the bare minimal. It only takes me 15 minutes to make a bare bones version because I usually don’t go all out and make fresh bulgogi or marinated bean sprouts. Yesterday I covered a small 8 oz. salmon fillet with some the same marinade I use for kalbi, and roasted it in the toaster oven. Prepare as many of the sides as you like, it would take way too much time to make them all.

Bibimbap – Korean Mixed Rice
Steamed rice
Browned ground beef or tofu with a little soy sauce, sugar, and garlic, leftover bulgogi, spicy pork bulgogi, or kalbi
Kimchi
Grated carrot
Grated daikon
Zucchini, julienned and sautéed with salt in a little vegetable oil
Button mushrooms or shiitake mushrooms, sliced and sautéed with salt in vegetable oil, finish with sesame oil drizzle
Seasoned beans sprouts
Spinach
Seasame seeds for garnish
Fried egg for each serving
Bibimbap sauce

Bibimbap Sauce
Gochujang (or substitute Szechuan hot bean sauce – dou ban jiang)
Mix in sesame oil and thin with a little water
Optional: honey + rice vinegar to taste

Tuesday, May 5, 2009

Red Wine Braised Beef and Sunchoke Creamed Spinach

new member of the kitchen why, helloooo sexy

When Steven and I went to the local outlet mall, I never expected to come home with a 13 pound addition to the kitchen. I didn’t even want to go inside the Le Creuset store because it’s just filled with gorgeous things I can't afford. *siiigh* Why bother? But Steven convinced me to take a peek and I’m sure glad he did because there happened to be a sale, a damn good one! The 5 1/2 quart Dutch oven was on sale for $150! Holy crap, what a freakin' steal! You bet I'm gonna get one. There was some inner turmoil about whether to get the original Flame or the sexy Cherry Red. It couldn't have been more perfect timing because the enamel on my Chefmate Dutch oven started chipping off. $40 for a pot that only lasted me 2 years or $150 for a lifetime warranty?

Red Wine Braised Beef & Sunchoke Creamed Spinach

The original plan was to get some lamb shanks or beef short ribs (inspired by Jen’s beautiful recipe) to christen the shiny new pot but neither of them were on sale. Instead, I got a chuck 7 bone roast, which is still pretty tasty. Our last CSA box had a bunch of good stuff, asparagus, sunchokes, and spinach. I roasted the asparagus in the toaster oven and made sunchoke creamed spinach after being inspired by Harold Dieterele’s recipe on Top Chef.

I'll have to try this recipe again with the lamb shanks like I originally planned.

Red Wine Braised Beef

1 oz. dried porcinis
4 large sprigs of parsley including stems
2 - 3 large thyme sprigs
2 bay leaves
2 pounds chuck roast or short ribs
1 Tbsp olive oil
1 large onion, chopped
1 medium carrot, diced
1 rib celery, diced
2 cloves garlic, minced
2 Tbsp tomato paste
1 1/2 C dry red wine
Salt
Freshly ground black pepper
Water as needed

Pour a cup of hot water over the dried porcinis to rehydrate them. When they are soft, use a fork to fish them out of the liquid, saving the liquid, wash them to get rid of excess dirt and grit, and mince. Wet a coffee filter or paper towel and line a fine mesh sieve. Strain the porcini water to get rid of excess dirt. The wet filter will prevent it from absorbing the flavorful porcini liquid.

Tie the herbs in a bundle with some twine so they’re easy to pick out later.

Season the beef with salt and freshly ground black pepper on all sides. In a Dutch oven or large pot, heat a tablespoon of olive oil over medium high heat. Brown the chuck roast (or short ribs, or shanks) until it is browned on all sides. Remove from pan and set aside.

Lower the heat to medium and add the vegetables, some salt, and freshly ground black pepper. Cook until the vegetables are softened and translucent and scrape up any browned bits on the bottom of the pan. Add the porcinis, garlic, and tomato paste and cook until the tomato paste has started to caramelize slightly. Add the porcini water, red wine, and return the beef and any accumulated juices back into the pot. Lower the heat to a bare simmer, cover and let it braise for 2 – 3 hours or until the meat is fall off the bone tender. Add some water if there's not enough liquid in the pot.

When the beef is done braising, remove from the pan and turn the heat up to medium and reduce the sauce by half.

Sunchoke Creamed Spinach
8 oz. sunchokes, washed and peeled, and cut into ½ inch chunks
1 Tbsp butter
1/2 C heavy cream + 1/2 C water
1/2 tsp lemon zest
2 tsp lemon juice
2 large bunches of spinach, rinsed of all grit and dirt
Salt
Freshly ground black pepper

Melt 1 tablespoon of butter in a saucepan over medium heat. Saute the sunchokes until they are light brown on the edges. Add half cup of heavy cream and half cup of water and simmer on very low heat until the sunchokes are tender, about 15 – 20 minutes. Puree the sunchokes in a blender or food processor, add some of the cream they were cooked in to thin the mixture.

In skillet heat 2 tsp of olive oil in a skillet over medium heat and sauté the spinach until it is wilted. Pour out until accumulated juices in the pan and use a spatula and press out as much liquid from the spinach as you can. Fold in the sunchoke puree, lemon zest, juice and season with salt and pepper.


Monday, May 4, 2009

Roasted Tomato and Quinoa Soup & Grilled Cheese Sandwich

Tomato and Quinoa Soup with Grilled Cheese Sammich(updated from recipe archives)

My vegetarian friend complained that my blog has been leaning too far into carnivorism lately. I guess I have to come to terms with the fact that not everyone likes bacon food porn staring them in the face. To switch things up, I'm updating an oldie but a goodie.

Last time I made this soup, I spent a good half day slow roasting tomatoes but because tomatoes aren't in season yet, a good substitute is Muir Glen fire roasted tomatoes. I finally got around to using the quinoa that's been sitting in my pantry since who knows when. Now I can cross off cooking quinoa for the first time off my list. I loved the texture and extra nutrition it added to the soup so I tried to convince Steven to let me add this superfood to our regular steamed rice. I can get away with sneaking whole wheat flour into baked goods and whole wheat pasta into spaghetti but messing with steamed rice? That was a no go.

Whenever I make tomato soup I have to make the obligatory grilled cheese sandwich. I debated if I should even bother posting a grilled cheese recipe. Short version: good bread + good cheese (my fav is Beecher's flagship, loooove it) + heat.

Long version (nothing groundbreaking)
- Use shredded cheese because it melts faster and evenly
- After I butter the bread, I pile on the shredded cheese and toast it slowly in a covered cast iron skillet over low or medium low heat. This way, the cheese has a chance to melt and the bread and butter won’t scorch.
- Sometimes if I'm feeling particularly unhealthy, I butter and toast one side, then flip over and butter and toast the second side and pile the cheese onto the first toasted side. Double butter, double delicious.
- If I feel fancy, I smear a little Dijon before adding the cheese, because I love Dijon.

Anyone have any other good sandwich making tips? (Don't say panini press because I don't have one and that makes me sad)

Roasted Tomato Soup with Quinoa
2 C roasted tomatoes (from 2 pounds tomatoes) or 2 cans of14.5 oz Muir Glen Fire Roasted Tomatoes
1 Tbsp olive oil
1 small onion or half a large onion, diced
1 clove garlic, minced
1/4 tsp dried oregano
2 - 3 C chicken stock or water, to taste
1/4 C quinoa, rinsed
1/4 C chiffonade* basil (optional)

*chiffonade right before using to prevent the basil from turning black

For Cream of Roasted Tomato Soup
- Add half a cup of heavy cream right after cooking

In a Dutch oven or large nonreactive saucepan, heat the olive oil over medium heat and add the diced onions. Saute the onions until they are translucent and have softened. Add the minced garlic and saute until fragrant, about 30 seconds. Scrape the onion and garlic mixture into a blender and add the roasted tomatoes or cans of fire roasted tomatoes. Blend until completely smooth, add a little of the chicken stock or water if the mixture is too thick.

Return the puree into the saucepan, add the dried oregano, and the chicken stock or water. Simmer on low to medium low heat for 10 minutes, adjust the seasoning with salt and pepper, add more stock or water if it’s too tomatoey, and add the quinoa. Continue to simmer until the quinoa are cooked through and opened, about 10 – 15 minutes.

Off heat, stir in the chiffonade basil. For creamy soup, stir in the cream after simmering the soup. Add basil at this time too.

Roasted Tomatoes
3 lbs tomatoes
2 Tbsp olive oil
Salt and Pepper

Slow Roasted (adapted from Alanna and Kalyn)
Cut the tomatoes in half and get rid of as many seeds as possible. In a bowl, toss the tomato halves with olive oil, salt, and pepper.

Arrange the tomatoes on a parchment paper lined metal sheet pan or skip the parchment and use a pyrex glass dish.

Roast in the oven at 300 degrees for 6 or more hours, depending on how dry you want them. I only roasted them for about 6 hours because I wanted to keep them juicy since they were going into soup.

Fast Roasted Tomatoes
Preheat the oven to 450 degrees F.

Cut the tomatoes in half and get rid of as many seeds as possible. In a bowl, toss the tomato halves with olive oil, salt, and pepper.

Arrange the tomatoes on a parchment paper lined metal sheet pan (do not use a pyrex in such high temps). Roast until the tomatoes start to color, about 30 minutes.

After roasting the tomatoes are easily peeled off. I forgot to peel them but the skins pureed in the blender and were not an issue.

Wednesday, April 22, 2009

Beef and Sausage Meatloaf with Roasted Bell Peppers


So many recipes end up in the blog post graveyard because I couldn’t remember how I made it. I never write anything down because I always think I’ll remember everything but two weeks later, I'm racking my brains trying to figure out if it was 1 or 2 teaspoons of x, y, and z. I’ve had this meatloaf sandwich photo in my photostream for over two months because I neglected to write down the recipe the last time I made it. I finally got around to making it again and this time I was extra meticulous in measuring and weighing ingredients. Steven volunteered to be the kitchen scribe so this recipe finally made it down on paper. The roasted bell pepper makes it extra special but I understand if you don’t want to go through the trouble. The best part is the crisp bacon wrapping, that’s something you absolutely can’t skip. I will use any excuse to add bacon to something, preferably copious amounts of bacon. This recipe has one loooong ingredients list but it’s so worth it!

The leftovers are just as good, especially in sandwiches. I prefer hot meatloaf sandwiches, I could never get behind cold meatloaf. I cut the meatloaf into thick slices and sear them in a skillet and sauté some mushrooms and onions. Then all of that gets piled on two slices of thick sourdough with shredded pepper jack or white cheddar, ketchup and mustard, and slowly toasted in a skillet with lots of butter until the cheese is melty and bread is golden. Good times.

I also recently started using Twitter because it seems like the cool thing to do. Actually, I registered my username a few weeks ago but never got around to setting it up. Mysteriously, I started getting followers of my empty Twitter, which pressured/prompted me to try to make things more interesting for all 4 followers. :) Anyway, so if you want to hear me tweet about classes, exams, and food aka my life in three words (more like bitch about the first two and go on incessantly about the third) you can follow me at @nookandpantry. I'm still a total noob at this twitter business so bear with me.

Beef and Sausage Meatloaf with Roasted Bell
Pepper

1 large red bell pepper, roasted, peeled, and diced
8 oz. extra lean ground beef
8 oz. Italian sausage
1/2 large diced onion chopped, roughly 3/4 C cup chopped
2 cloves garlic, minced
1/4 C chopped Italian/flat leaf parsley
1/3 C old-fashioned or quick oatmeal
1 large egg
1/4 C sour cream
2 Tbsp ketchup
1 Tbsp Dijon mustard
1 Tbsp soy sauce
1 Tbsp Worcestershire
1 tsp ground pepper
1 tsp smoked paprika
1/2 tsp oregano
Tabasco a few shakes to taste
6 - 8 slices of bacon, preferably thick cut

Roast the bell pepper on the stovetop or under the broiler, cut the bell pepper so it lays flat on a baking tray and broil on the top rack until the skin blisters and blackens. Let it sit until it is cool enough to handle before peeling off the skin then dice the roasted pepper. Set aside to cool.

Heat 1 tsp of vegetable oil in a skillet over medium heat. Add the onions and a big pinch of salt and cook until the onions are translucent and soft. Add the minced garlic and cook until fragrant. Remove from heat and set aside to cool.

Preheat the oven to 375 degrees F. Line a rimmed baking sheet with foil.

Mix all of the ingredients – beef, sausage, cooked vegetables, fillers, and flavorings in a large bowl. Turn the meat mixture onto the prepared baking sheet and shape it into a loaf form. Wrap the loaf with bacon, tucking the ends under the loaf. Bake at 375 degrees until the internal temperature is 165 degrees and the bacon is crisp, about an hour. Let it rest for 15 minutes before cutting.

Serve with ketchup because you can't have meatloaf without ketchup.

LinkWithin

Blog Widget by LinkWithin