Monday, January 28, 2008

Lemon Meringue Pie

Lemon Meringue Pie

When Jen revealed the January Daring Baker challenge, it immediately made me think of the Desperate Housewives lemon meringue pie episode. Bree, who everyone knows is the best cook and baker in the neighborhood, gets one-upped at a luncheon by Katherine, the new housewife on the block, who surreptitiously swaps Bree's pie with her own and conveniently sticks Bree's in the fridge. (*gasp* I know! The nerve right?!) Bree goes to no end to crack Katherine's secret recipe, which includes toiling away in the kitchen attempting to reproduce the pie but to no avail, an unsuccessful recipe exchange, and finally a friendly neighborhood breaking and entering into Katherine's house and padlocked recipe box. Who padlocks their recipe box? Luckily for us Daring Bakers, the recipe was given to us so no felonies were committed in the making of this pie. But there was a blow torch involved. Okay, okay, it was one of those little tiny kitchen ones BUT a blow torch nonetheless.

I think this is the first pie Daring Baker's challenge and it is actually my very first time making pie. I've baked tarts before but I've never baked a pie. I'm not crazy about pies because all of the ones I've tasted have had soggy crusts and theres really nothing worse than a soggy, greasy crust when a flaky crust is arguably the best part. Unlike a fruit pie where a wet filling is baked in the crust, a lemon meringue pie is must like a lemon tart where the crust is baked separately, filled with a lemon filling, and topped with meringue, then baked only briefly to color and cook the meringue. It sounded like the bottom crust had potential of being crispy and flaky. I held out hope. Then reports from other DBs around the globe started flooding in about watery, runny lemon fillings. I began to have my doubts.

Another thing I was a little wary about was the meringue. It seems like the meringue is still fairly fluffy and soft (to me that reads uncooked) when the pie is served. Some people love meringue, whether its the crisp, airy crunch when its baked into cookies, or soft, pillowy billows on top of meringue pies. Me? I'm not crazy about meringue. I think it tastes like sweet, sweet nothing. I was a little worried about eating uncooked egg whites because I get a little paranoid about food poisoning. But I was still eager to make the pie and play with my kitchen torch.

As a procrastinator, I didn't actually finish the challenge until the day before the due date. God that sounds like college all over again. But I did do my research. Before making the recipe, I read the Cook's Illustrated recipe to see what problems they encountered with lemon meringue pie (LMP) recipes. To my horror, LMPs are plagued with a multitude of problems some of which Cook's Illustrated wasn't even able to consistently solve. Cook's Illustrated is like my cooking bible. If they can't nail a recipe, how can I be expected to not screw it up? Conditions like humidity and temperature of your filling or oven can wreck havoc on your meringue. The filling can be too runny or the meringue can bead or weep. Crying meringue? That doesn't sound too happy. (Weeping meringue is when the egg whites start coming out of the foam state and back into liquid state and puddle on the top of your lemon filling. Yuck...) So by now I was a little intimidated.

But I made the pie and here are my thoughts.

Pie crust:
I used the food processor and it was easy peasy. Gimme a food processor and I can whip out a pie crust in less than a minute. Hand me a pastry cutter or 2 forks and I will look at you with a blank stare. Yes it is probably a bad thing I'm so dependent on my food processor but it is undeniably fast. Anyway the crust was the easiest part.

Lemon filling:
It started to get clumpy during the cooking stage after I added the egg yolks so I took it off the heat. I'm don't think it was boiling yet so I might not have cooked it enough so it probably could have been a little thicker. As for the clumps, they were nothing a fine mesh sieve couldn't take care of. After adding the lemon juice the filling seemed a tad thin.

Meringue:
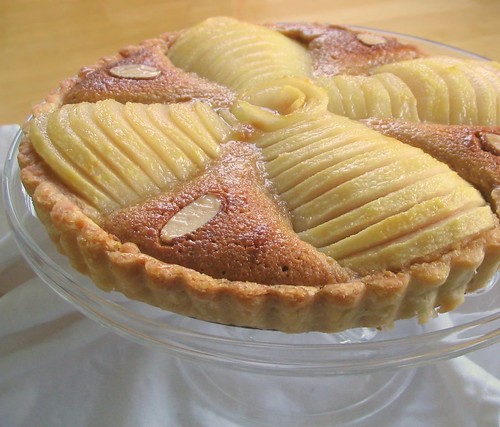
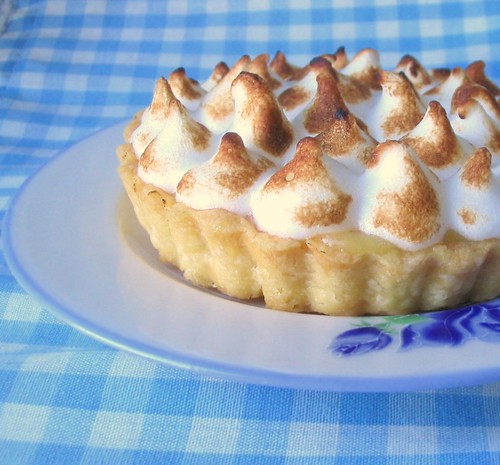
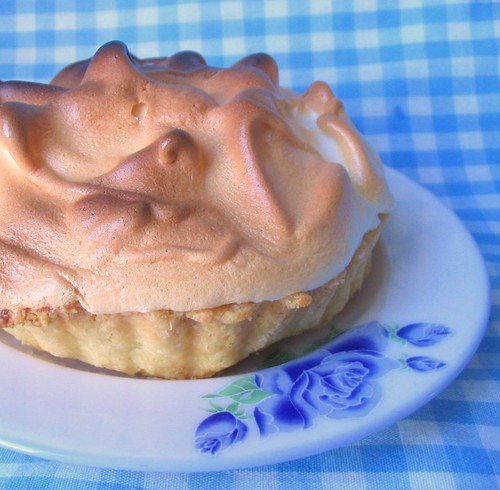
Easy to make *pats trusty KitchenAid*. I made one tart with the classic tall billowy layer of meringue and another with little meringue kisses. I baked the billowy tart in the toaster oven and used a kitchen torch on the kisses tart.

The Verdict:
Meringue... still not a fan of it. I gave it a try. It tasted kinda spongy. Really bleh... Maybe I didn't make it right. I've actually never had a meringue pie so I don't know what it's suppose to taste like. It wept a little on the bottom so the fact that I had raw egg white running on my tart kinda put me off. I ended up scraping the meringue layer off. By now I had a plain lemon tart. I like lemon tarts. I found that the filling tends to run if you cut it when its warm out of the oven but after a chill it sets up nicely. But my god it was WAY too sweet for me. This is coming from someone who usually cuts the sugar in baking recipes by 25% to 50%. I know you're not suppose to fudge with baking recipes and their liquid to dry ratios but I do it anyway. I don't do it for DB recipes (they are the exception). So I found the filling cloyingly sweet. I ended up spooning out some of the filling out of my tart. But the crust. Oh the crust... it was the best pie crust I have EVER made. It was so shatteringly crisp and flaky. Oh my god, the little tartlet pie shell covered in a thin layer of lemon filling was deeeelicious. Good dinner. :P

Anyways enough of my rambling so here's the recipe. (Bout time you say?) I made half the recipe into little tartlets. I also included tartlet instructions.

Lemon Meringue Pie

Lemon Meringue Pie
from Wanda's Pie in the Sky by Wanda Beaver

Makes one 10-inch (25 cm) pie

For the Crust:
3/4 cup (180 mL) cold butter; cut into ½-inch (1.2 cm) pieces
2 cups (475 mL) all-purpose flour
1/4 cup (60 mL) granulated sugar
1/4 tsp (1.2 mL) salt
1/3 cup (80 mL) ice water

For the Filling:
2 cups (475 mL) water
1 cup (240 mL) granulated sugar
1/2 cup (120 mL) cornstarch
5 egg yolks, beaten
1/4 cup (60 mL) butter
3/4 cup (180 mL) fresh lemon juice
1 tbsp (15 mL) lemon zest
1 tsp (5 mL) vanilla extract

For the Meringue:
5 egg whites, room temperature
1/2 tsp (2.5 mL) cream of tartar
1/4 tsp (1.2 mL) salt
1/2 tsp (2.5 mL) vanilla extract
3/4 cup (180 mL) granulated sugar

To Make the Crust:
Make sure all ingredients are as cold as possible. Using a food processor or pastry cutter and a large bowl, combine the butter, flour, sugar and salt.Process or cut in until the mixture resembles coarse meal and begins to clump together. Sprinkle with water, let rest 30 seconds and then either process very briefly or cut in with about 15 strokes of the pastry cutter, just until the dough begins to stick together and come away from the sides of the bowl. Turn onto a lightly floured work surface and press together to form a disk. Wrap in plastic and chill for at least 20 minutes.

Allow the dough to warm slightly to room temperature if it is too hard to roll. On a lightly floured board (or countertop) roll the disk to a thickness of 1/8 inch (.3 cm). Cut a circle about 2 inches (5 cm) larger than the pie plate and transfer the pastry into the plate by folding it in half or by rolling it onto the rolling pin. Turn the pastry under, leaving an edge that hangs over the plate about 1/2 inch (1.2 cm). Flute decoratively. Chill for 30 minutes.

Preheat oven to 350ºF (180ºC). Line the crust with foil and fill with metal pie weights or dried beans. Bake for 20 to 25 minutes. Carefully remove the foil and continue baking for 10 to 15 minutes, until golden. Cool completely before filling. For smaller tartlets, bake first for 20 minutes then remove the foil and bake another 10 minutes until the shell is golden.

To Make the Filling:
Bring the water to a boil in a large, heavy saucepan. Remove from the heat and let rest 5 minutes. Whisk the sugar and cornstarch together. Add the mixture gradually to the hot water, whisking until completely incorporated. Return to the heat and cook over medium heat, whisking constantly until the mixture comes to a boil. The mixture will be very thick. Add about 1 cup (240 mL) of the hot mixture to the beaten egg yolks, whisking until smooth. Whisking vigorously, add the warmed yolks to the pot and continue cooking, stirring constantly, until mixture comes to a boil. Remove from the heat and stir in butter until incorporated. Add the lemon juice, zest and vanilla, stirring until combined. Pour into the prepared crust. Cover with plastic wrap to prevent a skin from forming on the surface, and cool to room temperature.

To Make the Meringue:
Preheat the oven to 375ºF (190ºC). Using an electric mixer beat the egg whites with the cream of tartar, salt and vanilla extract until soft peaks form. Add the sugar gradually, beating until it forms stiff, glossy peaks. Pile onto the cooled pie, bringing the meringue all the way over to the edge of the crust to seal it completely. Bake for 15 to 20 minutes, or until golden. Cool on a rack. Serve within 6 hours to avoid a soggy crust.

For tartlets bake at 425 degrees F on the upper middle rack of the oven for 5 minutes or until the meringue is golden brown.

Cool before serving.


Now go and see all the other beautiful and daring lemon meringue pies made by my fellow bakers at the Daring Bakers Blogroll.

Friday, January 25, 2008

Tex-Mex Stuffed Peppers

Mexican Stuffed Peppers
I don't know about you but the classic stuffed bell pepper with plain rice and ground beef sounds a little... bland. So here's a twist using Mexican rice and spicy chipotle beef. I was very reluctant to use the word Tex-Mex because oh god it makes me think of Taco Bell but calling these Mexican stuffed peppers would be a misnomer because a Mexican stuffed pepper, or chile relleno, is something else entirely (a roasted poblano stuffed with cheese and deep fried). Anyways, naming technicalities aside these stuffed peppers are anything but boring.

I apologize for my absence lately and the short post (not very good about following my New Year's Blog Resolutions am I?) but somethin'-is-a-brewing in the Nook & Pantry. So stay tuned! :)

Tex-Mex Stuffed Peppers

4 red/orange/yellow bell peppers (green peppers are too bitter)
Cooked Mexican rice (see below)
1 lb lean ground beef
1 small onion or 1/2 medium onion, finely diced
1 Tbsp chili powder
1/4 tsp cumin seeds, toasted and ground
2 cloves of garlic, minced
2 chipotle peppers packed in adobo, minced
1/4 C chicken stock
Salt and pepper
1 Tbsp vegetable oil
1 C shredded pepper jack or a Mexican melting cheese

Preheat the oven to 350 degrees F. Have your Mexican rice cooking or precooked as you start this. I like to leave the rice a tad undercooked so it can finish cooking in the oven as it bakes in the peppers.

Heat a tablespoon of vegetable oil in a skillet over medium high heat and brown the ground beef. Drain all but 1 tablespoon of the fat. Return the skillet to medium heat and add the finely diced onions, chili powder, and cumin. Cook until the onions are soft and translucent. Add the minced garlic, chipotle peppers, and adobo sauce and cook until the garlic is fragrant, about 30 seconds. Season with salt and pepper to taste. Then add the chicken stock or water and simmer with the lid slightly ajar until most of the liquid evaporates. Set aside for stuffing the peppers.

There are 2 ways to prepare the peppers. You can either cut the tops off and scoop out the pith and seeds for 4 large stuffed peppers. Or you can cut them in half lengthwise for 8 half stuffed peppers. Whichever way you choose to cut the peppers remove all of the seeds and white pith.

Bring a pot of water to a boil and boil the peppers until they are slightly soft, 3 minutes. Then rinse them under cold water so they are easier to handle.

Stuff each pepper with some rice, then beef, and top with shredded cheese. Bake in a 350 degree F oven for 25 - 35 minutes or until the peppers are soft.


If you wish, double the recipe for extra rice to serve on the side.

Mexican Rice
Adapted from Rick Bayless

1 1/2 C medium grain rice
1 (14 - 15-oz.) can whole tomatoes, drained but reserve the liquid (Muir Glen roasted tomatoes are best)
1/2 onion, roughly chopped
2 garlic cloves, halved
1 1/2 Tbsp lard/bacon fat, canola or vegetable oil
2 - 3 jalapenos, seeds and pitch removed, 1/4 in dice
1 3/4 C chicken broth or water
Salt
Optional: chopped cilantro

Rinse the rice then let it drain in a sieve.

In a food processor or blender, puree the drained canned tomatoes, onion, and garlic. Add some of the drained tomato liquid for the puree to equal 1 cup.

Heat the oil or lard in a saucepan or dutch oven over medium high heat. Add the rice to the hot oil and stir. Toast the rice in the hot oil for about 5 minutes. Then add the jalapenos, tomato puree, and chicken stock. Scrape up anything stuck to the bottom of the pan. Bring the contents up to a boil then lower the heat to a bare simmer. Cook for about 15 - 20, or until the rice is cooked through and tender and the liquid has been absorbed. If you plan on stuffing it into peppers, leave the rice underdone so it can finish cooking while the peppers cook.

Fluff with a fork and mix in some chopped cilantro if preferred.

Sunday, January 20, 2008

Red Cooked Pork Belly

Red Cooked Pork Belly
Updated from Recipe Archive

The pork belly is a truly magnificent cut of meat. Every preparation results in something amazing whether it's cured into bacon or pancetta, roasted until the skin is shatteringly crisp, confited then deep fried, or braised until it literally melts in your mouth. Red cooked pork belly was one of my childhood favorites. I can still remember sitting at the tiny dining table in my grandparent's Shanghai apartment marveling at how a bite contains a perfect trio of rind, fat, and meat. Red cooking, hong shao, is a common way of braising meats in Shanghai, and the neighboring provinces of Jiangsu and Zhejiang. The color and deep flavors of red cooking comes from the use of dark soy sauce, which is thicker, richer, and sweeter than regular light soy sauce. Pork, chicken, beef, duck, even fish and tofu can be cooked this way but if you choose pork belly, you will be rewarded with something especially delicious. The rind is a deep reddish-brown, the thick striations of fat are soft luscious, and the meat is unbelievably tender and flavorful.

The belly is best enjoyed with some white rice and sauce made from the braising liquid. Serve it with a light side dish such as simple stir fried bok choy to counter the richness of the belly. You can also braise some eggs with the pork for some very flavorful braised eggs.

Red Cooked Pork Belly

2 lbs pork belly cut into 1 1/2 inch squares
3 Tbsp soy sauce
3 Tbsp dark soy sauce
1/4 C Shao xing rice wine
4 - 5 slices of ginger about 1/4 in thick smashed with the side of a knife
1/4 C roughly crushed yellow rock sugar
2 star anise
4 green onions cut in half lengthwise, cut into 3 - 4 inch segments and smashed
Water
Vegetable oil

Optional:
Hardboiled eggs

If you plan on braising eggs with the meat, hardboil and peel your eggs first.

Bring enough water to cover the pork belly pieces up to a boil in a dutch oven or saucepan. Add the pork belly and boil for a minute. Drain the belly pieces and rinse off any scum on the meat and saucepan/Dutch oven.

In a saucepan or Dutch oven heat a tablespoon of oil over medium and stir fry the ginger and green onions pieces in the hot oil. When the oil smells fragrant add the pork belly, peeled hardboiled eggs if using, dark and regular soy sauce, wine, sugar, star anise, and enough water to cover the meat. Bring up to a boil then lower to a simmer. Simmer for about 2 - 3 hours or until the pork is fall apart tender.

Skim the fat off the top or chill the sauce in the fridge to solidify the fat. Reduce the sauce by half until it has thickened and is syrupy. Drizzle it over the pork belly and rice.

Serve the pork belly with some white rice and stir fried baby bok choy.

Serves 4 to 6: It's so rich that just a few pieces is enough

Wednesday, January 16, 2008

Salt and Pepper Chicken Wings with Chilies, Garlic, and Thai Basil

Salt and Pepper Chicken Wings

Since I never deep fry at home, I love to order deep fried stuff when I go out. The dish that I almost always get at Chinese restaurants is salt and pepper pork chops, jiao yan pai gu. Small pieces of pork chops are flavored with salt and pepper, lightly dredged in flour, and deep fried until crispy. It gets even better when some restaurants top the dish with stir fried chopped chilies, thin slices of golden fried garlic, and deep fried thai basil leaves. I wanted to recreate this dish at home with chicken wings. By pan frying the chicken wings, I was able to get a nice crispy skin then I cooked the chilies, garlic slices, and basil leaves briefly in the hot oil and tossed that with the wings. The garlic isn't as fragrant and crispy as the deep fried stuff but the flavor is still there. In addition to black and white pepper, you add some ground szechuan peppercorns when seasoning the wings or finish the dish with a sprinkling of szechuan peppercorn salt for an interesting kick.

Quick Tip:
After purchasing a bunch of basil, snip the ends of the stems off as you would with cut flowers and store the basil in a glass of water by a bright window. I've been able to keep basil happy like this for over 2 weeks now.

Salt and Pepper Chicken Wings
Salt and Pepper Chicken Wings with Chilies, Garlic, and Thai Basil

2 lbs chicken wings, cut into wingettes and drumettes
1/4 C flour
Salt
Freshly ground black pepper
1/4 tsp white pepper
2 Tbsp vegetable oil
3 jalapenos, seeds and pith removed and cut into a 1/4 in dice
3 cloves of garlic, cut into thin slices
Handful or two of thai basil leaves, larger leaves torn in half

Season the chicken wings with salt, white pepper, and black pepper (it's best if the black pepper is freshly ground). Lightly dredge in flour. If the wings aren't seasoned enough at this stage, you can season them more after cooking.

Heat 2 tablespoons of vegetable oil in a nonstick skillet over medium heat. Add the chicken wings and brown on all sides. Cover the pan and let the chicken wings cook over medium low to medium heat. If the pan gets too dry add a little water. Cook for about 15 minutes. Remove the cover and begin to crisp up the chicken again. The chicken wings are fully cooked when no blood coming out of the bones, juices are clear, and the internal temperature 180 degrees F. Remove the chicken wings to a rack to keep them crispy.

By now a lot of fat will have rendered from the skin. Drain the fat from the pan, reserving about 1 - 2 tablespoons. Return the pan to medium heat. Add the garlic slices and cook until they start to turn a little golden. Add the diced jalapenos and saute briefly. Off heat, add the thai basil leaves and toss the leaves with the rest of the hot ingredients. Toss the chicken wings with the chilies and basil leaves. Transfer to a platter and serve. Add more pepper and salt if it needs additional seasoning. I always like to add a little more freshly ground black pepper.

Saturday, January 12, 2008

Green Bean Casserole

Green Bean Casserole

First a confession: the green bean casserole you see in the picture is the very first one Steven and I have ever tasted. That is to say, we cannot attest for the tastiness of the original Campbell's recipe but I'm willing to bet this fancy pants recipe blows Campbell's out of the water. My original plan was to make this as a side dish for Thanksgiving dinner and when I told Steven of this plan he said was "Bleh, I don't like casseroles." Upon seeing or hearing the word casserole he immediate assumes the worst. I'm sure there are some bad casseroles out there but I think when done right, casseroles are comforting and delicious. I tried to convince him, "I'll be using fresh green beans and homemade mushroom cream sauce! The sauce is a French mother sauce so it has to be good!" but no, he continued to resist. Oddly enough, none of my local (5 of them) grocery stores had green beans on sale during Thanksgiving time, and I don't buy stuff at regular price (that would simply go against my Chinese upbringing), so this recipe had to wait. While I was mildly peeved that I couldn't make this traditional side dish for a traditional holiday dinner, Steven thanked the food gods that he escaped the dreaded vegetable casserole. Well, I finally did buy some green beans and he had to face the inevitable.

The original green bean casserole, created in 1955 in the Campbell's Soup Company test kitchen, is made with canned green beans, canned cream of mushroom soup, and french fried onions. Frankly, I detest canned vegetables. Canned tomatoes are perfectly fine, canned beans are also acceptable, canned corn is tolerable (though frozen corn is much better), but canned green beans? Honestly, that stuff is atrocious. I mean cmon, they don't even look green anymore! Frozen green beans are another popular choice for this dish but I'm not a fan of frozen veggies either (corn and edamame are the exception). Vegetables have to be fresh and crisp so I needed fresh green beans for this dish. Even before cooking, I knew the version I planned to make would be delicious and it was going to be even better than the Cook's Illustrated version everyone raved about when their recipe first came out. Secretly, I knew that Steven would like it because the gourmet ingredients would call to his inner foodie. First, fresh green beans, not canned green beans, so that gives me +5 foodie points. As much as I love Campbell's, I can't used cream of mushroom here because I had to go all out for this fancy foodie version. The cream sauce is made with a roux, homemade chicken stock, cream, crimini mushrooms, and porcini mushrooms, which is +10 foodie points for homemade sauce and a bonus of +20 points for using porcini mushrooms. The one thing you can't change is the french fried onions. Those have to stay on and there is no substitute. When I first bought the can of French's, Steven's first reaction "Eww gross..." but I told him that I'm sure they taste just like Funyuns and he relented. When I opened the can to scatter the pieces on top, he started, believe it or not, snacking on them (now what's gross?)! And the final foodie touch on this fancy smancy pants casserole, toasted almond slivers (another +10). The crunch and nuttiness adds the perfect finishing touch (I'm sure we can go on and on about how it adds another flavor profile, yadda yadda, but I'm sure we can all do without the food snob/Top Chef schpeel) ;) .

Steven took a bite and chewed for a very, very, very long time (he said he was chewing for the full nuttiness of the almonds). Suuuuure... But it was truly delicious, dare I say the best green bean casserole ever? Is Steven a casserole convert? We'll see. Chicken Tetrazzini has been on my to cook list for a very long time.

The Foodie's Green Bean Casserole

1 lb green beans, ends trimmed and broken into about 3 inch pieces
8 oz crimini mushrooms, chopped
1/2 oz dried porcinis
3 Tbsp butter
2 cloves garlic, minced or pressed
2 Tbsp flour
salt and pepper
1/2 C chicken stock
1/4 C heavy cream
1 C canned fried onions
Handful of toasted almond slivers

Preheat the oven to 400 degrees F.

Toast the almond slivers beforehand. You can toast them in a dry skillet on the stovetop over medium heat until they look golden.

Rehydrate the porcinis in 1/2 C of hot water. Using a fork, scoop out the porcinis, give them a quick rinse in some water to wash off any remaining dirt, and chop. Wet a paper towel or coffee filter and place it in a sieve. You wet the filter so it doesn't absorb the precious porcini water. Pour the porcini water through the filter. Take the filtered porcini water and add it to the 1/2 cup of chicken stock

Heat 1 tablespoon of butter in a skillet over medium high heat. Add the chopped crimini and porcini pieces, minced garlic, some salt and pepper, and cook until the mushrooms are starting to release their liquid. When the liquid is starting to reduce, add the beans and cook until they are bright green and still a bit crunchy, about 5 minutes. You will only bake the casserole for a few minutes in the oven so cook the beans a little less than your desired tenderness.

While the beans are cooking, make the sauce. Melt the remaining 2 tablespoon of butter over medium heat in a saucepan. Add the flour, whisk and cook until the roux is slightly golden. Slowly pour in the porcini chicken stock mixture, while continually whisking. Simmer the mixture for about a minute (if it looks too thick, add a little milk). Season with salt and pepper. Whisk in the 1/4 C of heavy cream, and add the green bean and mushroom pieces, and toss to coat.

Pour the mixture into an 8 x 8 Pyrex or equivalent baking dish. (I made a mini one for the photo and an 8 x 8). Sprinkle a cup of canned fried onions on top or more if you wish. Bake for about 5 - 10 minutes or until the onions look golden brown. (I overbaked a little so my onions are a little darker than I would like).

Sprinkle the toasted almond slivers on top and serve.


Monday, January 7, 2008

French Pear and Almond Tart

French Pear and Almond Tart

When flipping through my copy of Baking, I discovered this recipe for a very French, very classic, pear and almond cream tart. Upon reading the recipe, I was just as surprised as Dorie was to learn that canned pears most often used for these tarts (*gasp*). Don't get me wrong, I have nothing against canned pears (Steven's mom makes the best ones); it just goes to show that delicious and elegant desserts can be made with simple and convenient ingredients. The beauty of this recipe is it's flexibility - it can be made with canned pears, poached pears, or fresh pears. I chose to poach some perfectly firm but ripe Bartlett pears. I'm a sucker for almond flavoring so I added a little almond extract to the almond cream because mmm... mmm... I love the smell of almond extract *takes one last whiff*.

Notes:
- Make sure your pears are small enough to fit in your tart pan. If your tart pan is 9 inches, your pears should be no larger than 4 inches tall. My pears were too large and I could only fit 4 pear halves on my tart, (actually I probably could have fit 5 halves when thinking about it in retrospect).
- A fun little article written by Dorie Greenspan: When French Women Bake.

French Pear and Almond Cream Tart
Adapted from Dorie Greenspan's Baking

6 canned pear halves or 3 small, firm but ripe pears, such as Bartlett or Anjou

Optional Poaching Liquid
3 C water
3/4 C sugar
Juice of 1 lemon

Frangipane/Almond Cream
3/4 stick/6 Tbsp unsalted room temperature butter
2/3 C sugar
3/4 C ground blanched almonds
2 tsp AP flour
1 tsp cornstarch
1 large egg
1/2 tsp vanilla extract
1/2 tsp almond extract

1 9 inch tart shell partially baked and cooled (I used an 8 inch)

Tart baking instructions:
Bake the crust at 375 degrees F for 25 minutes lined with foil and weighted down with pie weights, beans, or pennies, then remove the foil and weights and bake for another 5 minutes. Remove the tart pan, keeping the crust in the pan, and cool the crust until it is room temperature.

Optional Poaching Step:
Combine all the ingredients for the poaching liquid in a saucepan, that is just large enough to hold the pears, and bring the liquid to a boil. Meanwhile peel the pears but leave them whole.

Add the pears to the boiling syrup and lower the heat to a simmer. Poach the pears until they are tender when pierced with a knife, about 15 minutes.

Cool the pears to room temperature in the syrup. Reserve about 3/4 C of the liquid. You can discard the remaining syrup or save it, for up to a week, to poach more pears. I like to boil it down to a thick syrup and add it to tea.

In a bowl, whisk together the ground almonds, flour, and cornstarch. Process the butter with the sugar in the food processor then add the dry ingredients and process until smooth. Then add the extracts and egg and blend until smooth. The cream can also be made with a stand mixer or in a bowl with a hand mixer. The almond cream can be made in advance and stored in the fridge for up to 2 days or you can freeze it.

Preheat the oven to 350 degrees.

If you are using fresh unpoached pears, peel and core them. Rub them with fresh lemon juice and then pat them dry. If you are using canned pears, pat them dry.

If you are using poached pears, cut them in half and core them, and pat dry.

Slice each pear half crosswise into thin slices.

Spread the almond cream evenly in the tart crust. Lift the sliced pear half with a spatula, gently press down on it to fan it out, and lay it on the almond cream. The skinny part of the pear should face in. Repeat with the other 5 pear halves. The 6 pear halves will form spokes. Optional: decorate the tart with some almond slices.

Bake the tart for 50 to 60 minutes, or until the almond cream is puffy and brown. After baking let it cool until it is warm or room temperature to serve.

Meanwhile, simmer the pear syrup until it has thickened into a glaze. Reserve this to brush on the tart before serving.

Thursday, January 3, 2008

What will the new year bring?

Thank you Santa!

First, I just can't help but share these awesome presents.

You know he's a keeper when...

He supports your blogging habits by buying new dishware!

I swear Steven and I probably only have like five different dishes for taking food photos. It gets old. It's so nice to have some new dishes to use. Yay!

He buys you a freaking Thermapen!

Okay WOW. Just wow. This totally opens up a whole new world of cooking for me. I've never ventured into roasting, candy making, or some types of baking for fear of totally screwing up because I have no way to measure the temperature. Now I'll know exactly when my custards reach 180 degrees, my caramel at the right stage, and prime rib is perfectly medium rare (this is what Steven is most interested in). So you see, he gets prime rib, I get a $90 thermometer, it's WIN WIN!

And what else? No more trying to frost cakes with a butter knife (gift from Bettina, Yay! <3 thanks Bettina!). No more bending soup spoons in the ice cream container. I'm not planning to use the butter warmers for their intended purpose, rather they will be used for individual fondues. Another cookbook to add to my growing collection, which started at a mere 3 books earlier this year. And last but not least, a silicone mat (good for candy making, bad for my teeth and bum).

I love this man. Not just because he buys me awesome stuff, but hey that doesn't hurt! :D

Anyways, on with the show!

New Years Resolutions!
for the blog that is...

1. Post more regularly to eliminate the troublesome blog clog.
2. Post more Pantry Spotlights, one reason why this blog is named what it is.
3. Keep the recipe index up-to-date.
4. Blog redesign.
5. Try to cook earlier and take more photos under natural light conditions. (Not easy in the winter, when it's not only perpetually gray but gets dark at 4pm.) I took the photo above before the new year so I haven't broken this one yet! :)
6. More of my favorite Chinese recipes! It seems I rarely blog about the type of food that I grew up with, cook and eat most often, and love the most. We need to change that!
7. ???

What other blog resolutions should I make? Which ones will you make?

Feel free to share your culinary loot and resolutions, blog or not (yes, I will exercise this year)!

Happy 2008 everyone!

Bacon Wrapped Shrimp and White Cheddar Grits

Bacon Wrapped Shrimp with Cheesy Grits and Chipotle Roasted Red Pepper Butter

With the holidays coming to an end (I'm so sad... no more listening to Christmas songs 24/7), I finally have some time to tend my blog. I hope everyone had a great Christmas and New Year. Now it's time to write 2008 instead of 2007. I already had to scribble out two checks because I wrote December, then January 2, 2007. I'm sure I'll finally realize it's a new year sometime in March. What better way to start off the New Year than with some cleaning, blog cleaning that is. As I wade through this blog clog of recipes I'm going to attempt to finally clean it up and start the year fresh with no more old recipes! Hooray! After I post these recipes that is. :)

I made this dish a while ago when Steven and I were watching Top Chef Miami. Steven and I are Top Chef junkies you see; we watch the show religiously and have seen every episode, reunion, special, or what have you. If you ask me, nothing can beat the sheer awesomeness of season 1 (I <3 you Lee Ann) but the last season had its moments, especially the hilarity of Joey's numerous failed euphemisms (gray horse? throwing people over the bus?) and Anthony Bourdain's numerous guest appearances. Anthony Bourdain people! Need I say more? Ahh... I digress... Anyways, the biggest disappointment of the show was the elimination of my favorite competitor, Tre. I mean when someone makes a recipe like bacon wrapped shrimp with cheesy grits, how can you not cheer for them.

Bacon Wrapped Shrimp and Cheesy Grits with Roasted Red Pepper Chipotle Butter
Adapted from Tre

Bacon Wrapped Shrimp
12 - 16 large shrimp peeled and deveined
6 to 8 pieces of thinly sliced bacon
Freshly ground pepper

Season the shrimp with pepper, there should be enough salt from the bacon. Cut the bacon in half and wrap each piece around a shrimp.

Sear the shrimp after the grits and sauce have been prepared.

Sear in a skillet over medium to medium high heat until the bacon is crispy and the shrimp is fully cooked.


Cheesy Grits with Toasted Corn
2 C instant grits
3/4 C chicken stock
3/4 C milk
1/2 C corn kernels (frozen is fine)
3/4 C shredded white cheddar
Salt and pepper

Heat an empty skillet over medium high heat. Add the corn kernels, you do not need to add oil. Cook the corn, stirring occasionally until the corn starts to smell toasty and literally pop out of the skillet. Remove to a bowl and set aside.

Bring the chicken stock and milk to a simmer in a saucepan. Whisk in the grits a little at a time. Once all of the grits are incorporated lower the heat and keep warm. During this time you can start the shrimp.

Check the grits to make sure they are not too thick. If they are too thick, add a little milk. Before serving, fold in the shredded cheese and toasted corn.


Roasted Red Pepper Chipotle Butter
1/2 small yellow onion, chopped
2 cloves of garlic, minced,
2 red bell peppers
1 or 2 chiptole peppers packed in adobo, (seeds removed: optional) chopped
1 Tbsp adobo sauce
2 tsp lime juice
1/4 C chicken stock
1/2 stick or 4 Tbsp butter
Olive oil
Salt and pepper

Note: if you want the sauce to be less spicy, remove the seeds from the chipotle peppers.

Broil the red bell peppers until the skin has bubbled and blackened. Here is how I prepare my peppers for roasting.

When the peppers are cool enough to handle, peel the skin off, chop, and set aside.

Heat a tablespoon of olive oil in a saucepan over medium heat. Saute the onions until they have softened and are translucent. Add the garlic and cook until fragrant, about 30 seconds. Then add the chipotle peppers, adobo sauce, red bell peppers, and chicken stock. Simmer until the peppers have completely softened, about 3 - 5 minutes.

Add the sauce to a blender or food processor and puree until smooth. Whisk in the butter one piece at a time. Then season with salt and pepper and add the lime juice.


What other Top Chef recipes am I pining over? Elia's scallops and Ilan's fideos. Not to mention I'm SO excited for Top Chef Chicago. When will there be Top Chef Seattle?! Cmon Bravo!

LinkWithin

Blog Widget by LinkWithin