Tuesday, June 30, 2009

Korean Pancake - Pa Jeon/Pa Jun

Korean Pancake - Pa Jeonupdated from archives

A few years ago when I was visiting Steven's parents, his mom made some Korean pancakes for us. They were so good, I just had to ask her for the recipe. Then I was shocked to see her pull out a packaged mix from the pantry. I always thought that homemade always trumps convenience but that may not be the case with pajeon. After looking at the ingredients in the package, which was mainly flour, I thought I could go home and recreate it. But Steven's mom warned me that she's tried doing that too and the pancakes didn't taste the same. Well, she was right, and with my first attempt, my pancakes were dense and gummy.

After my original post over a year ago, I asked readers to share their pe jeon secrets and you guys offered some pretty good suggestions. I decreased the number of eggs from 2 to 1 and substituted some rice flour for all purpose flour. The resulting pancakes were excellent and the closest I've come to replicating the ones made from a package. But if you have access to an Asian market, I would go for the mix because it's easy and the results are consistent.

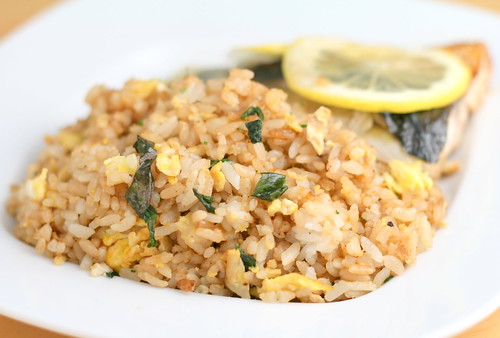
Unlike American pancakes, which are fluffy and usually topped with fruit or syrup, Korean pancakes are crispy on the outside, soft and tender on the inside, and packed with delicious morsels of seafood and vegetables. The pancake we ordered at the Korean BBQ restaurant in LA was probably 75% seafood. I used a seafood mix I got from a local Asian market that was a mix of imitation crab meat, octopus, squid, shrimp, and cooked oysters. Trader Joe's carries a seafood mix of squid, scallops, and shrimp or feel free to use only shrimp if that's what's available to you. Omit the seafood entirely and up the veggies for a vegetarian version. A lot of readers also suggested adding kimchi juice for added flavor but I rarely have kimchi around.

Korean Pancake - Pa Jeon

Pa Jeon/Pa Jun - Korean Pancake with Seafood and Vegetables
makes 3 10 inch pancakes

1 1/2 C all-purpose flour
1/2 C rice flour (not glutinous rice flour)
2 C water
1 egg
1/2 tsp kosher salt
8 oz chopped seafood mix or shrimp, peeled, deveined, and chopped
1 carrot, grated
1 zucchini, grated
3 green onions, thinly sliced
or substitute a handful of Chinese chives cut into 2 inches

In a large bowl add the all-purpose flour, rice flour, and salt. Whisk to combine. Add the egg and start with 1 1/2 cups of water. Whisk until smooth. If the batter is looking too thick, add a little more water. The consistency should be like heavy cream, not too watery. Add in the chopped seafood (if using), grated vegetables, and green onions or chives.

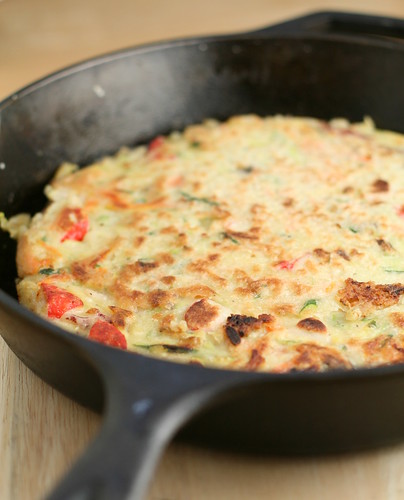
Heat a tablespoon and half of vegetable oil in a nonstick or cast iron skillet over medium high heat. Use plenty of oil, enough oil to cover the bottom of the pan, for a crispy pancake. Ladle one third of the mixture into the pan and spread it evenly in the pan. Cook until the bottom is crisp and golden brown. Flip and cook on the second side until crisp and golden brown. Repeat with the rest of the batter.

Cut the pancakes into 8 wedges and serve with dipping sauce.

For the spicy dipping sauce, I mix equal parts chili sauce (sambal oelek) with soy paste which is like a thickened soy sauce, Kim Lan makes our favorite. A more appropriate chili sauce would be gochujang (Korean chili bean paste, the Chinese equivalent is dou ban jiang). Adjust the spiciness according to your own tastes.

Tuesday, June 23, 2009

Braised Lamb Shanks and Saffron Pearl Couscous with Cranberries and Almonds

Braised Lamb Shank
I always feel like I’m committing a culinary faux pas braising in the middle of June. I try my best to keep things seasonal but it just doesn’t happen when lamb shanks are on sale. How can I say no when there's marrow involved? Lamb shanks have to be braised (I honestly can't think of any other way to cook a shank cut) but I refuse to turn on the oven for 4 hours so I put the Le Creuset to good use on the stovetop.

I tied the lamb shanks so they would keep their shape while cooking but it was futile. After about an hour of cooking, the shanks contorted out of the strings entirely. Same thing happened when I made Osso Buco. meh, oh well.

Red Wine Braised Lamb Shank
2 lbs lamb shanks, roughly 2 1/2 to 3 inches thick
1 medium onion, small dice
1 medium carrot, small dice
4 cloves garlic, minced
2 Tbsp tomato paste
3 - 4 large thyme sprigs
2 bay leaves
1 1/2 C dry red wine
Salt and freshly ground black pepper
Olive, vegetable, or canola oil
Water or chicken stock as needed
Chopped parsley or chiffonade basil for garnish

Salt and pepper the lamb shanks. Tie the shanks around the perimeter tightly with a piece of twine.

Heat 1 tablespoon of vegetable oil in a Dutch oven over medium high heat. Brown the lamb shanks on all sides, paying particular attention to the two flat sides. Remove the shanks and set aside.

Turn the heat down to medium and add the diced onion, diced carrots, and a large pinch of salt to the pan. Cook the vegetables, stirring occasionally and scrape up the brown bits, until they are translucent. Then add the tomato paste and minced garlic and cook for 30 seconds to a minute for the tomato paste to slightly caramelize. Return the shanks and any accumulated juices to the pan, and add the red wine, thyme, bay leaf, some more salt and pepper, and enough chicken stock or water to barely cover the shanks. Bring the contents up to a boil first then lower the heat to a bare simmer. Cover and cook for 3 - 4 hours or until the shanks are falling apart soft.

When the shanks have finished cooking, gently take them out of the pan and set aside. Take out the bay leaves and the thyme sprig. Turn the heat up to medium and reduce the sauce by half or until it is thick and syrupy. Serve the sauce on top of the lamb shanks and top with a little chopped basil or parsley if desired.


This was the perfect opportunity to cook up the Israeli or pearl couscous I got from Trader Joes. I hate how expensive (8 oz. for $3) this stuff is because I am seriously hooked! It looks so cute and bubbly and each grain, though it's more like a pasta than a grain, is more distinct and has more chew than regular couscous. While looking for a cheaper source, I found a few items on Amazon but I don't want 12 8oz. boxes or one 22 pound bag of it, so the search continues.

I cooked the couscous in a little chicken stock with saffron and added some cranberries and some toasted almonds but pine nuts would be just as good. Next time, I would chop up the cranberries so they can mingle better with the couscous. Steven was really skeptical about the cranberries with the saffron but it really works. The recipe on the back of the couscous box called for raisins so I didn't see why I couldn't sub some cranberries instead. I've never been a fan of raisins but I can eat dried cranberries by the handful. It's one of the few things I can justify buying at Costco. But if raisins are your thing, by all means use them.

Saffron Israeli Couscous with Cranberries and Almonds
serves 4

8 oz. (about 1 1/3 C) Israeli Couscous
1 3/4 C + more if needed chicken stock
Large pinch of saffron
1/4 C dried cranberries, chopped
1/4 C toasted almond slices or slivers or pine nuts
2 Tbsp chopped chives (or sub with parsley)
2 Tbsp chopped parsley
2 Tbsp butter
Salt and pepper to taste
Olive oil

Steep the saffron threads in 1/4 cup of hot but not boiling chicken stock for 15 - 20 minutes.

Bring the remaining half cup of chicken stock to a boil and set aside.

Heat 2 teaspoons of olive oil in a saucepan over medium heat. Add the couscous and toast until the pasta is golden brown. Turn the heat down to low and add the saffron liquid, hot chicken stock and some salt and pepper and simmer covered until all of the liquid has been absorbed and the couscous is soft with a slight chew, add more stock or water if necessary, about 12 minutes.

Off heat stir in the cranberries, herbs, and tablespoon of butter. Season with more salt and pepper if needed. Top with toasted almonds or pine nuts.


Monday, June 22, 2009

Basil Fried Rice

Basil Fried Rice
Basil fried rice and pan fried salted mackerel

I made a lot of fried rice during the school year. That and ramen (I'm very particular about my ramen)were my staples. The only constants for fried rice is leftover rice, which we always have plenty of, and egg. I would argue you need some sort of herb, which most of the time means green onion, in this case basil, but again that's debatable. If I'm feeling particularly fancy, I'll throw in some seafood (Trader Joe's seafood mix is great for this) or veggies, in an attempt to be healthy. But simple is good too, and fried rice doesn't get simpler than this.

Seafood and XO Sauce Fried RiceThe fancy stuff: Seafood and Veggies Fried Rice with XO Sauce

The basil came from my Aerogarden, a nifty hydroponic tabletop garden. It's pretty sweet but really expensive. If I hadn't gotten it as a gift I would have never considered buying one.

It started as this... (week 2)
Aerogarden week 2
aww, so cute!

Grew into this... (week 3)
Aerogarden Week 3
Then I forgot to keep track...

and it turned into this!
Aerogarden Week "I forgot to keep track"
Ahh! (Mint, Basil, Dill, Thyme, Parsley, Purple Basil, and Chives)

It would have been a smarter move to start the Aerogarden in the fall so I could have fresh herbs in the Winter but I wanted to harvest it for E's wedding. I was delusional in thinking that a tabletop garden could produce enough herbs for dinner for 40. I guess I could be growing this stuff outside with all the lovely weather we've been having in Sea-town, but having everything in the kitchen is pretty convenient.

Some herbs are growing better than others. The parsley is pretty slow but the dill and basil plants are growing like crazy and I'm constantly having to prune them. Short of eating the stuff straight, (I'm not that hardcore), I've been adding basil to everything. It worked out pretty nicely in fried rice (I don't think dill would go over as well).

Basil Fried Rice
serves 2

2 C cooked, cold, leftover rice from day before
2 eggs, beaten
1/2 C basil leaves, chopped right before adding to prevent blackening
1/2 tsp kosher salt
Freshly ground black pepper
1 - 2 Tbsp soy sauce (as desired, more soy sauce = browner rice)
1 Tbsp vegetable or canola oil (sometimes I use bacon fat, mmm!)

Heat the cooking oil over medium high heat in a nonstick skillet or wok. Add the rice and cook for 2 - 3 minutes. Break up any clumps of rice and cook until the rice is steamy hot. Add the salt and some pepper.

Push all the rice to one side to clear an area of the skillet. Add the beaten eggs to the open spot in the pan and stir to cook the eggs. When the eggs are almost fully cooked but still runny, stir it into the rice and add the soy sauce.

Take the pan off heat, roughly chop or tear the basil, and stir it into the rice. Add just seasoning with more salt if necessary.

-or- w/ Green Onions instead of Basil
1 to 2 (depending on the size and your preferences) green onions, thinly sliced

Instead of adding the green onions at the end like with the basil, add the green onions to the cooking oil before adding the rice and cook until it's fragrant, about 30 seconds, then add the rice and proceed with the rest of the recipe.

Friday, June 12, 2009

Raspberry Lemon Cream Tart

Raspberry Lemon Cream TartWhoops! Only had 2 minutes to take pics and forgot to take the tart out of the pan.

Short and sweet recipe post today! I still had some cream cheese leftover from the wedding and the giant 3 pound Costco tub was taking up valuable fridge space. I was trying to do something with it but couldn't manage to use all of it. Then I made way too much filling for one tart shell so now not only is the gargantuan tub still sitting in the fridge, but I also have a container of whipped filling taking up even more room. Crap! Now I'll have to think of something else to use up the whipped filling but honestly I'll probably just end up eating it with some fresh fruit.

Too bad I didn't get a photo of the sliced tart because the hidden layer of raspberry jam is a nice surprise-an idea I took from Dorie Greenspan's Hidden Berry Cheesecake. Speaking of which, I bet this recipe would work just as well with blackberry jam and fresh blackberries.

Raspberry and Lemon Cream Tart
1 Prebaked Sweet Tart Crust
2 oz. cream cheese
3 Tbsp granulated sugar
1/2 C heavy cream or whipping cream
1/4 C lemon curd
1/4 C raspberry jam, preferably seedless
1 C fresh raspberries

I scaled the recipe down to make enough filling for one tart. Depending on the sweetness of your lemon curd, you may want to use less sugar. I was using store-bought lemon curd (Trader Joe's makes a good one) and it's very sweet so I used 2 tablespoons of sugar. Homemade lemon curd is more tangy so you may need to use 3 tablespoons of sugar.

With a whisk attachment, using a stand mixer or hand mixer, beat the cream cheese and sugar on medium high speed until fluffy. Slowly drizzle in the whipping cream and whip until stiff peaks form. Fold in the lemon curd.

Spread the raspberry jam on the bottom of the baked tart shell. Then add the lemon cream cheese mixture. Top with raspberries and chill in the fridge for 30 minutes before serving.

Prebaked Flaky Pate Sucree
for an 8 or 9 inch pan

1 C flour
1/3 C confectioner's sugar
1/4 tsp salt
6 Tbsp cold butter, cut into 6 pieces
1 egg yolk
2 Tbsp cold milk or ice water
1/2 tsp of vanilla

Add the flour, confectioner's sugar, and salt together in a food processor and pulse once or twice to combined. Add the pieces of butter and pulse until the butter pieces are no bigger than a pea. Alternatively use a fork or pastry cutter to cut in the butter, or freeze the butter and coarsely grate it then use your fingers and rub the pieces into the flour. It is very important to keep the butter cold otherwise it will melt and make the crust greasy and you'll lose all the flaky layers.

Mix the egg yolk, milk, and vanilla together. Drizzle the mixture over the butter and flour mix in the food processor. Pulse again until the dough start to form large clumps. If it looks too dry add a little more milk.

Scrape the dough onto a large piece of plastic wrap and press the clumps together to form a disc. Wrap the dough in the plastic wrap and chill at least an hour up to overnight. Or store it in the freezer for as long as you want.

Preheat the oven to 375 degrees F.

Lightly flour a work surface and rolling pin and roll out the dough to into a large circle. Move the crust around often to make sure it doesn't stick to your work surface.

Transfer the dough to an 8 or 9 inch tart pan. To make this easier, drape the dough over the rolling pin and lay it over the pan. Lift the edges of the crust and gently press the dough down into the pan. Roll over the top of the pan with a rolling pin to trim any overhanging dough.

Prick the surface of the dough with a fork. Press a sheet of aluminum foil onto a crust and add pie weights, beans, or clean pennies on top. I like using pennies because they are the best heat conductor. Bake on the middle rack for 25 minutes. Remove the foil and baking weights (be careful the weights will be very hot!) and return the crust to the oven to bake for another 10 or so minutes until it is golden. Cool to room temperature before filling


Thursday, June 11, 2009

I Catered a Wedding Part 2: Wedding Cupcakes

Wedding Cupcake
Tahitian Vanilla Cake with Raspberry Coulis and Matcha Green Tea Frosting

Most of the wedding food was tested repeatedly but none as extensively as the wedding cakes. Even if the food was mediocre, I wanted E.’s cakes to be perfect. In between studying and midterms, I tweaked and adjusted the cake recipes all quarter long. I stopped baking everything else and focused solely on the cake for 2 months. I’ve never spent this long developing and testing a recipe. All that work was worth it because the cupcakes are some of the best things I’ve ever baked.

The Planning
When E. and I first started planning many months ago, we quickly settled on cupcakes instead of a traditional tiered wedding cake. Cupcakes are very trendy right now but we chose them for more practical purposes. A tiered cake would take days to put together and with me doing all of the food, it just wasn’t a feasible option. Cupcakes are also great for quality control. I can taste the cupcakes after baking to make sure it turned out okay and no one will be any the wiser. It would be painfully obvious if a chunk was missing from a large wedding cake.

For variety, we would have both yellow and chocolate flavors. E. loves green tea so that had to be worked in somehow. In addition to frosting the cupcakes would also have a filling, just like a layer cake, because I wanted them to have a little extra something. After all, they're for a wedding!

At first, we planned to make 2 dozen of each flavor but then we upped the number to 3 dozen each in case guests wanted to try both flavors.

Flavor Development & Recipe Testing
I originally planned to make a green tea buttercream but buttercream can be very temperamental. The last thing I wanted was buttercream breaking the night before the wedding, the frosting melting the day of, or hard and dense frosting if the cake was served too chilled. For simplicity sake I went with a cream cheese frosting because it’s easier to make and very stable.

I paired the green tea frosting with the yellow cake and first tried lemon curd as the filling, but in the end, raspberry coulis complemented the tea even better. The yellow, red, and green colors made it the perfect Springtime cupcake. Originally, I planned to make an almond buttermilk cake, but the almond and buttermilk flavors were lost under the raspberry and green tea flavors. I nixed that idea and decided to go with the classic vanilla. Instead of using extract, I used a Tahitian vanilla beans for a rich floral flavor to complement the fruit filling and grassy notes of the matcha.

Wedding Cupcake
I won't be writing about E.'s chocolate cupcake because I'd like to keep that recipe just for her. Out of all the wedding food, I spent the longest time working on this one.

Baking the Cakes
It was Friday morning, the day before the wedding, and I was still working on the yellow cake. My last attempt making a yellow cake led to my desperate cry for help on this blog. I want to give a really a big thank you for everyone who left suggestions. I told E. about my problems and she told me to just follow a recipe in a cookbook. If I was a sensible person I would have taken her advice and stuck to a recipe. But I've confessed before about how I can never follow a recipe. Less than 24 hours before the wedding, it still holds true, I still can’t follow a recipe. I’m pretty sure I have a problem and I need professional help.

But in my defense, after looking at nearly 2 dozen recipes, none of them fit my specifications. Either they called for too many eggs or cake flour or looked too similar to the recipe I tried already. Call me stubborn or just plain stupid, but I went with my gut and decided to give my crazy experimentation another go.

Instead of creaming the butter and beating in eggs, I decided to go with a sponge cake technique, beating egg whites to soft peaks and beating the egg yolks and whole egg separately to ribbon stage. I also added in some baking powder because I wanted as much leavening as possible for the fluffiest cake using all purpose flour instead of cake flour. As the cakes baked in the oven, I crossed my fingers hoping that this recipe worked, because I was running seriously low on time. When the cakes came out, they looked fine, no gross deformities and no cave-ins. I broke one in half to inspect the crumb and was completely blown away at how they turned out. The cake was airy and fluffy and looked like a cake made with cake flour. It was moist and flavorful, and substantial enough to be a cupcake. I simply couldn't believe I could make a cake like that without cake flour. Not to be tooting my own horn or anything but this cake was perfect.

I baked the chocolate cupcakes in the afternoon and was so worried something disastrous would happen. Nothing had happened yet but something bad was bound to happen right? I'm always very pessimistic when it comes to baking for an important event.

I made the frostings later that night and finally finished filling and frosting the cakes at 12pm. Then I successfully managed to fit 6 dozen cupcakes in 2 very large hotel pans in our tiny fridge and hope the fridge didn't decide to give out overnight. If I had more time and more piping experience I would have decorated the cakes more elaborately but I did the best I could after 10 hours of food prep. I’m really glad I bought this cupcake decorating set because the 1M tip is essential for making the large frosting swirl.

The cakes were the pièce de résistance and I was immensely proud of them. The texture of the cakes were perfectly moist and fluffy and the flavors were well balanced and harmonious. I wished I snapped more pics of the process but I was totally pooped.

Thank you Veronica for showing me the gorgeous paper cupcake wrappers. The moment I saw those wrappers on your site I immediately forwarded the link to E. and we both fell in love with them. They completed the cupcakes and were the perfect finishing touch!

Yellow Cake

makes 14 – 16 cupcakes or 2 8 inch cakes

3.5 oz. sifted, all purpose flour
1 oz. cornstarch, sifted
1 tsp baking powder
1/4 tsp salt
1/4 C melted butter
1/4 C vegetable or canola oil
3 large eggs
1/2 vanilla bean, sliced lengthwise and scraped or 1 tsp vanilla extract
3/4 C granulated sugar
1/8 tsp cream of tartar
2 tbsp whole milk

Preheat the oven to 350 degrees F.

Add the sifted flour, cornstarch, baking powder, and salt into a bowl. Whisk it together to evenly mix the ingredients. In a separate bowl, mix the oil and melted butter.

Separate the eggs and put 2 egg whites into a mixing bowl or the bowl of a stand mixer. Make sure the bowl is very clean and dry because any fat or water in the bowl will interfere with the egg whites whipping properly. With a whisk attachment, whip the whites on medium high until they are foamy. Add the cream of tartar and continue whisking. When the mixture starts gaining volume, slowing add 1/4 C of granulated sugar. Whisk until soft peaks form. If you lift up the whisk attachment and the mixture is still shiny and runny and looks like, keep whipping, you’re almost at the soft peaks stage. Scrape the whites into another clean bowl and set aside.

Add the 3 egg yolks, remaining egg white, 1/2 C of granulated sugar, and scraped vanilla bean seeds to the mixing bowl or stand mixer bowl. Whisk this mixture on medium high until the mixture is thick and pale yellow. Lift up the whisk and the mixture should fall back into the bowl like sheets of ribbon. The trail should be visible on the surface for 3 seconds before disappearing.

Sift in half of the flour mixture and carefully fold the flour into the egg mixture. When the flour is nearly almost all folded in, add the milk and half of the oil and butter mix, and continue folding. Make sure to bring up any oil that sinks to the bottom of the batter. Sift the remaining flour mixture into the batter, and continue folding, add the remaining oil and butter mixture and fold a few more times. Before the batter is completely mixed, scrape in 1/3 of the egg whites and continue folding. Then scrape in all of the egg whites and fold until no streaks remain.

Fill the cupcake tin 3/4 of the way full or divide the batter equally between 2 cake pans.

Bake at 350 for 20 – 22 minutes (may need a longer time for cake pans), or until a toothpick inserted into the center of the cake comes out clean and the top springs back when lightly pressed on.

Cool to room temperature before frosting.


I know others were also looking for a good yellow cake recipe. If you try this recipe let me know what you think!

Wednesday, June 10, 2009

I Catered a Wedding

Wedding Peonies

It’s Wednesday now right? A week of studying, 2 finals, 3 days of food prep, a wedding, and 3 days of downtime including much needed sleep brings me to where I am now. I think I’ve finally recovered enough to form coherent thoughts again. A week ago today, I finished my last exam of the quarter and with that, officially finished my first year of medical school! That thought hasn't completely sunk in yet because right after the exam, I started on the wedding food.

Wednesday:
I tried to make a schedule for the next two days and time points for when food should be chopped, cooked, or baked. I knew it wouldn’t be followed but I had to at least try to delude myself into thinking there was going to be some sort of organization.

Thursday:
E. and I hit up Costco, the local veggie stand, Trader Joes, and 2 local grocery stores for all the food. That night, I made seedless blackberry puree for the salad dressing, 6 dozen gougeres, and the Marsala cream sauce.

Friday:
The majority of Friday was devoted to wedding cupcakes, which deserve their own post.

S. came over to help me with the lasagnas. She also had the very important job of helping me keep it together in case I had a complete meltdown. Luckily, no meltdown. And even better, we successfully put together 2 enormous spinach and artichoke lasagnas.

Extra extra large lasagna ingredients
quadruple the ingredients of a 9 x 13 lasagna

Saturday:
AM: Steven and I packed every appliance, gadget, and cooking tool I could possibly need in the trunk. We had to turn around a few times because I nearly forgot a cookie sheet and my camera. The majority of the prep had to be done before the ceremony but luckily I had 3 awesome helpers, S., D., and Steven. In the 2 hours before the ceremony we had to make the orzo salad, blackberry vinaigrette, balsamic vinaigrette, cucumber sandwiches, and prep 5 pounds of vegetables.

We tackled the orzo salad first. A pound of orzo is deceptively small so I mistakenly thought I could cook 3 pounds of it in only 5 quarts of water. Big mistake. After a few minutes, the orzo sucked up all of the water and the contents of the pot turned into a starchy, bubbly, molten pot of deadly pasta lava. There was definitely a struggle in the great Orzo Battle of 2009, but our heroic Steven successfully managed to get all of the orzo strained, rinsed, and drained, without sustaining any 2nd degree burns. And he did it all using only this tiny sieve.

Meanwhile, I worked on the blackberry vinaigrette. I was following my own recipe but it just didn’t taste right. The blackberry puree I made on Thursday was too tart and I didn’t pack any sugar because none of my recipes called for it. Then I had the brilliant idea of...

wait for it...

diluting it with 7-Up!

First, the debacle with the orzo, then, who would have expected that high fructose corn syrup would be the secret ingredient.

Thank goodness there were no other major problems, otherwise my mental health would have been highly questionable. I won't bore you guys with the details of chopping 6 cucumbers, salt, pepper, and flouring 6 pounds of chicken breast, or how we expertly reheated the gougeres to piping hot perfection.

After the prep, I was able to sneak upstairs and take a few pictures. E. was hands down the most ethereal and angelic bride ever. If anyone disagrees with me I will first politely show you picture proof, and then if there is still disagreement, I will take you down. ;) Everything about the ceremony, the decorations, the music, the vows, flawlessly captured the beauty and essence of the couple, as individuals and together as husband and wife. All I can say is it’s hard to hold a camera still while crying. I’m just glad I wore waterproof mascara.

Wedding Peonies
E.'s mom grew all of the flowers, made all of the arrangements, and decorated the venue

With timing being my main concern, my biggest accomplishment of the day was getting all of the food done at the same time so everything was hot and served at peak deliciousness. I had been bracing myself for something catastrophic for the last 2 days, but thankfully there were no disasters in the kitchen. Long story short, no burns, cuts, lost digits, food poisoning, and not a single stain on wedding clothes.

Oh and I seared 6 pounds of chicken in a satin dress and heels. Hell yeah!

Everything came out the way I was hoping it would and exceeded all of my expectations. I can now say that I’ve catered for 50 people. I’ve thought about starting a catering business on the side in the future, keyword being future. Now I know it’s definitely not something I would want to tackle again without enough counterspace, a second fridge, and a dishwasher in our kitchen. Washing everything by hand in a tiny sink is not an experience I would like to repeat. But in the end, it was a great feeling seeing everyone happy, wellfed, and having a good time. Whew!

appetizers included:
Cucumber and Arugula Sandwiches
Parmesan and Chive Gougeres


the menu:
Salad with Balsamic Vinaigrette or Blackberry Vinaigrette
Spinach and Artichoke Lasagna
Spring Vegetables (asparagus, snow peas, fava beans) Sautéed with Mint
Chicken Scallopini with Mushrooms in Marsala Cream Sauce
Orzo Salad with Lemon, Cucumbers, and Dill


I want to say thank you, thank you, thank you to:

D. for being my prep bitch on Saturday and doing all of the grunt work--peeling fava beans, chopping snow peas, bell peppers. etc. I am so grateful. And you did the dishes afterwards. I don’t know how to properly say that you are really kickass.

S. for helping me with lasagnas on Friday and letting those lasagnas hijack your fridge space.

Steven for being the glue that held everything together on Saturday. You know how I work in the kitchen and I couldn’t have done this without you.

LinkWithin

Blog Widget by LinkWithin