Wednesday, May 28, 2008

Green Tea White Chocolate Opera Cake

Green Tea White Chocolate Opera Cake
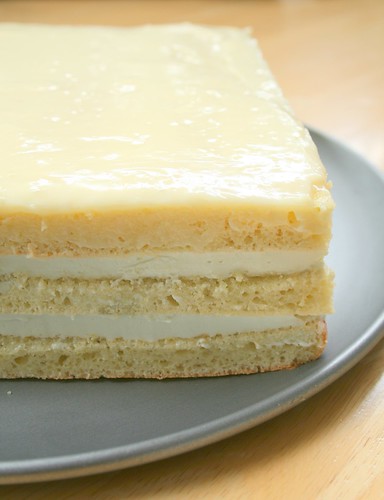
Earlier this month I volunteered to bake a cake for a birthday party. I was trying to decide what kind of cake to make but it just so happened that our cohosts this month, Lis and Ivonne, founders of the DB, and Fran and Shea chose an opera cake for the group's monthly challenge. How perfect! The traditional opera cake consists of three layers of joconde, almond sponge/genoise, soaked with a strong coffees syrup, coffee buttercream, and finished with a shiny, dark chocolate glaze.
But this month's challenge was extra special and it wasn't going to be just any opera cake, this opera cake is a tribute to Barbara, fellow food blogger, honorary Daring Baker, cancer survivor, and host of one of the biggest food blogging events, A Taste of Yellow for LIVESTRONG Day. I was so bummed I missed the deadline for A Taste of Yellow this year so I'm very grateful for a second chance to give tribute to not only Barbara but all cancer survivors, those currently battling cancer, and everyone that has been affected by this disease. In honor of Barbara's A Taste of Yellow event, the main rule for this challenge was to keep everything light colored, no browns or dark colors. Instead of the traditional chocolate glaze, we were using a white chocolate glaze. Immediately, I thought of pairing the white chocolate with green tea because that combo is one of my absolute favorites for desserts and the light green of matcha buttercream is very Spring.

Believe it or not, I actually finished the challenge way before the posting date this month. Yay for me! Too bad I can't say the same about posting on time. Oh well, baby steps people, baby steps. This month I had a different deadline to work with, the day of the party. And like a professional procrastinator, I finished the cake with literally minutes to spare before I had to leave for the party.

Okay, moving on to the cake. I kept the joconde plain adding just a little almond extract, made a green tea soaking syrup, a green tea buttercream, and finally the white chocolate glaze (I skipped the mousse because I'm lazy). The plan was to bake the cake and make the syrup the night before then make the buttercream and assemble the cake the next morning (the party being at noon). But whenever you make a plan, something always goes wrong, that's just how it goes right? I ran into an issue with the buttercream; after adding three sticks of butter to the egg yolk syrup mixture I was left with runny buttery glop that couldn't hold a peak to save its life. With only a three hours left, I had to make a new buttercream but this time I played it safe and went with a Swiss buttercream (Dorie's recipe), which I'm more comfortable with. But I was running out of time and my butter needed to be at room temperature and I had just taken it out of the fridge. After some frantic instant messaging to my friend telling him of my failures as a French buttercream maker, he suggested sitting on the cold butter (not seriously of course... I don't think). Gives a new meaning to the word buttercream eh? Anyway, the butter eventually softened enough (no sitting required) to make the buttercream and luckily, the second batch of buttercream turned out perfectly, melt-on-the-tongue ethereal. With 30 minutes left to put the cake together, I haphazardly assembled the joconde layers, brushed on the syrup, spread on the buttercream, and finally poured on the white chocolate glaze, which thank god did not seize because it was my last bit of my white chocolate. I didn't have time to make any decorations or even trim the messy looking edges. I snapped a few photos then ran off to catch the bus. I feel a little embarrassed about my naked cake. No spiffy decorations here but I've seen some drop dead gorgeous decorations this month. Man, this group never ceases to amaze me. So make sure to check out the DB Blogroll to see some beautiful music notes, g clefs, sexy legs, and a gorgeous edible rose.

Now I'm feeling kinda lazy again (actually, I've just been lazy recently, as you can see from the lack of posting) so instead of writing out the recipe, I will link to it because it is veeerrrry loooonggg.

Recipe:
Daring Bakers' Opera Cake

My notes:
- Almond meal can be really expensive but luckily it can be made very easily at home. If you are starting from raw almonds, first blanch them and squeeze them out of the skins (how to blanch almonds). Then be sure to grind them very fine in the food processor. Add a tablespoon or two of the flour from the recipe with the almonds to soak up some of the oils that the almonds release. It will start to get clump so make sure to stop the food processor once in a while and loosen up the mixture. Do not overprocess to almond butter.

- Dorie's buttercream recipe is the same one we used for the March Challenge, Perfect Party Cake. Instead of the lemon juices addition at the end, I dissolved some matcha powder in a few tablespoons of hot water (ideally 180 deg F), then cooled that to room temperature, then slowly added that to the buttercream in the end.

Monday, May 26, 2008

Creme Brulee

Creme Brulee

The first time I made creme brulee, I was 17 and totally ill-equipped. I didn't have any ramekins so I used small pyrex bowls and small disposable foil tins, you know the kind from frozen pot pies, yes it was sooo very ghetto. Instead of a vanilla bean I used imitation vanilla extract *shudders* and in lieu of a torch, I used the broiler - luckily the pyrex didn't explode, whew! Even without the proper equipment, the creme brulees turned out pretty decent. That's the beauty of creme brulee, it looks very impressive and seems like it would be complicated to make but it's pretty simple to do. Creme brulee is one of the best desserts to showcase the beauty of a vanilla bean but you can play around with many different flavors like Earl Grey or lavender honey.

Creme Brulee
from Cook's Illustrated
4 ramekins or 6 shallow ramekins

2 C heavy cream
6 egg yolks
1/3 C sugar
Pinch of salt
1/2 vanilla bean or 1 tsp of vanilla extract but skip the steeping of the cream
4 - 6 tsp of turbinado sugar or Demerara sugar

Preheat the oven to 300 degrees F.

Combine 1 cup of the cream, sugar, and salt in a small saucepan. Cut the vanilla bean in half lengthwise and scrape the seeds with a paring knife and add to the cream. You can either submerge the pod in the cream as well or leave it out and save it for making extract. Bring the cream mixture to a gentle boil over medium heat, remove the pan from heat, and let steep for 15 minutes.

Place a kitchen towel or silicone baking mat in the bottom of a large roasting pan and place the ramekins in the pan. Bring a kettle of water to a boil.

After the cream has steeped and cooled, stir in the remaining cup of cream. Whisk the egg yolks in a bowl and whisk in the cream mixture. Strain into a 2 cup measuring cup.

Pull out the oven rack and place the roasting pan on the rack. You can either pour the custard mixture into the ramekins first then pour the boiling water in the roasting pan, or pour the boiling water first, then the custard. I like pouring the boiling water first into the pan followed by the custard into the ramekins to minimize splashing water into the custard. Pour the water until it reaches 2/3 up the side of the ramekins. Carefully slide the rack back into the oven.

Bake until the center of the custards are barely sit, not sloshy but a little jiggly. The center should read about 170 - 175 deg F, 30 - 35 minutes (25 - 30 minutes for shallow fluted dishes). Begin checking the temperature 5 minutes ahead of time.

Transfer the ramekins to a wire rack to cool to room temperature, about 2 hours. Then transfer to a rimmed baking sheet, cover tightly with plastic wrap, and refrigerate until cold at least 4 hours or up to 4 days.

Before bruleeing, place a paper towel on the surface on the custards to soak up any moisture. Sprinkle about 1 teaspoon of turbinado sugar on the surface (may need to use more for shallow dishes), tilt and shake the ramekin so the sugar covers the surface completely, and brulee until the sugar forms a caramel colored crust.

Optional: refrigerate uncovered for 30 - 45 minutes to re-chill.

Sunday, May 18, 2008

Hunan Eggplant

Hunan Eggplant

I hated eggplants as a kid. Eggplant dishes were always mushy, watery, tasteless, just plain "bleh". Doesn't inspire much confidence in an already weird looking vegetable. Since then, I've avoided buying and cooking with eggplants. But after reading about all the flavors and ingredients of Hunan cooking in Fuchsia Dunlop's Revolutionary Chinese Cookbook, I was inspired to create a Hunan style eggplant dish. Insipid eggplant dishes are now a thing of the past! I won't lie, it doesn't look very pretty but the taste more than makes up for it. I'm not bragging here but this was hands down the best eggplant dish I've ever had. I made it for my dad when he was in town and he was surprised that eggplant can taste so good. This could be the dish to convert even a diehard eggplant hater like me.

I would only recommend using Chinese/Japanese eggplants because they are less bitter and are less watery than the globe variety that's commonly found in supermarkets. The most important flavoring ingredient is the chili bean paste so choose a good one that's made with fermented broad beans (aka fava bean) or a combination with fermented soy beans rather than only fermented soy beans. Lee Kum Kee is a good brand (it's made with both fermented broad beans and soy beans). The dried shrimp add a lot of umami flavor but feel free to omit it for a vegetarian version. Chinese picked mustard tuber, zha cai, is also called Szechuan/Sichuan picked vegetable. It's the salted and pickled stem of a type of mustard green. Rinse the vegetable before using to get rid of any excess salt and fermenting liquid.

Hunan Eggplant Ingredients

Hunan Eggplant
2 Tbsp vegetable oil
2 oz. zha cai, Chinese/Szechuan/Sichuan pickled mustard tubers, minced
2 Tbsp dried shrimp, minced
1/4 C chili bean sauce
3 green onions, white parts only, thinly sliced
1 tsp minced or grated ginger
4 cloves of garlic, minced or pressed
4 Chinese/Japanese eggplants
2 Tbsp soy sauce (more to taste)
1/2 tsp sugar
White pepper
Salt to taste

Garnish
Green onion, green part, thinly sliced

Cutting the Eggplant

Soak the dried shrimp in a few tablespoons of hot water for about 5 minutes. Drain, rinse, then mince the shrimp.

Cut the eggplant into chunks on the bias (see picture). Cut at an angle, then rotate the eggplant a half turn, then cut on the bias again, repeat.

Heat 2 tablespoons of oil in a wok or large skillet over medium high heat. Add the chopped zha cai and minced dried shrimp, cook for a minute or two in the hot oil. Add the chili paste, green onions, minced ginger, and minced garlic and cook until the mixture is fragrant, about 1 minute. Add the eggplant and stir to coat the pieces in the chili mixture, cook for a minute. Add the soy sauce, sugar, white pepper, and about a 1/4 cup of water. Cover and steam until eggplant are tender but not mushy. Stir occassionally, don't be too rough or you'll smash the eggplant. Season to taste with more soy sauce or salt.

Garnish with sliced green onions (green part only). Serve with rice.

Monday, May 12, 2008

Guacamole

Guacamole
I looove guacamole. Not only is it my favorite dip (chips are just the vehicle for large scoops of guac), but it's also my favorite topping for tacos, burritos, burgers, sandwiches, breakfast bagels (try it on a bagel or toast with scrambled eggs, mmm...), or whatever else I can think of that would benefit from a hit of avocadoey goodness. So I knew right away what I was going to make with the two avocados in our CSA box. Everyone makes guacamole a little differently. It can be smooth or chunky, with or without tomatoes, and include a few herbs and spices. Here's how I make my guacamole. First of all, it has to be chunky with no dairy fillers, so no mixing in sour cream or *shudders* mayo into the guacamole. I throw in some diced tomatoes because I like the bright red color adds. I skip the cilantro because Steven absolutely hates it due to a genetic quirk that makes cilantro taste gross and soapy. I could add parsley as a substitute for cilantro but I didn't have any today. I don't add any spices, but I do like just 1 clove of finely minced garlic. There has to be enough tang from the citrus (both lime or lemon is fine) juice to cut through the richness of the avocado and finally some salt and freshly cracked black pepper.

Now go on and try that guac on a hearty slice of toast with some scrambled eggs, maybe throw on some bacon or a slice of ham on top.

Guacamole
2 ripe Hass avocados
1 small tomato, seeded and diced fine
1/4 small onion, diced fine
1 jalapeno or serrano, seeded and diced fine
1 garlic clove, minced by hand
Juice of 1 lime
Salt and pepper to taste

Halve the avocados, remove the seed, and scoop the flesh into a bowl. Add the rest of the diced and minced ingredients and gently mix and mash with a fork until it is as chunky or smooth as you like. Season with salt and pepper.

To store, press a piece of plastic wrap directly on the surface of the guacamole to prevent the guacamole from turning brown due to oxidation (keeping the seed in the guacamole is a myth).

Serve with tortilla chips, or on anything else your heart desires. :)


Friday, May 9, 2008

Mizuna and Minced Chicken Stir Fry

Chicken and Mizuna

Steven and I recently signed up for a local CSA. CSAs are growing increasingly popular and I bet many of you are already familiar with the concept but we just learned about them a few weeks ago (man I feel so behind the times). CSA or Community Supported Agriculture is a program where you establish a relationship with a local farm and you receive a weekly, biweekly, or monthly box of produce that the farm grows. It's a great way to 1. eat locally and support local farms, 2. eat seasonally, 3. eat more fruits and veggies (because okay, let's be honest, who gets their 5-a-day, not me...) and 4. try fruits and veggies that you've never tried before. The great thing about our CSA is the variety and flexibility. Everything in our box is organic. Some items come from the main farm, other items come from other farms in Washington State, and some come from outside of the region to give subscribers a little variety. We can make substitutions, pickup either weekly or biweekly, or cancel or put our subscription on hold at anytime.

CSA

Last week our box contained:
2 Russet potatoes
1 bunch Carrots
1 Leek
.75 lb Zucchini
.75 lb Shallots
2 Hass avocados
4 Valencia oranges
2 Tommy Atkins mangos
2 Lemons
1 Romaine lettuce
1 bunch Mizuna
.34 lb Spring Mix

Organic carrots taste so much better than the giant supermarket carrots and Bunny was happy that the carrots came with green leafy tops attached, which he quickly nommed away.

After looking at our produce list for the week, Steven asked me what mizuna was. I wouldn’t have had a clue if he had asked me the day before, but it just so happened that I had just read a post about mizuna on Susan's blog, Food Blogga. I felt pretty sharp when I replied, "Oh, it's a Japanese mustard green." So I knew what it was, but I was at a loss of how to prepare it. Google to the rescue! I found a recipe for a mizuna and chicken stir fry from Whole Foods, and while I liked the idea, that recipe called for all sorts of random ingredients. I just wanted a simple mizuna and chicken stir fry. Mizuna, I discovered, cooks down a lot. It’s like spinach, you start out with a huge bunch and 2 seconds later, poof, it shrinks down to nearly nothing. I kept a 1:1 ratio of mizuna to chicken in this recipe but feel free to use more or less chicken. The mizuna also cooks very quickly. I added it after I took the pan off the heat and the residual heat of the cooked chicken and hot pan was enough to gently wilt the mizuna. If it's cooked too long, the greens will be limp and lifeless.

Mizuna and Minced Chicken Stir Fry
Inspired by Whole Foods

3/4 lb chicken breast
1 Tbsp soy sauce
1 Tbsp Shao Xing rice wine
1 Tbsp cornstarch
1/2 tsp sugar
1/4 tsp white pepper
3/4 lb mizuna
Salt to taste

Pulse the chicken breast in a food processor to mince it finely until there are no large pieces remaining but do not grind into a paste. Or alternatively mince it with a chef's knife. Mix the minced chicken with soy sauce, wine, cornstarch, sugar, and white pepper and set it aside to marinate.

Meanwhile, trim the ends off the mizuna. It's easiest to keep the mizuna in a bunch and trim the ends off all at once then untie the bunch to wash. My mizuna was pretty dirty, so wash it a few times to loosen and wash away any dirt on the stems and leaves.

Heat 2 tsp of oil in a wok or skillet over medium high heat. Add the chicken
and stir fry until it is fully cooked through, about 4 - 6 minutes. When the chicken is fully cooked, turn off the heat and add the mizuna. Toss the mizuna in the hot pan with the chicken and it will start to wilt and cook down, season to taste with salt.

Serve with rice.


More about CSAs:
If you live in the Pacific Northwest area, there are many different CSAs to choose from (we signed up with Full Circle Farms). To find a local CSA in your area go to this website: http://www.localharvest.org

Sunday, May 4, 2008

Beef Stroganoff

Beef Stroganoff
Beef stroganoff is traditionally made by sauteing strips or cubes of beef but I have bad luck cooking beef this way. Sometimes my beef stir fries/sautes turns out great but many times it ends up kinda chewy and tough. So instead of a saute, I opt to braise the beef for my stroganoff. Braising takes longer but I love the way it magically transforms a cheap tough cut into something moist and fork tender. And this way I won't screw up cooking a pricey piece of meat. One of my local supermarkets had a 7-bone chuck roast (great braising cut) on sale for only $1.29/lb, quite the bargain compared to a $5/lb steak or tenderloin. I know some people dislike mushrooms but I can't have stroganoff with lots of them. Finally, a white wine sour cream sauce with thyme, dijon mustard, and teensy bit of soy sauce brings it all together.

Not all roasts are created equal. Here's a guide from Cook's Illustrated that rates the flavor of various cuts most widely available at the supermarket: http://www.cooksillustrated.com/images/document/howto/ND02_BeefRoasts.pdf
I like using the top blade roast or chuck 7-bone roast because those cuts are already thin so it's easier to cut into 1 inch cubes.

For a quick version, skip the braise and saute a strips of a tender cut like tenderloin, sirloin steak, or flank steak instead. Or you can even use ground beef.

Beef Stroganoff
Braise
3 lbs braising beef cut, cut into 1 inch cubes
2 Tbsp soy sauce
2 bay leaves
1/2 C chicken stock + 1/2 C water

Veggies and Sauce
2 Tbsp butter
1 large yellow onion, diced
1 lb crimini or white button mushrooms, sliced
1 Tbsp fresh thyme leaves
1/2 C white wine
2 Tbsp soy sauce
1 1/2 C sour cream
1 Tbsp Dijon mustard
Vegetable oil
Salt and pepper

Serve with:
Egg noodles or rice

Trim off any excess fat and cut the beef into 1 inch pieces and season with salt and pepper.

Heat 2 teaspoons of vegetable oil in a Dutch oven over medium high heat. Add 1/3 of the beef and sear until browned on all sides (or a 2 - 3 sides if you want to cheat like me since I get impatient). Transfer to a boil and repeat the searing. If the browned bits on the bottom of the Dutch oven are accumulating and turning too brown, add some water and scrape up the browned bits. Pour this flavorful liquid into the bowl with the already seared pieces of beef and then resume the searing.

After all of the beef has seared, return the beef and any juices back into the Dutch oven. Add the chicken stock and water, two tablespoons of soy sauce, and bay leaves. Bring to a simmer then lower the heat until the contents are barely simmering. Cook for about 3 hours or until the beef is fork tender, stir occasionally to make sure all the pieces get cooked evenly. Transfer to a bowl and reserve one cup of the braising liquid.

In a skillet heat two tablespoon of butter over medium heat. Add the diced onions and cook until translucent and slightly browned on the edges. Add the sliced mushrooms, a little salt, and pepper. The mushrooms will release some liquid so cook until all of the liquid has reduced and the pan is dry. Add the white wine, reserved cup of braising liquid, and thyme. Turn up the heat to medium high and cook until this liquid is reduced and thickened. Season with a little soy sauce (about 1 - 2 tablespoons), salt, and pepper. Stir in the braised piece of beef and take the pan off heat. Off heat, stir in the dijon mustard and sour cream. Serve over buttered egg noodles or rice.


LinkWithin

Blog Widget by LinkWithin