Sunday, May 27, 2007

Nutella Stuffed Brioche French Toast

Nutella French Toast

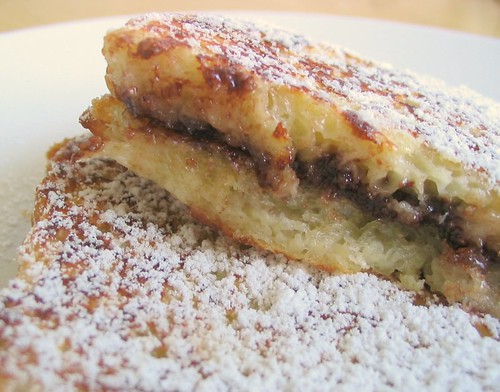
I look forward to a stale brioche as much as a fresh-from-the-oven loaf. In fact, I specifically set aside a portion of my last brioche and eagerly waited for it to dry out. Why? Because stale brioche makes the absolute best French toast and bread pudding. The day had finally arrived, and I was gathering ingredients for French toast when I spotted the jar of Nutella sitting innocently on the pantry shelf. “Eureka!” I knew I wouldn't be making any French toast but Nutella stuffed French toast! A luscious layer of Nutella is sandwiched between two slices of brioche, then the whole thing was to be dipped in French toast batter, fried in butter, and finished with a dusting of powdered sugar. It sounded so divine the prospect of making it led me to hum and prance excitedly around the kitchen. And the taste? Well, brioche and Nutella were made for each other. It made my heart flutter with happiness (or was that my heart struggling to pump after all that artery clogging goodness?), it was no doubt the best French toast I have ever had with a crisp exterior and a soft, custard like interior.

This will be my entry for Leftover Tuesdays hosted by Foodie Project

Nutella French Toast

Notes:
- The batter recipe will also work for regular French toast, just cut the brioche slices 3/4-in thick instead of 3/8in thick.
- I kept the flavorings to a minimum because the brioche was already scented with lavender but if you're using a plain brioche, you can try variations such as adding cinnamon, nutmeg, or swap the vanilla extract with almond extract

Nutella Stuffed Brioche French Toast
Adapted from Cook's Illustrated

1 egg
3/4 C milk
3 Tbsp AP flour
1 Tbsp unsalted butter, melted (and more for frying)
1 Tbsp granulated sugar
2 tsp vanilla extract
Pinch of salt
Half loaf of brioche; cut into 8 3/8-in slices
Nutella, a few tablespoons
Powdered sugar for serving

Whisk the egg, milk, melted butter, flour, sugar, salt, and vanilla together until a smooth, thin batter is formed.

Spread some Nutella on half of the brioche slices and then top with a second slice of brioche, forming 4 Nutella brioche sandwiches about 3/4-in thick.

Add a tablespoon of butter to a nonstick skillet over medium heat.

To ensure even soaking of the bread, pour only half of the batter into a flat dish and soak both sides of 2 brioche pieces. You may not use up all of the batter but this way you don’t oversoak the first two bread pieces, leaving you with not enough batter for the second two pieces.

Once you have soaked the first two slices, remove and start frying them. Pour the remaining half of the batter into the dish and soak the next two pieces of bread.

Fry the French toasts until crisp and brown, about 1 1/2 to 2 minutes on the first side, flip then fry the second side until crisp and brown also, another minute or so.

Serve with powdered sugar.

~~~

Brioche French Toast

1 egg
3/4 C milk
3 Tbsp AP flour
1 Tbsp unsalted butter, melted (and more for frying)
1 Tbsp granulated sugar
2 tsp vanilla extract
Pinch of salt
Half loaf of brioche; cut into 4 3/4-in slices

Variations: Add cinnamon, nutmeg, or swap almond extract for vanilla extract


Whisk the egg, milk, melted butter, flour, sugar, salt, and vanilla together until a smooth, thin batter is formed.

Add a tablespoon of butter to a nonstick skillet over medium heat.

To ensure even soaking of the bread, pour only half of the batter into a flat dish and soak both sides of 2 brioche pieces. You may not use up all of the batter but this way you don’t oversoak the first two bread pieces, leaving you with not enough batter for the second two pieces.

Once you have soaked the first two slices, remove and start frying them. Pour the remaining half of the batter into the dish and soak the next two pieces of bread.

Fry the French toasts until crisp and brown, about 1 1/2 to 2 minutes on the first side, flip then fry the second side until crisp and brown also, another minute or so.

Serve with powdered sugar.

Friday, May 25, 2007

Buffalo Chicken Drumsticks

Buffalo Chicken Drumsticks

I’ve heard that “true” buffalo wings only have 3 ingredients: chicken wings, butter/margarine, and Frank’s Hot Sauce. Well this recipe has more than 3 ingredients but I’m still going to call them buffalo drumsticks because honestly, I don’t know what else I can call them. The drumsticks are first baked in the oven then finished under the broiler to crisp up the skin. Before serving, they are coated with more Frank’s hot sauce for extra finger-lickin’ goodness. They may look spicy, but Frank's is fairly mild so you may wish to add some Tabasco too if you like things extra spicy.

Another way to bake these drumsticks is to cook them entirely under the broiler, 10 minutes a side on the middle rack. Keeping the chicken on the middle rack prevents them from browning too quickly but if the skin is getting too dark before the chicken is fully cooked, turn the temperature down (350ºF or so) so the insides can catch up and finish cooking. This method cuts the cooking time significantly but I haven’t tried it yet. It’s how Elise made her Spicy Chicken Drumsticks so I’m sure this method works well. You can also grill these drumsticks over medium high heat.

Buffalo Chicken Drumsticks

6 chicken drumsticks
6 Tbsp Frank’s Original Hot Sauce (and some more for coating the drumsticks later)
2 tsp Tabasco (and more to taste)
2 tsp brown sugar
2 cloves garlic, minced or pressed
1 tsp smoked paprika (I love the smokey flavor this gives)

Mix all the ingredients (except the chicken) in a bowl and pour the marinade over the chicken. Marinate for a few hours to overnight.

Preheat the oven to 350ºF, adjust the oven racks to the middle and top position. Add the chicken to a broiler safe pan, pour the remaining marinade over the chicken, and bake on the middle rack for 35 - 40 minutes. Then move the pan up to the top rack, turn on the broiler (500ºF), and broil until the skin is crisp, about 5 minutes for the first side. Then flip the drumstick over, and broil for another 5 minutes. Drumsticks can range in size so check to see if they're cooked through (no pink).

Coat the chicken with more Frank's (and Tabasco if preferred) before serving. I skipped the butter because drumsticks have more fat than chicken wings.

Serve with blue cheese dressing and celery sticks

Blue Cheese Dressing

Once you taste homemade blue cheese dressing, you’ll never go back to the dull stuff in the bottles. Steven and I picked up some amazing blue cheese at the Cheese Festival and it made the best blue cheese dressing we’ve ever had (at $23 a pound it had better be darn good).

Blue Cheese Dressing
1 oz. blue cheese, personal preference which kind, you can use from Danish to Gorgonzola
2 Tbsp mayonnaise
2 Tbsp sour cream or yogurt
About 1 Tbsp milk or buttermilk (optional, depending on how thick you want your dressing)
1 clove of garlic, pressed or minced
1 tsp lemon juice or white vinegar
Pinch of sugar
Freshly ground pepper (no salt, the cheese is salty enough)

Mash the blue cheese with the mayo and sour cream. You can leave it as chunky or creamy as you want.

Thin the mixture out to desired consistency with milk or buttermilk. Buttermilk will give a richer, thicker consistency than milk but not everyone may have it on hand. You may even skip this step all together if you want a really thick dip. If you want a thinner dressing, use a little more milk.

Then add the lemon juice, garlic, pepper, and sugar. Let it sit in the fridge for a few hours for the flavors to develop.

Wednesday, May 23, 2007

Honey Lavender Brioche


The last time I was wandering the aisles of Trader Joe’s, I curiously looked at a loaf of brioche, and then I proceeded to balk at the price. $4.29 for a tiny loaf of bread! You’ve got to be kidding me! After shunning the expensive brioche (I'm sure this is relative, it was expensive to me), I was determined to make my own. Then one day I thought, “Hmm... what about a honey lavender brioche?” I always get super excited when I think of new ideas like this. I could either use lavender honey or lavender blossoms. Lavender honey is made from the nectar of lavender flowers, produced mainly in France and Spain, but unfortunately, it can be quite expensive. So instead, I picked up some lavender blossoms (much more affordable) at World Spice a few weeks ago.

After purchasing the lavender, I surfed the web looking for a brioche recipe. I thought it was so funny when I read Megnut’s “Mean Chocolate Chip Cookie,” because it's something I do with many of my recipes (though I don’t take it as far as Meg and average the baking temperatures and times). After taking science classes for the last five years, it’s only natural that I approach each new cooking endeavor as a scientific experiment. I gathered about a dozen brioche recipes and compared the ratios of the ingredients; in the case of a brioche, the flour, eggs, butter, milk, yeast, and sugar. For example, I found that the egg content in a brioche recipe can range from 2 to 4 and butter from 4 tbsp to 10 tbsp! Then I take the average or most common measurement of a certain ingredient to create my own recipe.

I replaced sugar with honey for honey brioche but I've never cooked with lavender before so I had no idea how much of the blossoms to use. Using too much lavender can be a deathtrap, resulting in food reminiscent of soap or potpourri. I planned to infuse some milk with lavender. After the milk had cooled, I sniffed it and I could barely detect any lavender fragrance. So I decided to add half of the lavender blossoms into the bread itself to lend its aroma to the bread as it baked. And it worked! The end result was a rich and fluffy brioche with just the light lavender flavor I was looking for. The lavender scent is only noticeable after you finish eating the bread as it lingers ever so delicately on the tongue. It was really very nice, not overpowering at all.

Notes:
- When buying lavender blossoms, make sure to buy culinary lavender specified for cooking not the kind used for soap or candle making (sold in craft shops), which are usually treated with toxic chemicals and pesticides. Store the blossoms in a cool dry location.
- I’m sure you can use lavender honey instead of lavender blossoms in this recipe, just substitute regular honey for lavender honey.
- You can use this recipe to make a regular brioche as well, just omit the lavender and replace the honey with white sugar.
- This is a quick brioche that does not call for an overnight rise in the fridge.
- Some of the recipes I looked at included: Cook’s Illustrated, Thomas Keller, Helen of Tartelette and Epicurious, Freya and Paul, and Bea of La Tartine Gourmande.

Honey Lavender Brioche (or Lavender Honey Brioche)

2 - 2 1/4 C AP flour
1 package instant yeast, about 2 1/4 tsp
1/3 C milk
2 eggs, room temp
3 Tbsp honey
6 Tbsp butter, room temp, cut into 6 pieces
1 tsp of lavender flowers (only 1/2 tsp is added into the bread)
1/2 tsp salt
1 beaten egg for wash

Heat milk until it is very hot but not boiling. You can use a small saucepan but I actually used the microwave. I heated it for 20 second intervals and whisked in between. Add the lavender blossoms to the hot milk, cover, and set aside for 5 - 10 minutes, let the milk slowly cool down until it is warm, about 110ºF. The lavender will infuse into the milk and it allows the milk to cool to a temperature that won't scald the yeast.

(If you're using active dry yeast, wait until the milk has cooled until it's still warm then strain and reserve the lavender blossoms and add the yeast to allow it to proof.)

Add 2 cups of flour, yeast, and salt in the bowl of a stand mixer, whisk to combine. When the milk has finished infusing and is still warm, strain and reserve the lavender blossoms, whisk the honey into the milk then add the milk to the flour. Add half of the lavender flowers, about 1/2 tsp. Add the eggs and mix with the dough hook until the dough comes together. It will look very sticky and shaggy.

With the mixer running, add one piece of butter and wait until it is almost incorporated before adding the next. Add the butter piece by piece, then knead the dough for 5 minutes. If the dough looks too sticky, add some more flour, up to 1/4 C total. The dough should still be sticky and stick to the bottom of the mixer bowl but it shouldn't be absolutely unmanageable. Put the dough in a lightly greased bowl, cover, and set aside in a warm place and allow it to rise until doubled, about an hour.

Lightly flour a work surface. Cut a piece of parchment for the bottom of a loaf pan and grease the sides of the pan. Gently pry the dough out onto the work surface and divide in half. Then divide each half into 3 sections. Roll each section into a ball and place them in a loaf pan, 2 x 3. Cover, and set aside to let rise for another hour.

Meanwhile preheat the oven to 350ºF and adjust the oven rack to the lower middle position. My loaf rose pretty high so baking on the middle position would have caused the top to get too brown.

After the loaf finishes the second rise, brush the top with the beaten egg (probably won't use all of the egg). Bake for 35 - 40 minutes, or until the loaf sounds hollow when the pan is tapped. If you notice the top is getting too brown during baking, cover the top with a piece of foil to sheild it. If you notice that the top isn't getting brown enough, move the loaf up to the middle rack.

Take the loaf out of the pan and let it cool for 15 minutes before digging in (if you can wait that long). It was delicious drizzled with some more honey.


This will be my entry for Weekend Herb Blogging, an event created by Kalyn of Kalyn’s Kitchen and hosted this week by Ellie of Kitchen Wench.

Sunday, May 20, 2007

Cha Shao Shu


I’m too intimidated to make my own pastry dough so I always take a shortcut and use store-bought puff pastry. I had a pastry sheet left over from Valentine’s day and some extra cha shao filling from making cha shao bao so I made some quick cha shao pastries, one of my favorite dim sum items. The Chinese use lard in their pastries so the buttery taste of puff pastry is not typical to Chinese baked goods (but I don't have hours to devote to making authentic pastry, maybe some other day).

When I told Steven I planned on making these, he was pretty apathetic, saying he didn't care too much for them. Well it was a different story when they came out of the oven. Since he ended up liking them so much, I lamented I didn't make more but I guess it's a good thing I only made 6 since eating so much puff pastry can't be too healthy.

I halved my original recipe for the filling so this adjusted recipe will be enough for 9 pastries. You can eat any leftover filling with some rice. The filling is pretty darn good, I ate a little bit while it was cooling.

Cha Shao Filling
1 C chopped cha shao
2 green onions, bottom half only, sliced thinly
1 1/2 tsp soy sauce
1 1/2 tsp oyster sauce
1 1/2 tsp hoisin sauce
1 1/2 tsp Shao Hsing rice wine
1 tsp sesame oil
1 tsp sugar
1/8 tsp white pepper
2 Tbsp to 1/4 C water, depending on how saucy you want the filling
1 tsp corn starch
Vegetable oil

In a mixing bowl, whisk together the soy sauce, oyster sauce, hoisin sauce, rice wine, sesame oil, sugar, and white pepper.

In a separate bowl, mix the water and cornstarch.

Heat a scant teaspoon of vegetable oil in a skillet over medium heat and stir fry the green onion (white part only) for about 30 seconds to a minute, or until fragrant. Then add the cha shao and the sauce and cook for a minute, until the mixture is bubbly. Then add the cornstarch water and stir together. Cook until the mixture bubbles again and thickens, about a minute.

Cool to room temp before using.

Cha Shao Shu
1 sheet of store bought puff pastry (Pepperidge Farm)
1 egg, beaten
1 tsp white sesame seeds
Cha shao filling

Defrost the puff pastry sheet according to package instructions.

Preheat the oven to 375ºF.

The puff pastry sheet is folded in thirds, so cut along the folds for 3 equal pieces of puff pastry. Then cut each third into 3 pieces, for a total of 9 squares of puff pastry.

Roll out each puff pastry square into a rectangle about 3 by 4 in. You don't need to roll it very much, the squares are about 3 x 3 in to begin with.

With the short side facing towards you, scoop a heaping tablespoon of filling onto the puff pastry. Fold the pastry over the filling and seal the 3 edges.


Brush the pastries with some beaten egg and sprinkle a pinch of white sesame seeds on top.

Bake at 375ºF for about 25 to 30 minutes or until the pastries are fully risen and golden brown. Serve hot.

Makes 9 pastries

Seattle Cheese Festival


On Saturday Steven and I revisited Pike Place Market with camera, water bottle, and crackers in tow for the third annual Seattle Cheese Festival. The festival showcases over 200 varieties of international and domestic artisanal cheeses. In addition there are wine tastings, cooking demonstrations, seminars, and scavenger hunts for the kids. Best of all, cheese sampling and most of the activities (with the exception of the seminars) are free! I was afraid it would rain since the weather report predicted AM showers, but it turned out to be a beautiful day so I couldn’t have been happier.

I never found out what this big cheese was.

We wanted to get there before 10 to see the cheese race where local restaurant owners roll cheese down the cobblestone streets of the market but we ran a little late and just missed it. Maybe next year.

The tables were lined with cheese after cheese; it was a plethora of cheese as far as the eye could see. There were imported cheeses from all over Europe including France, England, Ireland, Switzerland, Germany, Italy, and domestic ones from Washington, Oregon, California, Utah, and Montana. There were cheeses made from cow’s milk, sheep’s milk, and goat’s milk and cheese of all shapes, sizes, colors, smells, and textures, from nutty hard cheeses, smooth soft cheeses, to stinky runny cheese.

Do you dare try the Stilton?


How about the intimidating Roquefort?

Off the top of my head, I recall we tried about 2 or 3 Stiltons, some Roquefort after rallying up our courage, 4 delicious Goudas, an amazing smoked Cheddar, cave-aged Cheddar with lots of crystals, an odd Fontina that left a bitter aftertaste, Comte, Asiago, 3 or 4 goat cheeses, delicious Irish cheese that reminded us of Parmesan, Camembert, and dozens more that I can’t remember. I discovered I’m not the biggest fan of goat cheese. We loved one of the Goudas so we purchased some along with some blue cheese.

Eventually, the little cubes of cheese add up! After sampling over 40 varieties of cheese, Steven and I were full of cheese, crackers, and delicious local bread. I don’t know how we would manage to sample all 200 plus varieties.


The festival is over for this year but I think it will be back next year. It's a lot of cheese and a lot of fun! Cheese sampling goes from 10 am to 5pm but it's best to get there early because the lines get longer and longer. There are sometimes crackers and breads available with the cheese but it's a good idea to bring some crackers with you so you can clear your palate occasionally (you never know when you'll taste a really strong cheese). Also bring a water bottle because you might get thirsty.


As we were leaving, we met an adorable African Gray Parrot, Phineas, and his trainer. Phineas was so sweet and intelligent (about the intelligence of a 7 year old his trainer says). If you point your finger at him and say "Bang!" he swings back and dangles from the trainer's finger. Phineas also did a handstand and back sommersault for us and calmly rested on my palm while I petted his head.


And a trip to Pike Place wouldn't be complete without getting some more Daily Dozen Doughnuts. See more photos here (no smell-o-vision I'm afraid).


Friday, May 18, 2007

Cha Shao Bao Chronicles Part 1: Trials and Tribulations

One purpose of this blog is to document my culinary endeavors. By endeavors I meant experiments, the good and the bad. It’s easy document the successful experiments, the ones that turn out well after the first attempt, like the strawberry lemon bars. It’s more difficult to document the experiments that fall short, the well... how should I put this... the failures.. Usually, I keep experimenting until I achieve the happy ending of a desired result. Unfortunately, Chinese steamed buns have me stumped so I’m wondering if anyone has any tips to make soft and fluffy steamed buns.

Last time I made cha shao, Steven and I ate it all before I could make bao. I promised that next time I made the pork, I would specifically set aside some for bun making. I have tried to make Chinese steamed buns many times in the past, during my inexperienced but ambitious teenage years, only to obtain less than stellar results. Emboldened by my recent successes with sticky buns and brioche (more on this later), I figured I was on a roll (I guess that pun was intended). Now that I’m older and wiser, at least I would like to think that I am, I figured I would have no trouble reproducing the soft and fluffy pristine white buns served at dim sum and Chinese bakeries. Boy was I wrong…

I must have looked at least a dozen recipes. Many recipes called for yeast raised dough made with a starter. So I decided to take this approach. I made a basic starter, then made the dough, let it rise, shaped it into buns, proofed, then steamed them. They looked a little… odd. Frankly they weren’t the prettiest buns on the dim sum trolley but looks aren't everything! I was hoping they would taste good. Well… the good news is that I did a decent job with the filling but the buns themselves tasted chewy and doughy, not the light and airy interior I was hoping for.

The recipe I used came from Ellen Leong Blonder’s Dim Sum: The Art of Chinese Tea Lunch. This seemed like a pretty decent recipe to me. The use of baking powder and baking soda would provide additional leavening power along with the yeast raised dough. The author states that the vinegar makes the dough more tender.

(Half of the original recipe)
Starter
1 tsp active dry yeast (I used instant yeast)
1/2 C lukewarm water
3 Tbsp sugar
3/4 C cake flour

Dough
1/4 tsp salt
1 1/2 tsp rice vinegar
1 C cake flour
1 1/2 Tbsp baking powder
1/8 tsp baking soda
1 1/2 tsp shortening (I used oil)

- The recipe is not entirely to blame for my poor results because I did not have any cake flour, so I substituted AP flour, which I suspect was mistake number one. The lower gluten content in cake flour would result in more tender buns. Also cake flour is bleached so the buns would be whiter than those baked with unbleached AP flour (mine were a bit yellow).

- Another possibility is that I overkneading the dough, leading to gluten formation. I used my Kitchenaid to knead the dough for a good 5 minutes. In retrospect this may not be good for bun dough because Chinese buns are not as chewy as oven-baked bread. Perhaps, less kneading the better.

- I also found some conflicting information about what leavening is best buns. Some say that using a yeast dough is unnecessarily because restaurants use only baking powder and cake flour. On the other hand, some sources attest that using only baking powder will yield bao that are less fluffy than those made with both yeast and baking powder.

- The grind of the flour also seems to be important. Some recipes call for Hong Kong flour, which is bleached, superfine flour. Maybe I'll look into buying this at my local Asian grocer but I think, cake flour would be an adequate substitute. Buns made entirely from cake flour are sometimes too lumpy, thus cake flour should be mixed with some AP flour.

- Some recipes call for milk instead of water. Maybe milk would create a more delicate dough.


What should I do for next time?
- Flour: Hong Kong/special bao flour? Cake flour? 50/50 cake and AP flour?
- Leavening: Yeast + baking powder or just baking powder?
- Liquids: Milk or water?
- Less kneading?
- Longer rise? Longer time for the starter?
- More baking soda + vinegar for an even higher rise?

And the final question? How do I get the bao to look like the ones served at dimsum. The bun itself looks like it blossomed, the filling isn’t entirely encased. Do I snip after I steam? I snipped before I steamed this time and it was pretty far from what they look like at dim sum.

Wednesday, May 16, 2007

Chicken Provencal - WHB


The other day I was perusing the potted herbs selection looking for a thyme plant for my (future) herb garden but there were so many varieties, it was very confusing. Lemon thyme, lime thyme, caraway thyme, wooly thyme, garden thyme? For someone like me who knows nothing about plants or gardening, having so many options is just too overwhelming. I later found out that there are over 300 different species! Thyme originated in the Mediterranean and because it's indigenous to warmer climates, the major flavor components remain stable in heat and can stand up to the drying process. This allows dried thyme to retain much of its original flavor. Thyme is heavily used in French cooking and is also the main component of herbes de Provence.

Provence is a region in southeast France that borders Italy and the Mediterranean sea. The area is best known for culinary specialties that include bouillabaisse, ratatouille, and pissaladiere, and the herb mix, herbes de Provence. The cuisine is heavily influenced by Spanish, Mediterranean, and Italian flavors and features a prominent use of olive oil, herbs, and tomatoes. Chicken provencal is a French country dish of roasted (or braised in this case) chicken with garlic, tomatoes, and olives. Cook's Illustrated suggests cooking this in the oven, but I didn't feel like heating up the oven so I simmered it on the stovetop. If you wish to cook it in the oven, preheat it to 300ºF and adjust the oven rack to the lower-middle position.

Chicken Provencal - Poulet Provencal
Adapted from Cook's Illustrated

6 - 8 bone-in, skin-on chicken thighs
1 tsp of olive oil
1 small onion, chopped
6 cloves of garlic, minced
1 anchovy fillet, minced
1/8 tsp cayenne pepper
1 C dry white wine
1 C chicken stock/broth
1 14 oz can of diced tomatoes, drained
2 1/2 Tbsp tomato paste
1 1/2 Tbsp fresh thyme leaves, chopped
1 bay leaf
1 tsp herbes de Provence (optional)
1/3 C nicoise olives, pitted and roughly chopped
Zest from 1 lemon
2 Tbsp fresh parsley

Heat 1 tsp of olive oil in a Dutch oven over medium high heat. Cook the chicken thighs in batches (4 at a time if you’re cooking 8, since I was cooking 6 small thighs, I squeezed them all in there). Add the thighs skin side down and cook until the skin is crisp and golden brown, about 5 minutes. At first the skin will stick to the pot but when they start to brown, they'll release easier from the pan. Turn the thighs over and brown the second side until golden brown, another 5 minutes. Remove the chicken thighs and set aside. Drain all but 2 tsp of fat from the pot.

Add the onions to the pot and cook over medium heat until browned, about 4 minutes. Add the garlic, anchovy, tomato paste, and cayenne and cook until fragrant, about 30 seconds to 1 minute.

Add the wine and scrape up the brown bits and then add the chicken broth, tomatoes, thyme, bay leaf, and herbes de Provence (if using).

Remove the skins from the chicken thighs and nestle them into the pot with any accumulated juices. Bring to a simmer then either cook in the oven at 300ºF for about 1 hour or barely simmering over low heat for an hour.

Remove the chicken and set aside and discard the bay leaf. Cook the contents in the pot over high heat until thickened and reduced, about 5 minutes. Stir in olives and cook for 1 minute. Then off heat stir in the parsley and lemon zest and spoon the sauce over the chicken. Serve with crusty bread.

Serves 4

This will be my entry for Weekend Herb Blogging, hosted this week by Rinku from Cooking in Westchester. Weekend Herb Blogging is an event created by Kalyn of Kalyn’s Kitchen that encourages bloggers to share recipes and information about herbs and plants.

Tuesday, May 15, 2007

Hainanese Chicken Rice


Hainanese chicken rice is a dish that originated in Hainan, a tropical island off the southern coast of China. (It was there that I got picked up by an elephant and ate mangoes the size of footballs on the beach, but I digress...) Soon the dish made its way to Malaysia and Singapore. In fact, it is so popular in Singapore, some would consider it to be the national dish. Singaporeans take chicken rice very seriously and will heatedly debate about which stall has the best chicken rice.

A whole chicken is slowly poached in chicken stock and the rice is cooked in rendered chicken fat and stock. Finally, the chicken is chopped up and served cold with cucumber slices, chicken rice, a bowl of stock, and dipping sauces.

*this is the first time I made this recipe so if you have any special tips, let me know :)

Hainanese Chicken Rice
For the chicken:
1 whole chicken, around 3 1/2 lbs
3 1/4in slices of fresh ginger
3 green onions
Salt
Lots of chicken stock (making chicken stock)

For the rice:
3 C long grain rice, washed and drained
3 cloves of garlic, minced or pressed
2 tsp of freshly grated ginger
1 green onion, white part only, thinly sliced (save the green top for garnish later)
3 1/2 C chicken stock from boiling the chicken

*I made the sauces to taste so the quantities are estimations
Chili Ginger Dipping Sauce
8 red chilis, or hot sauce like Sambal Oelek
2 garlic cloves, minced or pressed
1 tsp freshly grated ginger
2 tsp freshly squeezed lime juice
2 Tbsp chicken stock
Salt

Soy Dipping Sauce
2 Tbsp soy sauce
1/2 tsp Sesame oil
2 Tbsp chicken stock

Other:
1 cucumber

For this recipe, you’ll need lots of chicken stock and a deep, thick walled (to retain heat) pot that can fit a whole chicken.

I can't say for sure how much stock you’ll need. It depends on the size of the pot you use and the size of your chicken but you need enough stock to fully submerge the chicken.

One way to tell how much stock you'll need is to add the chicken to the empty pot then add enough tap water to cover the chicken by an inch or two. Then remove the chicken. Make a mental note of the water level without the chicken. Dump out the water and add your chicken stock to the appropriate level. If you don’t have enough stock, you can add more water so you have enough. You don’t want to boil the chicken in only water because it will leech out too much flavor from the chicken.

Cooking the chicken:
Wash chicken, remove and save the excess fat, you’ll need it for the rice. Rub the entire chicken with salt. Set aside at room temp for about 30 minutes. Stuff the cavity with 3 green onions and ginger slices.

Bring enough stock to cover the chicken to a boil. Add the chicken breast side down and turn the heat down to the lowest setting so it’s barely (only a few bubbles) simmering. You don’t want to boil the chicken but you don’t want the stock to cool down too much either. After 25 minutes, gently lift the chicken out of the pot, let the stock from the cavity drain back into the pot, and set aside temporarily.

Quickly bring the stock back up to a boil, add the chicken, this time breast-side up, then turn back down to low heat, barely simmering, and cook for another 20 – 25 minutes.

Meanwhile in a wok or skillet, heat the reserved chicken fat over medium low heat to render out the oil. You’ll want about 2 tbsp for the rice.

Have a big bowl of ice water ready for the chicken. The chicken is done when juices from the thigh runs clear. When it’s done, submerge it in the bowl of ice water to stop the cooking. This helps tighten the skin and makes it jelly-like and taste really, really good. Let it cool in the ice bath for 10 - 15 minutes, then take it out and cool to room temperature.

Bring the chicken stock up to a boil and skim off the excess fat and scum. Continue to boil and reduce the stock for a more flavorful soup.

Cooking the rice:
Heat the chicken fat in a skillet over medium heat and add the chopped white part of the green onion and rice. Toast the rice until each grain is evenly coated with fat and looks golden.

Stir in the ginger and minced garlic and cook for 30 seconds until fragrant.

Add 3 1/2 cups of chicken stock and transfer this mixture to a rice cooker. I have to admit I always let my rice cooker do all the work and consequently, I don’t know how to cook rice on the stovetop. But Chubby Hubby has some stovetop chicken rice instructions. After some research it seems like the gist is you bring the rice and stock up to a boil in a saucepan over medium or medium-high heat, let it boil until the water level gets down to the level of the rice. Decrease the heat to low, cover the rice and let it cook for 30 - 40 minutes.

While the rice cooks, chop the chicken into bite size pieces and slice the cucumber. Whisk together the dipping sauces. Ladle the stock into bowls and garnish with some sliced green part of the reserved green onion.

Serve the chicken with cucumbers, chicken rice, soup, and the 2 dipping sauces.

Sunday, May 13, 2007

Pasta Puttanesca


There aren’t many foods that I dislike but I recently discovered one: capers. The little buds are painstakingly harvested by hand so they seemed like something really special and delicious. I made some spaghetti puttanesca as my first caper dish and surprisingly, I couldn’t stand the taste of them. I can’t explain why I don’t like them, they just taste very alien to me. So if you’re like me and don’t like capers (but I may be alone in this), you can easily omit them from the recipe. But don't let me put you off capers, since many if not most people love them. One day I will give capers another chance, perhaps it's an acquired taste.

Puttanesca is a simple and very flavorful dish with plenty of healthy ingredients so it’s perfect for this month’s "Heart of the Matter" theme, pasta. Tomatoes are a great source of lycopene, a powerful antioxidant, and other compounds that help prevent cancer and heart disease. Studies have shown that the volatile oils in parsley inhibit tumor growth in animals and also neutralize harmful carcinogens. Olives are also a good source of monosaturated fats, omega-3 fatty acids, and vitamins A, C, and E. There is no meat, cream, butter, or cheese in this dish. Another way to make pasta even healthier is to sneak in some whole wheat pasta (Ronzoni is the best brand). I can get away with about 1 part whole wheat to 3 parts regular pasta before Steven notices a difference but I'm slowly trying to add more and more.

Spaghetti Puttanesca
Adapted from Cook’s Illustrated

2 garlic cloves
1/2 tsp red pepper flakes or substitute cayenne but use less (1/8 to 1/4 tsp)
2 tsp minced anchovies, about 4 – 5 fillets (or you can press the fillets through a garlic press)
1 14 oz. can of diced tomatoes, drained and reserve 1/4 C of the juice
1 Tbsp capers or more to taste, rinsed
1/4 C Kalamata olives, chopped
1 Tbsp olive oil
2 Tbsp minced parsley
8 oz. pasta of your choice
salt

Start by boiling water for the pasta. Start cooking the sauce when you add the pasta and salt to the boiling water.

Mix the minced garlic with a scant tablespoon of water. Add the garlic, anchovies, red pepper flakes to olive oil in a skillet and heat the mixture over medium heat. Cook until the garlic is fragrant and slightly blond but not brown, about 2 minutes. Add the drained tomatoes and simmer until it slightly thickens, about 8 minutes.

Drain the pasta when cooked.

Stir the olives, capers, and parsley into the sauce and toss with the pasta. If the mixture looks too dry, add in some of the reserved tomato juice. This dish is already salty enough from the olives and anchovies. Parmesan is not used to garnish this pasta.

Serves 2

Be sure to check the round up later this month at Ilva’s blog Lucullian Delights for more heart healthy pasta dishes.
Previous Heart of the Matter rounds for other great recipes.

Friday, May 11, 2007

Century Egg Tofu


Century egg tofu is my favorite way to enjoy these eggs. Silken tofu and century egg slices are drizzled with soy sauce (or soy paste) and sesame oil and topped with green onions and pork floss.

Soy paste is light soy sauce thickened with starch and sometimes sugar. The brand I use is Kimlan. It is used as dipping sauce because the thick consistency clings more readily to food. Using soy paste prevents the dish from being too runny but light soy sauce can be substituted (use less because it might be saltier) if you don’t have soy paste on hand.

Century Egg Tofu - Pidan Doufu
1 block silken tofu
2 century eggs
1 green onion, thinly sliced.
2 Tbsp rinsed and chopped preserved mustard stems (zha cai), optional
1 tsp vegetable oil
Approximately 1 1/2 Tbsp soy paste, to taste
1 tsp toasted sesame oil
About 3 Tbsp pork floss

Steam the block of silken tofu for 10 – 15 minutes and drain. This helps get rid of excess water in the tofu. Let it cool to room temperature and slice into 1/2 in pieces. Personally I like this dish to be at room temperature but it can be served cold too.

Cut the century eggs into slices. First cut in half lengthwise then each half into quarters and each quarter into 2 or 3 slices.

Heat 1 tsp of vegetable oil over medium heat and cook the zha cai for 1 or 2 minutes (if using). Then take the pan off heat and add the sliced green onions and let the flavor bloom in the hot oil. If not using the zha cai, heat up the oil and once hot, take the pan off heat and add the green onions to the hot oil.

To serve arrange the century egg slices on the tofu slices. Drizzle soy paste and sesame oil over the tofu and egg. Sprinkle the green onion (and zha cai) and pork floss on top.

Century Egg Congee


Congee is a porridge made from rice cooked in lots of water or stock. It’s a good way to use up the leftover rice from the previous day. The rice is cooked for a long time until it breaks down and the porridge thickens. It can be as thin as soup or as thick as oatmeal. Congee is very popular for breakfast because it is filling and warms the body. It is also a comfort food for someone who is sick, like chicken noodle soup. Congee is eaten with an assortment of dried, preserved, or pickled condiments. In century egg congee, chopped century eggs and ground pork are added.

Century Egg Congee
There’s no right or wrong way to make congee, since it’s a very informal dish so there's really no official recipe.

1 C leftover cooked rice
3 C water or stock (more or less depending on how thick you like your congee)
3 oz. ground pork, optional
1 green onion, separated into white and green part, then thinly sliced
2 century eggs, roughly chopped
1/4 tsp white pepper
1 Tbsp soy sauce
1/4 tsp sesame oil
Salt
Vegetable oil

Heat 1 tsp of vegetable oil in a saucepan over medium heat. Add the sliced white part of the green onion and ground pork. Brown the ground pork. Then add the rice, water, and white pepper and bring to a boil. Lower the heat to a simmer and simmer for an hour, stirring occasionally.

Add the soy sauce and sesame oil to the chopped century egg and let it marinade for the time you cook the congee.

If you want your congee thicker, add less water or cook it uncovered for a while and if you want it thinner, add more water. At the end of cooking, stir the century egg and sliced green part of the green onion into the congee. Cook for a minute to let it heat through. Salt to taste, then serve immediately.

Serve with condiments of choice like:
pork floss (rou song)
pickled bean curd
zha cai
bamboo shoots
wheat gluten

Century Eggs


Century egg, also known as thousand-year egg or pidan, is a type of preserved egg that is a Chinese delicacy. Unlike the name suggests the eggs are not hundreds of years old but rather only a few months old. Traditionally they were made by coating chicken or duck eggs in clay but nowadays the eggs are preserved with an alkaline mixture of salt, tea, lime, and wood ash. The preservation process results in the most peculiar metamorphosis. The shell looks speckled and aged making the egg seem like it's been buried for hundreds of years. The white becomes an amber colored jelly-like substance occasionally decorated with patterns that resemble snowflakes or pine tree branches. The yolk transforms into a grayish jade, creamy center. For the most part the white is tasteless but provides a springy texture to the soft yolk that takes on a pungent, savory, earthy, almost cheese-like flavor.

Century eggs are definitely an acquired taste. When I was young, my sensitive palate did not like the strong flavors of the egg yolk, which some would say is the best part, so I only ate the white. Now that I’m older, I love the yolk as well. Since century eggs are a delicacy, they are served in small quantities as an appetizer course. These eggs are also added to rice congee for century egg congee, a very popular breakfast dish. A Shanghainese dish, century egg tofu, combines the eggs with silken tofu.

Because the eggs give off an ammonia smell there is a myth that once upon a time, horse urine was used in making these eggs. However this is just a myth because horse urine is actually a bit acidic whereas you need an alkaline substance for the preservation. Sometimes lead oxide, an extremely dangerous neurotoxin, is used to speed up the preserving process. When buying these eggs, look for packages that clearly state no lead oxide. If the eggs have no clear statement, to err on the side of caution, avoid the eggs from China entirely. The eggs should be refrigerated and can be kept for a month. However, I have kept these eggs for several months in the fridge with no ill effects.

Recipes:
Century Egg Congee
Century Egg Tofu

Wednesday, May 9, 2007

Strawberry Lemon Bars


Spring is my favorite season. It marks the end of the long and dreary Seattle winter and welcomes an abundance of fresh fruits and vegetables. The other day I picked up some lots of strawberries; four pounds to be exact! At $4.88 how could I resist. Buying 4 pounds of strawberries is quite a gamble. Sure you can check the package for mold or squished berries but you can’t see the ones buried in the middle and you certainly can’t taste the berries. When I got home, I sorted through them and I was astonished to find not a single moldy, mushy, squished, or injured berry. Most were a dark ruby red, with only a few slightly under-ripe berries. As I inspected each berry, I couldn't help but notice that strawberries have the most amazing floral and fruity fragrance. I froze half, ate quite a bit (they were sweet too), and baked with the rest.

These strawberry lemon bars were inspired by strawberry lemonade. If a regular lemon bar is like lemonade, I wondered if I could achieve the same delicate pink color and interplay of strawberry and lemon flavors of strawberry lemonade in a lemon bar. Originally, the plan was to mix strawberry puree with the lemon bar filling. Then Steven asked if I was going to make strawberry swirls, like swirls in cheesecakes. I thought, ya know that’s not a bad idea! It definitely made more sense than mixing it all together because if I mixed the strawberries into the filling I would get orange not a delicate pink due to the very yellow egg yolks. But of course ideas always sound really good on paper or in my head but reality can prove to be different. I envisioned picture perfect swirls of dark red in a sea of bright yellow. When I started making the lemon bars, I realized that the filling is actually really thin. So when I plopped the strawberry puree in, they didn’t exactly swirl like I planned. They ended up just floating around on top of the filling. Hmm... Oh well! So I ended up haphazardly swishing it around. Sure they aren’t as pretty as I pictured them but the important thing is that they taste good! Just like a glass of strawberry lemonade. Mission accomplished!


Strawberry (Swirl/Swish) Lemon Bars
(Adapted from Cook's Illustrated Lemon Bar recipe)

Crust
7/8 C all-purpose flour
1/3 C confectioner’s sugar
2 Tbsp cornstarch
A pinch of salt
6 tbsp unsalted butter, cold and cut into 1/2 in cubes

Lemon Filling
2 large eggs
2/3 C granulated sugar
1 1/2 Tbsp flour
1/4 C lemon juice, from 2 lemons
2 tsp lemon zest, from 2 lemons
2 Tbsp milk
A pinch of salt

Strawberry Puree
1 C chopped strawberries
1 – 2 Tbsp granulated sugar, depending on how sweet the berries are

Mix the chopped strawberries with sugar and set aside to macerate for about 30 minutes. I used about 1 1/2 tbsp of sugar.

Add the flour, confectioner’s sugar, cornstarch, and salt in a food processor. Blend the ingredients together for a few seconds to mix evenly. Then add the pieces of butter and pulse until the mixture is pale yellow and looks like coarse cornmeal. If you don’t have a food processor you can use a fork, a pastry blender, or even your hands to cut the butter into the flour. Cook’s Illustrated recommended freezing the butter then grating it into the flour and using your hands to rub the pieces between your fingers.

Line a 8 x 8 in baking pan with a sheet of parchment. Press the crust mixture into an even 1/4 in layer in the pan bottom and about 1/2 in up the sides. Chill in the fridge for 30 minutes.

When you finish making the crust the fruit should almost be done. Blend the strawberries in a food processor (for a few seconds) or mash with a fork until there are no large chunks. Cook over medium heat for about 5 minutes until thick. We need to cook out some of the moisture in the puree so it gets more syrupy. Set aside to cool.

Preheat the oven to 350ºF and after the crust finishes chilling, bake for 20 minutes, until golden brown.

You can prepare the filling while you bake the crust. Whisk the eggs, sugar, flour and salt in a bowl until the sugar dissolves. Then whisk in the lemon juice, zest, and milk.

Reduce the oven temp to 325ºF, pour the filling into the crust. Drop spoonfuls of the strawberry mixture on the surface. Use spoon or knife swirl/swish the strawberry puree into the filling.

Bake for about 20 - 22 minutes, until the filling feels firm when touched lightly.

Cool to room temp, dust with confectioner’s sugar and serve.

I made these for Meeta’s Monthly Mingle, A Taste of Spring.


Tuesday, May 8, 2007

Greek Meatballs


Steven and I love gyros but making the meat at home is a bit challenging since we don’t have a vertical rotisserie. I figured Greek style meatballs would be the next best thing. We ate them on warm pita breads with chopped lettuce, tomatoes, sautéed onions, and tzatziki sauce; pretty close to a gyro.

Greek Meatballs - Keftedes
1/2 lb lean ground beef
1/2 lb ground lamb
Half a medium onion, finely chopped
1 slice of bread, crust removed, pulsed in a food processor or cut into small cubes
1/4 C milk
2 cloves garlic, minced or pressed
Zest from 1 lemon
1 egg
1 tsp dried oregano
1 Tbsp fresh dill or mint, finely chopped (I had some dill leftover from the tzatziki sauce)
2 to 3 tbsp fresh parsley, finely chopped
1/2 tsp black pepper
About 3/4 tsp salt, to taste

1/2 C or more dried breadcrumbs
Vegetable oil

Heat 1 tsp of vegetable oil in a skillet over medium high heat and cook onions until softened. Remove from heat and stir in minced garlic.

Mix the onions and garlic together with the other ingredients except for the dried bread crumbs and vegetable oil.

To form the meatballs, instead of rolling them individually by hand, use this really cool method I learned from Rachel’s blog, Coconut & Lime:

Sprinkle your work surface with some bread crumbs. Roll about a cup of the meat mixture out into a log then cut into pieces about 1 tbsp for your mini meatballs. Then place the pieces into a wire mesh strainer and sprinkle some more bread crumbs over them. Toss and roll the meatballs around in the strainer over a bowl and you’ll have lightly-coated, perfectly round meatballs. You can reuse the breadcrumbs in the bowl for the rest of the meatballs, then throw away the excess in the end.

Heat about 1 tsp of oil in a nonstick skillet over medium heat. I didn’t use very much oil because the meatballs exuded quite a bit of oil. If you find that your meatballs are dry, add more oil so they don’t dry out or burn. Brown all sides of the meatballs until they are fully cooked, about 10 minutes.

Makes about 20 meatballs.

Links:
Check out Elise's recipe for Greek meatballs
Kalyn also has another recipe for Greek meatballs. The addition of feta is a great idea! I'll have to try that next time.

Tzatziki - Weekend Herb Blogging


For this week’s Weekend Herb Blogging, I’m using the delicate and feathery, dill. Dill, like parsley, is a member of the carrot family. The leaves are used as an herb and the seed is used as a spice. The larger stems are often tough and woody but they can be saved and tossed into a soup for a light flavoring. Dill is used with salmon, soups, vegetables, and rice all over Europe and Asia. It is also one of the main components in Tzatziki sauce.

Tzatziki is a very popular Greek sauce and appetizer. The word is derived from the Turkish word for “chutney.” It is a mixture of strained yogurt, or Greek-style yogurt, cucumbers, seasoned with olive oil, garlic, vinegar or lemon juice, and herbs. The sauce is traditionally served with pita bread as an appetizer and is the condiment of choice for gyros. I used this with some Greek meatballs.

Tzatziki Sauce
16 oz. Greek style yogurt*
1 cucumber, washed and peeled
3 - 4 cloves garlic, minced or pressed
1 Tbsp extra virgin olive oil
1 Tbsp lemon juice
1 1/2 to 2 tbsp chopped fresh dill
1/2 tsp salt

*Greek style yogurt is much thicker and richer than normal yogurt. If you can’t get a hold of it you can make your own. Place some plain yogurt in a cheesecloth, tie up the edges and hang it over a bowl or place the cheesecloth in a strainer over a bowl in the fridge for a few hours.

Cut the cucumber in half lengthwise and scrape out the seeds with a small spoon. Then coarsely grate the cucumber.

Gather the grated cucumber in a cheesecloth or paper towel and squeeze out the excess water, otherwise the tzatziki will be too runny.

Mix the grated cucumber with everything else.


This week’s WHB is hosted by Pat of Up A Creek Without A Patl.

Sunday, May 6, 2007

Honey Walnut Prawns


When I was a teenager, there were some foods I did not like; one of which was mayonnaise. To me it tasted weird and when I found out what it was made from, raw egg yolk and oil, I wondered how anyone could like something so strange (seemed icky too). Now that I'm older, I’ve come to appreciate things like fats, raw foods, and mayo. Mayo definitely has its place. A BLT wouldn't be the same without a thin layer of mayo and there would be no potato salad, egg salad, or honey walnut prawns if there was no mayo. Honey walnut prawns is a very popular dish in many Chinese restaurants. It may not be an “authentic” Chinese dish but that doesn’t matter to me because it’s really tasty. When I first tried it a few years ago, I was a bit hesitant due to my no-mayo policy but I liked it so much, I gave mayo a second chance.

Honey Walnut Prawns
1 lb large shrimp, peeled and deveined
1 Tbsp Shao Hsing rice cooking wine
1/4 tsp white pepper
1 egg white
1/2 tsp salt
1/4 C corn starch
Oil for frying

Sauce:
1/4 C mayo
2 tsp honey*
2 tsp rice vinegar
1/4 tsp Salt

Glazed Nuts
3/4 C walnuts or pecans halves
2 tsp honey*
Scant tsp water
Sliced lettuce and or toasted white sesame seeds for garnish
*Honey is a pain in the butt to measure so I just eyeballed the amounts

Beat the egg white until lightly foam. Toss the shrimp with rice wine, white pepper, beaten egg white and salt. Let marinate in the fridge for 15 to 30 minutes.

To make the glazed nuts, mix the honey with a bit of water until its smooth and liquidy but not too thin. Toss the nuts with the honey glaze and spread into an even layer on a baking sheet. Bake at 300ºF for about 15 minutes, toss them every 5 minutes. They’ll crisp up when they're completely cool.

For the dressing, whisk all the ingredients together and set aside.

While the oil is heating, dredge the prawns in cornstarch. Heat oil to 350ºF and fry the shrimp for 2 minutes. I didn’t deep fry the shrimp, just pan fried them. Remove and drain on a paper towel lined plate. Then fold the mayo dressing with the shrimp.

To serve, add the shrimp on top of a bed of shredded lettuce and sprinkle with candied nuts. Garnish with toasted sesame seeds and a spring of cilantro (optional).

Serves 4.

Thursday, May 3, 2007

Gruyere Gougeres - A Taste of Yellow


jump to the new blog for gougere recipe

How to Cut Up A Whole Chicken

There are a few benefits to cutting up a whole chicken yourself as opposed to buying the parts separately. You can save some money since whole chickens cost less, you have better control over how your chicken is butchered, and the scraps can be kept for chicken stock. To do this, you’ll need a large cutting board with a gutter for the juices, a sharp chef’s knife, and a pair of kitchen shears. For further deboning (for example for deboning a chicken breast) a boning knife gives you more control and maneuverability. With a bit of practice, a whole chicken can be done in less than 5 minutes, but always be careful!

Disclaimer: This guide contains multiple pictures of chickens and chicken parts, so if you are uncomfortable with seeing this, please don't read the rest of the guide.

Wash the chicken and remove the giblets. Save the neck for stock.


Lay the chicken breast up on your cutting board with wings closest to you (the above picture the wings are away from me so I turned the chicken 180 degrees). To separate the wings, cut a little bit into the breast to expose the wing joint. Here in the picture you can see the wing joint.


Once you can see the wing joint, pull the wing back so you expose more of the joint and see better. Then cut through the joint.


Repeat for other wing and now you have 2 whole wings. Cut the wingtip off and reserve for stock.


Cut through the second joint to separate the wingette and drummette. You can save these for buffalo wings or other dishes.


The legs are attached to the body of the chicken only by the leg joint and some skin and connective tissue. Sometimes the body is already starting to separate from the legs so just cut through the skin. The red circled area highlights where you should cut on the skin. You can see on my chicken the legs are already very separated from the body.


Once you cut through the skin, pry the leg away from the body.


Then bend the leg back to pop out the leg joint.


Cut through this joint but cut as close to the backbone as possible, you don't want to lose the tasty thigh meat, and now you have a leg quarter. Repeat for the other leg.


Flip the leg quarter over, skin side down. You’ll notice a line of fat, this line separates the drumstick from the thigh. Cut down to expose the joint, then cut through the joint and now you have a drumstick and thigh. Repeat for the other leg.


Now turn the chicken over, breast side down.


Using kitchen shears, cut out the backbone. Kitchen shears are much safer for this than a knife because a knife can slip. Save the back bone with the neck and wing tips for stock.


Now you have a bone in chicken breast. Skin side down, cut the breast in half for 2 chicken breasts. You can use a cleaver or a chef’s knife. You’ll need to cut through some bone; this is the most difficult part, so be careful! Now you have 2 bone in, skin on chicken breasts.


(my camera ran out of batteries here)

For further boning, use a small boning knife and make cuts as close to the breastbone as possible to debone the chicken breasts. Remove the skin and now you have 2 boneless skinless chicken breasts.

*a note about chicken breasts: There is a smaller muscle that is attached to the chicken breast, the tenderloin muscle. Sometimes this part tends to fall off from the rest of the breast. This is okay, for example when you're preparing chicken cutlets it's best to remove this piece and save it for stir fry or something else because it usually comes off when you pound the chicken breast.

After you are done cutting up the chicken, wash your cutting board and all other equipment with hot soapy water, then disinfect it with a solution of dilute bleach. This is the best way to kill all the bacteria.

Links:
Cutting up whole chicken at Cooking for Engineers.

LinkWithin

Blog Widget by LinkWithin