
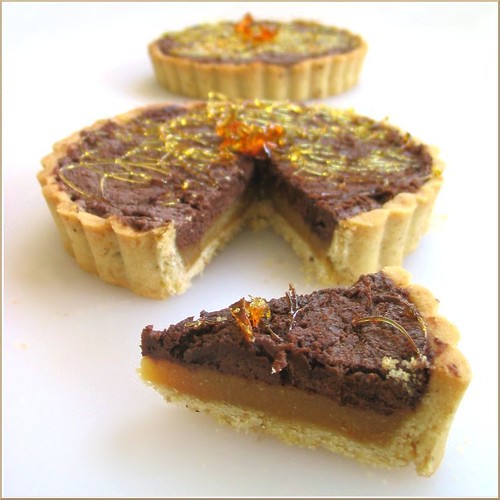
I have already professed my affection for tarts so when Veronica and Patricia unveiled this month’s Daring Baker challenge featuring the heavenly combination of chocolate and caramel, it was love at first sight. Their luscious selection from Eric Kayser's Sweet and Savory Tarts
 is made with a chocolate shortbread crust, caramel filling, and a layer of chocolate mousse. Bettina (Steven’s little sis) and I had planned to make it together, but things kept coming up and pretty soon she was getting ready to leave for college again. It was the last week of August and Steven said, “Hey... don’t you have to do your Daring Baker thing soon?” I’ve been feeling a little under the weather lately but managed to set aside some time to make the tart just yesterday. If you've been checking out all the beautiful tarts made by my fellow DBs (you can find them here, you’ll notice that there are a few things wrong with my tart but hopefully I will answer all your questions.
You can find the complete recipe on Veronica's or Patricia's blogs.
Part 1: The Crust
The original recipe made enough for three 9 1/2 in square tarts or 10 in round tarts. I decided to make some little tartlets so I made 1/4 of the original recipe (it was easier to scale down by 4 than by 3). One thing that struck me as rather odd was the addition of cinnamon in the crust, and quite a bit of it too. I had never heard of combining cinnamon, chocolate, caramel, and hazelnut. Luckily Veronica said we could omit the cinnamon, which I chose to do because I’m not the biggest fan of it and many DBs felt the flavor was just way too overpowering in this case. Here are the ingredients I used for the crust:
Chocolate Shortbread Pastry
4 Tbsp butter
1/4 C + 1 1/2 tsp powdered sugar
2 Tbsp ground hazelnuts (I toasted some at 350F, rubbed the skins off, and ground them in the food processor)
1/2 beaten egg (I beat an egg and measured out half)
1 C + 2 Tbsp cake flour
1/2 tsp baking powder
1 tsp cocoa powder
Optional: 1/2 tsp cinnamon (I omitted this)
In a food processor or stand mixer cream the butter.
Add the powdered sugar, ground hazelnuts, and cinnamon if using, and mix.
Beat 1 egg and measure out half of it, add it the food processor or stand mixer and mix it into the butter.
Sift in the flour, baking powder, and cocoa powder, and mix well.
Form the dough into a ball and chill overnight.
Preheat the oven to 325F. Roll out the dough and line the pan. Bake for 15 minutes.
Another thing you’ll notice is that although it’s suppose to be a chocolate shortbread crust, the amount of cocoa powder the recipe calls for is very tiny (original recipe called for 1 1/2 tablespoons and for the proposes of my scaling, I rounded down to 4 teaspoons). I scrounged around the pantry for the cocoa powder I rarely use and it looked absolutely ancient, must have been a few years ago. I didn’t trust the quality of the cocoa powder to use it so as a result, my crust is pale blond and not the pretty shade of chocolatey brown like it should be.
After the chill overnight, I went to roll out my dough. While it was very easy to roll out, when it came time to lift the dough into my tartlet plans, it cracked and broke into pieces. Not pretty. I was able to use a bench scraper to lift the dough into the tartlet pans and push together the pieces of the crust. I can only imagine the nightmare this dough caused when attempting to lift the whole thing into a larger tart pan.
Part 2: The Filling
Caramel Filling
1 C sugar
1 C heavy whipping cream
4 Tbsp butter
2 eggs
1 egg yolk
2 1/2 Tbsp flour
Although I only made a quarter of the dough recipe, since I was going through all the trouble, I made the full caramel filling recipe. Plus, extra caramel is an added bonus. The caramel making was a bit of a fiasco but in the end it turned out okay - it wasn't a complete failure. I started by taking my butter and cream out of the fridge so they could warm up to room temp. I poured the sugar into a saucepan and placed it over medium heat. There are two ways to make caramel, the dry method, which is just sugar in a pan (method called for in the recipe), and the wet method, which is sugar with some water and corn syrup. The dry method is more difficult because the sugar can burn easier, whereas the water and corn syrup in the wet method helps to stabilize the sugar. I didn't have any corn syrup on hand, so I decided to try my luck with the dry method. I really had no idea what I was doing. I started to panic, “Oh no what if the sugar on the bottom is burning, I better stir it!” and as soon as I stirred it, the sugar clumped up and stuck to my spoon, to the sides and bottom of my pot; it was a mess.
I kept the pot over low heat and slowly it began to change colors. However, I thought the sugar was getting too dark, and I panicked again. “Oh no, I think the sugar is getting too brown, should I add the cream? But not all of the crystals have melted yet.” So to prevent the sugar from get any darker, I added the cream and the whole thing immediately seized. At this point what I had was very light brown colored cream with crystallized sugar stuck to the sides of the pot and caramelized sugar stuck on my spoon and floating in the cream soup like pieces of amber glass.
Again I kept the mixture over low heat and the sugar was slowly starting to melt into the cream. Maybe the light was playing tricks on me but I thought now the cream was getting too brown. Cue panic attack 3. “Oh no maybe I should add the butter, maybe I should just strain what I have into the flour and egg mixture.” So I added the butter, turned the heat up to medium low so the caramel was barely bubbling. At this point, it had already been 45 minutes into the caramel making process and my patience was wearing thin but now things started to take a turn for the better! The caramel started to thicken up really nicely, the sugars on the bottom and sides of the pot started melting, and after what seemed like an eternity, I had relatively chunk-free, thick, gooey caramel. The strange thing is, it didn’t look very dark anymore, rather, it looked a bit too light. As I let it cool, I slowly sifted and whisked the flour into the eggs. When the caramel was cool enough, I tasted a spoonful and my god this stuff was delicious (well with a whole cup of sugar and cream and half a stick of butter what wouldn’t taste good?). I whisked the egg mix into the caramel and then poured the mix into the baked tart crusts half full (ended up using only half the caramel mixture) and baked them at 325F. The filling firmed up quite nicely in the oven after about 10 minutes.
Part 3: The Mousse
Chocolate Mousse
1/2 C heavy cream
3 1/2 oz. milk chocolate
Uh oh... I don’t have milk chocolate! Because I wasn’t feeling well that day, I didn’t want to go down to the store just for some chocolate. I know we weren’t suppose to use dark chocolate (I’m sorry Veronica) but I used the bittersweet chocolate in my pantry and that explains why my mousse is such a dark brown. I melted the chocolate and while it was melting I whipped the cream to stiff peaks. I was afraid my chocolate was too hot and would deflate the cream so I waited for it to cool. I waited... and waited... and waited... and by the time I finally added the chocolate to the cream, I had waited too long. As I began to fold it into the cream, the chocolate solidified into chunks and streaks in the cream and the mousse became very grainy and weird. I spread it on top of the caramel filled tarts and after an hour or so in the fridge, the mousse solidified into a thick, grainy, chunky mess. It definitely didn't look like the light brown, airy mousse in the picture from the cookbook. I had originally planned to pipe some decorative stars on the tart, but the mousse was so stiff and gross, it wasn’t pipeable at all; luckily it still tasted good. Ironically, I completely screwed up the easiest part of the tart.
As for the sugar decorations on top, I melted some more sugar and this time I resisted the urge to stir it (just the occasional gentle swirl) and it melted into an even amber color without any crystallizations.
The Verdict:
In the end, I don’t think I did proper justice to the tart because I totally failed at making the mousse. The crust was a little difficult to work with but it was tasty and I liked the subtle hazelnut flavors. I should have bought some new cocoa powder for it. I panicked multiple times about burning the sugar, but I don’t think I caramelized my sugar enough because the filling didn’t have enough caramel flavor. When I sliced into the tart, it looked a little light compared to the darker, richer hues of other DB’s caramels. Lastly, I really shouldn’t have used dark chocolate for the mousse because the intense chocolate flavor completely overpowered the very light caramel flavor of my filling. Perhaps if my caramel had a stronger and more developed flavor then it could properly stand up to a dark chocolate mousse. In the end the tart was still really delicious. I was able to make 4 6 in tartlets and we gobbled them up so quickly there’s only 1 left! I will most definitely make the caramel filling again and try my hand at the mousse again too.


 . When you eat rice at least once a day, perfectly cooked rice is important, downright crucial! Bad rice can ruin a meal. I mean c'mon, who doesn't want a machine that serenades you with "Twinkle Twinkle Little Star" when it's finished cooking each grain of rice to fluffy perfection with its Fuzzy Logic "electronic brain." Ah alas, the catch? The $180 price tag. Oh well, practicality wins out over extravagance (but here's something that's definitely going on the wedding registry some day).


