Sunday, March 30, 2008

Dorie's Perfect Party Cake

Dorie's Party Cake

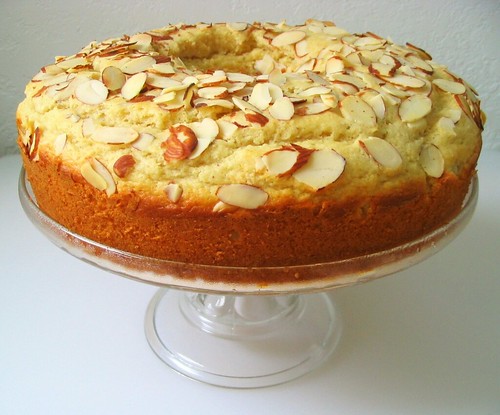
This year when Steven and I celebrate our birthdays together in July, I want to bake an extra special cake for the two of us. I don't make many layer cakes because I think they're too fussy to make and frost. I'm more of a muffin/quick bread kind of gal where I only need two bowls and don't have to bust out the KitchenAid. But I just can't resist the sheer beauty and elegance of a pristine white layer cake with buttercream frosting. There's really no substitute for a tall layer cake for a special occasion so I need to get as much practice in as possible before making the official birthday cake. I don't want to screw up like last year because screwing up a birthday cake is something I never want to do again. A white layer cake something I've always wanted to make, it's even on the list! So when Morven chose Dorie's Perfect Party Cake, I really couldn't have asked for a more perfect challenge.

Dorie's Party Cake

We had a lot of flexibility this month. We could play around with the cake flavor, the fillings, and the buttercream flavors, as long as we stuck to Dorie's basic recipe for the cake and frosting. At first glance, I was shocked by the amount of butter and sugar the entire recipe called for: a full POUND of butter and 2 1/2 cups of sugar (not counting the sugar in the preserves). Oh my! I didn't mess with the butter content but I simply couldn't put 1 1/2 cups of sugar in the cake alone! First I scaled down the recipe by 3/4 for my 8 inch cake pans and then decreased the sugar to 3/4 cups. I tasted a piece of the cake and it was sufficiently sweet so I can't imagine how cloyingly sweet it would have been if I had used the full amount. Many Daring Bakers had an issue with the cake not rising very much and I ended up with the same problem. I used cake flour and followed the instructions to a T and yet my cakes did not rise very much at all. After baking, the layers were about 1 inch high. I worried that my cake would end up like my first chiffon cake, dense and rubbery. I cut off a tiny piece and surprisingly, the interior of the cake was light and fluffy and tasted amazing, it just didn't rise very much. Odd but nothing catastrophic. I compared the recipe to a Cook's Illustrated recipe for white layer cake and found that CI used the same amount of flour, more butter, but also more baking powder and eggs whites. Maybe next time I should try adding a little more baking powder?

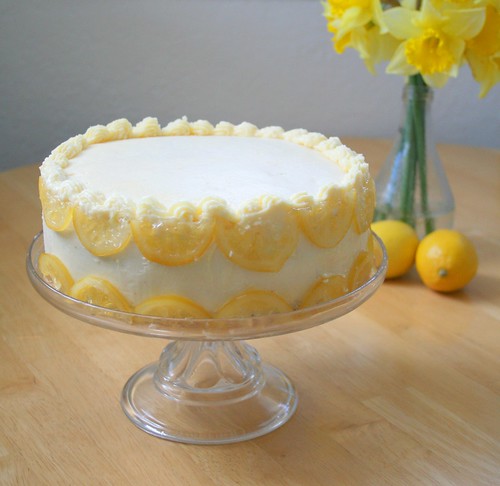
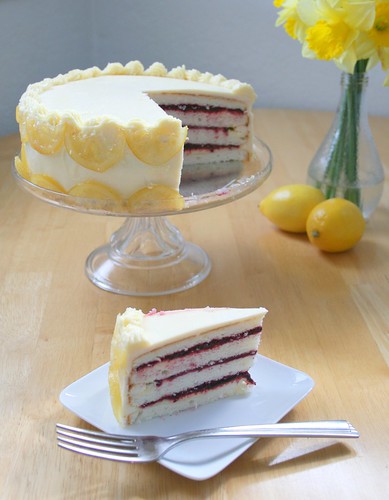
I knew I wanted to fill the cake with blackberry jam because I still had a huge gallon size bag of blackberries in the freezer from last summer that I needed to use (to make room for strawberry season). With my recently purchased shiny new food mill, I was able to make seedless jam since the first thing Steven did the last time I made jam was complain about all the seeds. I kept the lemon flavor in the cake because I think it pairs very well with blackberry. Instead of filling the cakes with buttercream and preserves, I boosted the lemony flavors of the cake by making Pierre Herme's lemon cream, also found in Dorie's book, to go inside. I still made the buttercream to frost the outside of the cake but since I had a 8 inch cake and no longer needed it to fill the cake, I only made half the recipe, just enough to frost the outside of the cake. Finally I made some candied lemon slices to decorate the outside. I used my new frosting spatulas that Bettina got me for Christmas for the first time (yay thanks Bettina!). This was my first time frosting a layer cake and all I can say is I definitely need more practice frosting cakes. Even though I did a crumb coat to seal in any loose crumbs, I still ended up with some crumbs on the outside of the cake. Oh well, go figure. And I spent a good 5 minutes trying to get the exterior to look perfectly smooth, but I gave up in the end. I planned to do a shell border on the top and bottom of the cake but only had enough frosting for a top border. At first the buttercream was too cold so it was difficult squeezing it out through the tip, then it started to melt from the heat of my hands and got a little too liquidy. I ended up with only half a dozen perfect shells, the rest were either chunky or blobby. It's okay, practice practice.

The cake was absolutely delicious. The blackberry and lemon flavors were perfect together. The cake was light and the frosting was sinfully creamy. I had 2 slices and then I realized I had just ingested roughly half a stick of butter. Eek! Better not think about that and just concentrate on how yummy it is. This is definitely a cake I will be making over and over for special occasions; it really is the perfect party cake.

I think everyone did the cake a little differently this month so be sure to check out all the great cakes by going to the Daring Baker Blog Roll

Dorie's Perfect Party Cake: Lemon and Blackberry
from Dorie's Baking: From My Home to Yours
Lemon White Cake (for 2 9inch pans)
2 1/4 C cake flour
1 Tbsp baking powder 1/2 tsp salt
1 1/4 C whole milk or buttermilk (I used buttermilk, Dorie says she prefers this with the lemon)
4 large egg whites
1 1/2 cups sugar
2 tsp grated lemon zest
1 stick (or 1/2 C or 4 oz.) unsalted butter, at room temperature
1/2 tsp pure lemon extract (I used some vanilla extract)

for 2 8 inch pans
1 2/3 C cake flour
2 1/4 tsp baking powder
1/4 tsp salt
1 C whole milk or buttermilk (I used buttermilk, Dorie says she prefers this with the lemon)
3 large egg whites
1 1/4 C sugar (<- oh my god that is so much sugar, I used 3/4 C and the end result was fine)
1/4 tsp pure lemon extract (I used 1/2 tsp vanilla extract)

For the Buttercream (I made half of this recipe)
1 C sugar
4 large egg whites
3 sticks (12 ounces) unsalted butter, at room temperature
1/4 C fresh lemon juice (from 2 large lemons)
1 tsp pure vanilla extract

For Finishing
Lemon Cream Filling
2 tsp lemon zest
1/3 C sugar
2 large eggs
1/3 C lemon juice
8 (1/2 C or 4oz.) unsalted butter, very cold cut into 8 slices

Blackberry preserves (I had some homemade)
(I skipped the coconut on the outside)

Getting Ready
Preheat the oven to 350 degrees F and adjust a rack to the center position. Butter 2 8 inch (see adjusted recipe for 8 inch pan) or 9 inch cake pans and line the bottom with a round piece of parchment paper. Set aside.

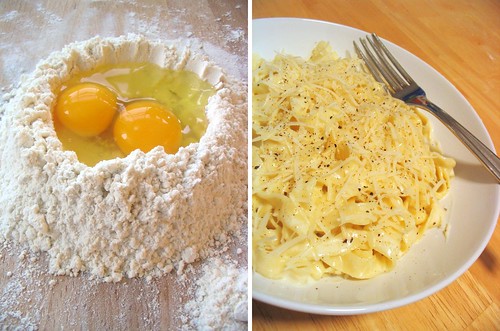
Sift together the cake flour, baking powder, and salt. Whisk the egg whites with the whole milk or buttermilk. Put the sugar and lemon zest in a mixer bowl and rub them together with your fingers until the sugar feels moist and smells lemony.

Using either the whisk or paddle attachment, add the butter to the sugar and beat at medium speed until the sugar and butter is fluffy and light, 3 full minutes.

Beat in the extract, then lower the speed and add one third of the flour mixture. If you continue to mix on medium you'll get flour poofing out. The add half of the milk-egg mixture, then beat in the rest of the dry ingredients, mix until incorporated. Finally add the rest of the milk-egg mixture and beat for a full 2 minutes on medium speed to insure that the batter is homogeneous and aerated.

Divide the batter evenly between the two prepared pans and smooth out the top. Bake for 30 - 35 minutes (or 25 - 30 minutes for 8 inch cakes) or until a toothpick inserted in the center of the cake comes out clean. Check early.

Transfer the cakes to cooling racks and cool for 5 minutes, then remove them from the pans, peel off the parchment liner, and cool the cakes to room temperature (the cooled cake layers can be wrapped airtight and stored at room temperature overnight or frozen for up to two months).

To Make the Lemon Cream Filling
Bring a saucepan of water to a simmer. Place the sugar and lemon zest in a mixer bowl or heatproof bowl and rub the two together with your fingers until the sugar is moist and lemony. Whisk in the eggs, followed by the lemon juice. Place this ontop of the pan of simmering water and whisk constantly until the mixture reaches 180 degrees. As it approaches 180 degrees it will thicken considerably and the whisk will begin to leave tracks. Be very diligent about checking the temperature at this point. As soon as it reaches 180 degrees take it off heat. With a rubber spatula, scrape the mixture into a blender or food processor and let it cool until it is 140 degrees, this will take about 5 - 10 minutes. When the mixture has cooled, turn on the blender or food processor and with it running, add 3 1-tablespoon pieces of butter at a time, waiting until each addition has been incorporated before adding more. Blend for a full 2 minutes to emulsify and aerate the cream. Chill it in the fridge for 30 minutes before working with it. It will store overnight but you will need to let it warm up and soften before you can work with it.

To Make the Buttercream (I made half of the recipe)
Bring a saucepan of water to a simmer. Put the sugar and egg whites in a mixer bowl or heatproof bowl and place this bowl over the pan of simmering water. Whisk constantly until the mixture feels hot to the touch and the sugar has completely dissolved, about 3 minutes. The mixture will look white and shiny like marshmallow cream.

Using the whisk attachment, beat the meringue on medium speed until it is cool, about 5 minutes. It will become very white, fluffy, and sticky. Switch to the paddle attachment and add the butter one stick at a time. Since I was only using 1 1/2 sticks I added 1/2 a stick at each time. Beat the buttercream until it is thick, fluffy, and smooth. At some point it will curdle but don't worry, this is normally and with continued beating it will come together. Gradually add the lemon juice, making sure each addition is absorbed before adding more and finally add the vanilla. I don't know how well buttercream keeps in the fridge. It is best to work with it right after you make it. You can make the cakes and filling ahead of time, but make plan to make the buttercream and finish the cake on the same time. However after frosting the cake you can refrigerate it for 2 days or freeze it for a month.

To Assemble the Cake
Using a serrated knife, gently saw each cake layer into two layers. I like to first slice an outline around the perimeter of the cake then work my way in.

Dab a little frosting in the middle of a cardboard cake round or a cake plate and center the bottom layer cut side up. The frosting will act as the glue so the cake doesn't skid around when you are trying to frost it.

Spread 1/3 of the lemon cream on the layer. Then spread blackberry preserves on top. Place the top cake layer, cut side up. This way the domed top will be face down. Repeat with the spreading of the lemon cream and blackberry preserves. Now place the top layer of the second cake layer cut side up. Repeat with the filling, then filling place the final layer cut side down, the bottom of the cake layer should be facing up.

First apply a thin layer of frosting all around the cake as the crumb coat. This helps seals in all of the crumbs that you don't want on the outside of your cake. Then, use the remaining buttercream to evenly frost the outside of the cake. If you have any leftover frosting you can pipe designs on the outside. I made some candied lemon slices for the outside of the cake.

Storing
The cake is best the day it is made, but it will keep well covered and refrigerated for up to two days or you can freeze the cake (freeze it solid then wrap it well) for up to two months (defrost it well wrapped in the fridge overnight). Bring it to room temperature before serving. I find that the buttercream tastes the fluffiest the day it's made.

Playing Around
You can use whatever flavors or fillings your heart desires and decorate the cake however you like. In the original recipe, Dorie covered the outside of the cake with coconut but but you can also used grated chocolate, chopped nuts, or fresh berries.

Saturday, March 29, 2008

Citron/Yuzu Spread

Citron/Yuzu Spread
Whenever I go to Trader Joe's, I rarely walk out of there without buying at least half a dozen things that weren't on my shopping list. This citron spread was one of those products that caught my eye.

I've been using citron and yuzu to refer to the same fruit but after doing some research, I was surprised to discover that yuzu and citron are actually two different types of citrus. Yuzu (Citrus ichangensis x Citrus reticulata var. austera) is a cold hardy Asian citrus fruit that originated in China and then introduced to Japan and Korea. Citron (Citrus medica) on the other hand, is a different species that most likely also originated in Asia, but was subsequently spread throughout the Mediterranean. I was searching for the difference in flavor between the two fruits but it was difficult to find a comparison because many people, like myself, and resources use the names interchangeably. Even my jar says "Citron (Yuzu) spread", so now I'm not sure whether it's made with citron or yuzu. My guess is that the flavors are comparable. Yuzu has been a part of Japanese and Korean cuisine for quite some time but recently it has come to the attention of the Western food world and is now all the rage.

Yuzu is rarely eaten as a fruit but both the juice and zest are prized in cooking. The fruit bears very little juice, so it's very precious. The tart lemon-like juice with hints of lime, grapefruit, and pine forms the base of the Japanese dipping sauce, ponzu. The powerfully aromatic zest is used as a garnish on soup. It is also working its way into many sweet applications like cakes and sorbets. A spoonful of yuzu marmalade, similar to the spread I bought, is swirled into hot water to make a Korean drink called yuja cha, used as a remedy for the common cold.

Fresh yuzu are about the size of a small orange and are in season from November to May and can be found at at Japanese or Asian markets but they will be rather pricey ($3 - $4 each). The bottled juice can also be found at Asian markets.

So far I've used it as a glaze on scallops and as a filling in Asian rugelach. As Wandering Chopsticks suggested, it would be great on fish as well. And to satisfy your sweet tooth, Tartelette has wonderful yuzu recipes like this cheesecake or berry salad.

Wednesday, March 26, 2008

Seared Sea Scallops with Yuzu Ginger Glaze on Greens with Miso Sesame Dressing

Seared Sea Scallops with Yuzu Ginger Glaze and Miso Sesame Dressing
I'm slowly making progress on my list. I cooked scallops for the first time the other day and I didn't screw up and turn them into little hockey pucks! Hooray! I usually don't make these type of fancy-pants dishes with mile long names but this one was truly stellar. Now that I know how to sear scallops, I can make this dish for company because it looks and sounds super gourmet. ;) But just between you and me, it's as simple as plating some prewashed bagged greens, whisking together a dressing, and searing the scallops in literally 2 minutes. You don't even need the yuzu ginger glaze but it does add a nice "flavor profile". The dressing itself is my new favorite and it's a nice change from the vinaigrettes I usually make. After seeing how easy it is to cook scallops, now I don't have to pay $15 for a tiny plate of salad or deal with an inattentive waiter, I just get the beau to do the dishes.

Seared Sea Scallops with Yuzu Ginger Glaze on Greens with Miso Sesame Dressing
Serves 4 as an appetizer

1 1/2 pound sea scallops 10/20s (10 - 20 per pound)
Salt and pepper
Vegetable or canola oil

Yuzu ginger glaze
2 Tbsp yuzu marmalade
1/2 tsp grated ginger
Water

Miso Sesame Dressing
1 Tbsp miso (yellow or white)
1 Tbsp mirin
1 Tbsp rice vinegar
1 Tbsp mayo
1 tsp sesame oil

Salad
7 oz. salad greens: mixed greens, baby arugula, baby spinach, or watercress will all work (may not need the whole bag)
2 Tbsp sesame seeds (white, black, or combination), toasted in skillet

Since the scallops cook in literally 2 minutes, the prep for the rest of the dish must be done before you begin cooking the scallops. The dressing and glaze can be made ahead of time.

Season the scallops with salt and pepper and keep them sandwiched between two layers of paper towels in order to draw away any moisture from the scallops because they will exude a lot of moisture.

Even though the arugula I bought was prewashed, I like to give it one more wash, then spin dry in the salad spinner. Set aside to dry.

Meanwhile prepare the rest of the components for the dish. In a small saucepan, add the yuzu marmalade and 2 tablespoons of moisture. Bring to boil, lower to a simmer and simmer until it is your desired consistency. Whisk in the minced ginger, remove from heat and set aside.

In an empty skillet add the sesame seeds and toast over medium heat until they are golden brown, about 5 minutes. I use a 1:1 ratio of white to black sesame seeds. It's much easier to gauge the doneness of white seeds but a combination of the two give a better aesthetic appeal.

Plate the greens before cooking the scallops.

Heat a nonstick or cast iron skillet over high heat. You want the pan very hot in order to get a good sear on the scallops. The scallops are cooked in two batches so the liquid doesn't flood the pan and they steam and stew in their juice. Cooking for two is easier since you can divide the recipe in half and cook the scallops in one batch. Add 1 tablespoon of oil and pat the scallops dry right before you add them and add half of the scallops in the pan. The scallops should have plenty of room. Cook them on the first side for 1 - 2 minutes. They should have a golden brown crust. Remove the first batch to a plate, do not cook the second side yet. Wipe out the skillet by holding a wad of paper towels with tongs and add 1 tablespoon of oil to the pan again. Wait for the oil to heat up and add the rest of the scallops, cooking them 1 - 2 minutes a side. Now flip these scallops over to the second side to sear and add the first batch back into the pan. Cook the scallops for only 30 seconds to a minute on the second side. The second side doesn't have to be cooked as long or seared for color, you only want to cook them through.

Divide the scallops onto the four plates, with the seared side up for presentation. To glaze the scallops, you can either spoon the glaze on each scallop or just toss all of them in the glaze to coat. I chose to spoon the glaze on, it was a bit more fussy and more work, but it looks a little better. :) Then drizzle the plate with dressing and sprinkle some sesame seeds on top.

Serve immediately.

Monday, March 24, 2008

Almond Cake

Almond Tea Cake

Back when I was taking organic chem lab in college, we were assigned a "mystery compound" to identify by conducting various tests like finding the boiling temperature, melting temperature, NMR peaks etc. After going through all of the experiments, I was pretty confident I knew what my compound was, but to double check, I did something that you should never, ever do in ochem - I smelled it. The basic no-brainer rules of ochem lab are don't eat, sniff, touch (ie. rub all over your body), mix together unknown chemicals. I was pretty sure my compound was benzaldehyde, aka synthetic almond extract. So when the TA wasn't looking, I gave my "mystery component" a quick sniff test. Mmm... smelled good. Turns out, I was right, it was benzaldehyde, and I got an A+ in the class. But shh... don't tell anyone and don't do what I did since it's definitely not a good idea smelling unknown chemicals.

I have already professed my love for the smell of almond extract and this cake, one of my favorites, uses plenty of it. This triple almond cake has ground almonds and almond extract in the batter and sliced almonds on top. Cakes made with oil taste more moist at room temperature than all butter cakes (butter being solid and oil being liquid at room temp), but butter cakes have superior flavor, so I used a combination of both. If you plan on serving this cake warm, feel free to use all butter.

Almond Tea Cake
2 C all purpose flour
1/2 C finely ground almonds/almond meal
1 Tbsp baking powder
1/4 tsp salt
3/4 C sugar
2 egg
1 1/4 C buttermilk
1/4 C oil
2 Tbsp butter, melted
2 tsp almond extract
1/3 C almond slices

Preheat the oven to 350 degrees F. Butter and flour or spray with nonstick spray a baking pan (tube and round pans will both work, bundt pan can also be used but since the cake will be flipped upside down, skip the almond slices decoration).

In a bowl, whisk together the flour, ground almond, baking powder, salt.

In separate bowl, whisk the sugar and eggs until the eggs are beaten, whisk in the buttermilk, melted butter, oil, almond extract. Pour this into the dry ingredients and fold until the batter is mixed and there are no streaks of flour.

Spread the batter into the prepared cake pan. Spread almond slices on top of the butter (skip this step if you are using a bundt pan). Bake in a 350 degree F oven for 25 - 30 minutes* or until a skewer inserted into the center of the cake comes out clean.

*note: I forgot to write down how long I baked the cake for so this is just a ballpark figure. I think it was closer to 30 minutes but check early so you don't overbake.


Sunday, March 23, 2008

Fettuccine Alfredo

Fettuccine Alfredo

Steven recently mentioned something about me making a "good kitchen purchase" (I can't remember what he was referring to) so I asked him what he thought was a "bad" purchase. I personally think all of my kitchen items are great and can't-live-without necessary. That madeleine pan? Yup, absolutely essential, how else am I going to make madeleines, right? ;) He thought for a moment, I'm not sure if he realized he was treading on thin ice here, and said, "pasta machine." I gasped, I protested, but, as much as I hate to admit it, he was right. Ever since I made bought it many months ago, I had only used it once. Instead of trying to justify why I needed a pasta machine, I made it a personal mission to make good use of it and created a long list of fresh noodle and pasta dishes I planned to make. I have to stand up for my gadgets after all, and yeah, I also do want to prove Steven wrong, but he can't complain because he reaps the delicious benefits of handmade pasta.

This was my first time making fresh pasta so I reached for my copy of Essentials of Classic Italian Cooking cuz you can't go wrong with Marcella Hazan for Italian. I kept it simple and made the classic alfredo sauce. In the past I've tried to make alfredo reasonably healthy because all that cream, butter, and cheese is a little alarming. My light version was a roux, milk, and cheese, essentially a bechamel and parm (or a Mornay). It was alright, but that's all it was, a bechamel with parm, it was not alfredo sauce. Since I was going through the trouble of making my own pasta this time, I didn't hold back. This isn't something I would make everyday, but when I do choose to indulge, there's no reason to skimp right?

Mmm... cream, butter, and cheese, deeeelicious.

Fettuccine Alfredo
Serves 2 - 3 as a main dish, 3 - 4 as an appetizer

Fresh Pasta
1 C flour
2 large eggs

First make a mountain of flour on your work surface, then create a crater in the center. Add your eggs in the crater. Use a fork and beat the eggs in the crater incoroporating a little bit of the flour at a time. Once the egg mixture begins to look like a batter, you can start incorporating more of the flour into the dough. After incoporporating all the flour, you will end up with a dough. If the dough is still sticky, add some more flour. Knead by pushing with the heel of your palm, fold the dough in half, give it a half turn, and repeat the process for 8 minutes or until it feels smooth. Marcella did not specify to let the dough rest but I let the dough rest (covered) for 20ish minutes.

Cut the dough into 3 equal portions. Take one portion of the dough and press it flat, then run it through the pasta machine on the widest setting. Fold the dough in thirds and run the narrow end into the machine again. Repeat twice more. Do this to the remaining 2 portions of dough. Now you should have 3 portions of dough that have been passed through the widest setting 3 times each. Go up one setting, and run each portion of dough through twice, but do not fold in thirds this time, just run it straight through twice. Repeat with the two other pieces of dough. Go up one setting, and repeat again. My machine has 7 settings and I stopped on setting #3 for fettuccine because I want my noodles a little on the thicker side. After running the pasta through the #3 setting twice more, run it through the fettuccine cutter (the wider cutter). Separate any noodles that did not get cut all the way through. Lightly toss the noodles in some flour.

Bring a pot of water to a boil, salt the water, then add the pasta. Cook for 1 1/2 - 2 minutes or until the pasta is al dente. Drain the pasta reserving some of the pasta water to thin out the sauce if necessary.

Alfredo Sauce (enough to dress the pasta made from the above recipe)
1/2 C heavy cream
1 Tbsp butter
1/2 C grated parmigiano-reggiano + additional if needed at table
Pinch of ground nutmeg
Freshly ground black pepper and salt to taste

Simmer the cream, butter, and nutmeg in a saucepan over low heat until it has thickened somewhat, about 5 minutes.

Toss the pasta in the cream, add the grated cheese and toss until evenly distributed. If the sauce is too thin, add a little of the pasta water. Add freshly ground black pepper and salt to taste, add additional cheese on top at the table.

Friday, March 21, 2008

Pulled Pork

Pulled Pork
Daffodils and cherry blossoms may be blooming everywhere but winter isn't going down without a fight. Sure yesterday was the first day of spring but... well, just see for yourself.

the weather...
SNOW? Okay, so the snow is very unlikely, that's rare around these parts even in the middle of January. I don't know what the hell those weather.com meteorologists are doing over there but it definitely ain't meteorologizing. I guess it could be worse, it could actually be snowing, but it's still pretty darn cold, wet, and windy and that doesn't exactly make me crave a light mixed-greens salad or steamed asparagus. I want something hearty, filling, and meaty - something braised. Braised dishes make me happy because, 1. they require little to no prep, throw everything in the pot and you're good to go, 2. it's cheap, transforming lousy tough cuts of meat into 3. something meltingly tender and totally delicious, 4. and best of all, it tastes even better the next day - isn't it great to look forward to eating leftovers? As Martha Stewart would say, "it's a good thing".

Authentic Carolina pulled pork, or simply BBQ, is smoked but I do not own a smoker or know how to use one for that matter nor do I intend to rig some contraption to smoke indoors which would most likely fill my abode with smoke and grease. So I cheat, and use the slow cooker. You don't even have to rub the pork and let it sit overnight. It's partly me being lazy but the whole thing is just gonna get mixed all up anyway so no need to let the flavors permeate right? After a few hours in the cooker, the pork pretty much pulls itself. A few tosses with the tongs and it just falls apart into submission. Then slathered in sauce and piled high on a bun, it makes for a great dinner and lunch the next day.

Slow Cooker Pulled Pork
3 lbs pork butt (which is the shoulder) or country style ribs are a good substitute
1 medium onion, roughly chopped
2 Tbsp chili powder
1 Tbsp smoked paprika
2 tsp freshly ground black pepper
1 tsp whole cumin seeds, smashed or crushed (can use a mortar and pestle or just give it a few chops with a knife or smashes with a meat mallet)
3 cloves of garlic, finely chopped or minced (no biggie)
1 tsp cayenne pepper
2 tsp salt
1/4 C brown sugar
3 Tbsp Worcestershire sauce
1/4 C chicken stock or water

Cider vinegar to taste

Heat 1 tablespoon of oil in a skillet over medium high heat. Sear and brown the pork on all sides and transfer to the crock pot or Dutch oven.

Turn the heat down to medium and add the onion to the residual oil in the skillet. Add the chili powder, smoked paprika, pepper, and cumin seeds and cook in the oil to bloom the flavor of the spices, about 3 - 5 minutes. Then add the minced garlic and cook until fragrant, about 30 seconds. Add the cayenne pepper, brown sugar, worchestershire sauce, salt, and chicken stock or water. Bring to a boil and pour the skillet contents over the pork in the slow cooker or Dutch oven (everything except the vinegar should be in the slow cooker now). Cook on high for an hour then turn to low for as many hours as it takes for the pork to be fork tender, 6 - 8 hours for a whole pork butt. Country style ribs are in smaller pieces and will cook faster or you can cut your pork butt into 1 pound pieces for it to cook faster. You can also cut the cooking time down if you cook it on high the whole time, but if the bubbles get too vigorous you will need to turn it to long because boiling will toughen the meat. You want to cook at a barely there simmer. Or if you do not have a slow cooker, use a Dutch oven and transfer the pot to a 300 degree F oven and cook until the meat is fork tender.

Carefully transfer the meat only to a large bowl and use tongs or two forks to pull the pork. If it does not pull that easily, wait for it to cool enough to pull with your hands.

Strain the cooking liquid and discard the spent and mushy onions and any floating impurities. Reduce this liquid in a saucepan by about half, to a somewhat thicker sauce like consistency. It shouldn't be as goopy as bottled sauces but it should have some body. Add the pulled pork back in and add vinegar to taste. In North Carolina the sauce is vinegar based, devoid of any tomato product, so in keeping with tradition, I just used only cider vinegar in addition to the pork's natural braised juices.

Now pile it on high on a hoagie or bun, don't be shy. Devour that meaty, bun soaked goodness.

Wednesday, March 19, 2008

Chicken Tetrazzini

Chicken Tetrazzini
Steven: "Why do you have to call it a casserole? Why can't you call it something else?"

Me: "Like what?"

Steven: "I don't know... noodle bake with chicken and mushrooms and... sauce."

Me: "Well it's called Tetrazzini but it's still a casserole."

Steven: *grumble grumble*

I made this a few days after I made my green bean casserole to see if I could change Steven's mind about the dreaded "casserole." Of course he remained convinced that casserole is just a code word for bad cooking. Sadly, casseroles have a bad rap, conjuring up the image of overcooked noodles, bland meats, mushy vegetables, and greasy sauces. With proper execution, however, they can be refined and sophisticated, and at the same time homey and comforting - the best of both worlds. Although Steven couldn't escape the fact that this was technically a casserole, he didn't deny that it was darn tasty.

Now fast forward to a few weeks later. As I'm writing this, I turned to him and asked, "Do you like casseroles now?"

"Eh... they're okay."

Alright! Makin' progress! Next up, cheesy tater tot bake anyone? ;)

Notes
- This is great for leftover roast chicken (like rotisserie chicken) or leftover Thanksgiving turkey
- To avoid the culinary atrocity that is mushy noodle, cook the noodles 2 minutes short of the recommended package time. If they finish cooking before you have finished preparing the sauce, shock them in ice water to stop them from continuing to cook.
- And to prevent the second culinary atrocity that is overcooked vegetables, I add the broccoli florets at the end. I cut them into small bite sized pieces and the residual heat of the sauce and the oven time will be enough to cook them.
Chicken Tetrazzini
Serves 8

Bread crumb topping
3/4 C fresh bread crumbs
1 Tbsp butter, melted
1/3 C sliced almonds

Pasta
6 Tbsp butter
1 lb crimini or white button mushrooms, sliced
1 large onion, chopped fine
4 cloves of garlic
1 Tbsp fresh thyme leaves
1/4 C white wine
salt and black pepper
16 oz. linguine or spaghetti
4 Tbsp flour
3 C chicken stock
1/4 C heavy cream
1 C grated Parmesan
2 tsp lemon juice
1 - 1 1/2 C frozen peas or 1 C broccoli florets chopped into very small bite sized pieces
4 C shredded cooked chicken meat or turkey

Prepare the bread crumbs. Preheat the oven to 350 degrees F.

Pulse the bread a few times in a food proecessor to make fresh bread crumbs. Toss the bread crumbs with a tablespoon of melted butter and spread in a even layer on a baking pan. Bake for 10 - 15 minutes in a 350 degree oven or until they are light golden. Set aside for later.

Preheat the oven to 450 degrees F.

Heat 2 Tbsp of butter in a skillet over medium heat and add chopped onion and a little salt, cook until softened. Add the mushrooms, some salt and pepper, and cook until the mushrooms release their liquid and the liquid evaporates. Add the garlic and thyme and cook until fragrant, about 30 seconds. Add the white wine and cook until reduced. Set this mixture aside.

Meanwhile, bring a large pot of water to a boil. Break the pasta in half lengthwise and boil 2 minutes short of the package time for al dente. If your noodles finish before you are done before you finish preparing the sauce, shock them in ice water and set them aside to drain.

In a large saucepan or Dutch oven, melt the remaining 4 Tbsp of butter over medium heat. Add the flour, whisk and cook until the roux is golden and smells nutty. Add the chicken stock in a steady stream while whisking, making sure to get out any lumps. Season with salt and pepper and simmer the mixture until it has thickened, about 5 minutes. Take the pot off heat and whisk in the heavy cream and lemon juice. Add the broccoli florets or frozen peas, the mushroom onion mixture, the Parmesan, and noodles to the mixture, stir to evenly combine.

Transfer the mixture into a 9 x 13 baking dish, top with bread crumbs and almond slices and bake for 12 - 15 minutes until the bread crumbs and almonds are golden brown and the mixture is bubbly.

You can cut the recipe in half or make the full recipe and freeze half (though I have not tried freezing it).


Sunday, March 16, 2008

Steamed Pork and Shrimp Roll

Pork and Shrimp Egg Roll

Before I start my project, I need to post all of the old recipes that have been sitting on my computer for way too long. I feel bad bombarding everyone with so many short recipes but this blog clog is getting out of hand! For this steamed pork and shrimp roll, I was inspired by Bee's steamed fish rolls, who was originally inspired Chubby Hubby's and My Kitchen Snippets. Instead of fish paste I used a combination of ground pork and ground shrimp creating something that's reminiscent of one of my favorite dimsum items, pork and shrimp siu mai.

Steamed Pork and Shrimp Roll
Egg wrapper:
2 eggs
1 Tbsp flour
1 Tbsp water
1/8 tsp salt

Pork Filling:
4 oz. ground pork
2 tsp soy sauce
2 tsp shao hsing rice wine
1/4 tsp freshly grated ginger
Pinch of sugar

Shrimp Filling:
4 oz. ground shrimp (I used my food processor to grind it)
2 tsp soy sauce
2 tsp rice wine
1/2 tsp sesame oil
1/4 tsp freshly grated ginger
1 Tbsp corn starch
Dash of white pepper

1 - 2 sheets of nori

In two separate bowls, mix the ingredients for the pork filling and shrimp filling. Set aside.

Stir the flour and water together making sure to mix out any lumps, then add the eggs and salt and beat together.

Heat a nonstick skillet (I used a 12 inch skillet) over medium heat and add 2 tsp of oil. Add the eggs and swirl the pan to coat the entire surface, forming a thin layer. Cook until the eggs have set.

Prepare your steamer and have the boiling water ready.

Transfer the egg sheet to a work surface. Cover the entire surface with a thin layer of ground pork. Try to spread it out as evenly as you can. Cover the ground pork with nori 1 or 2 sheets depending on the size of your nori sheets. Cover the nori with the ground shrimp mixture and again, spread it into a thin even layer. Then take one edge and roll the entire thing in a tight cylinder. Cut the cylinder in half if the entire length does not fit into your steamer.

Steam over medium high heat for 10 - 12 minutes. Cut into the roll to make sure the interior is fully cooked.

After steaming, the egg roll will release some liquid. You can thicken this liquid with a cornstarch slurry to make a simple sauce.


Friday, March 14, 2008

Rugelach, Asianified

Rugelach, Asianified
The other day I found some bricks of cream cheese way in the back of the fridge that were pretty darn close to the expiration date. Naturally, the first thing that came to mind was cheesecake. Steven isn't the biggest fan of cheesecake so I made two mini cheesecakes instead of a full recipe. That took care of 2 bars, but there was still one left. I racked my brain trying to think of what else I could do with the cream cheese and the second thing I came up with was the cream cheese based dough of rugelach. The first time I make something, I try to stick to the most traditional recipe as possible. For rugelach, that meant a combination of apricot jam, walnuts, chocolate, raisins/currants, and poppy seeds. But it didn't work out quite like I planned because I didn't have the apricot filling. I grabbed a jar of yuzu marmalade because it was the only jam in the house, and the color is pretty close right? Then I thought well, I'll just Asianify the whole thing! Instead of cinnamon I used fresh ginger and instead of poppy seeds I used sesame seeds. Citrus and chocolate go pretty well together, so I added some chopped chocolate, which ended up being the lone traditional ingredient. I decided against all of the nuts and dried fruit in the pantry because nothing else seemed to match the yuzu and sesame. What I ended up with was the combination of yuzu, ginger, sesame, and chocolate wrapped up in a flaky cream cheese dough. Sounds pretty weird but it turned out surprisingly delicious!

Note: I also included the traditional filling if you want to go that route.

Rugelach, Asianified
Dough recipe adapted from both Cook's Illustrated and Traditional filling adapted from Dorie Greenspan

Dough
1 1/2 C all purpose flour
1 Tbsp sugar
1/8 tsp salt
1 stick butter (1/2 C or 4 oz.), cold cut into 1/2 in pieces
4 oz. (half a bar) cream cheese, cold, cut into 1/2 in pieces
1/4 C sour cream

Traditional Filling:
2/3 C apricot jam
1/2 tsp cinnamon
1/4 C chopped toasted walnuts
1/4 C currants or raisins
1/2 C finely chopped chocolate or mini chocolate chips
2 Tbsp poppy seeds (optional)

or

Asianified Filling:
2/3 C yuzu/citron marmalade
1/2 tsp freshly grated ginger
1 Tbsp white sesame seeds
1 Tbsp black sesame seeds
1/2 C finely chopped chocolate or mini chocolate chips

Glaze
1 egg beaten
2 - 3 Tbsp raw sugar

In the bowl of a food processor, add the flour, sugar, and salt and pulse to mix. Scatter the butter and cream cheese pieces and pulse a few times to cut it into the flour, stop about halfway to add the sour cream. The pieces of butter and cream cheese should still be relatively large before you add the sour cream. Scatter spoonfuls of the sour cream over the mixture and continue to pulse until the mixture starts to form large curds. Don't over work the dough otherwise you won't get the flaky layers.

Turn the dough onto a work surface and press the pieces together. Divide the dough into two pieces, flatten it into a disc, wrap in plastic wrap, and chill for at least 2 hours.

Before you bring the dough out, heat the jam in a small saucepan or in the microwave until it is warm and easier to spread. If you are using fresh ginger and yuzu, mix the freshly grated ginger into the warm jam. If you are using the apricot and cinnamon filling, add the cinnamon to the other dry ingredients for the filling.

If you are using sesame seeds, add both the white and black seeds to a small skillet and toast over medium heat until the white ones look golden brown, about 3 minutes.

In bowl, mix the dried filling ingredients together, for the traditional filling that would be the cinnamon, chopped nuts, dried fruit, chocolate, and poppy seeds (if using) and for the Asian filling that would be the toasted sesame seeds and chocolate.

Preheat the oven to 350 degrees F. Bring out a disc of the dough and roll it out into a 11 - 12 inch circle. Spread half of the jam over the dough and then scatter half of the dried filling ingredients. Cut the dough into 12 wedges, first cutting the dough into quarters, then each quarter into 3 equal pieces. Roll each wedge, starting at the base of the triangle, the point of the wedge should be on the exterior of the dough.

Refrigerate for 30 minutes or freeze for 15 minutes before baking.

Before baking, brush the tops of the cookies with beaten egg and sprinkle some raw sugar on top. Bake only one tray at a time. Bake in a 350 degrees F oven for 22 - 25 minutes. The cookies should be golden.


Wednesday, March 12, 2008

Italian Sausage and Mozzarella Pasta Bake

Pasta Bake

This photo has been sitting in my Flickr for a while now so it's about time I post the recipe. I have a weak spot for extra cheesy dishes and this one has a whopping 1:1 ratio of pasta to mozzarella. The best part is how each scoop pulls away never-ending tendrils of gooey, melty cheese.

A note:
Leave the pasta boil the pasta two minutes short of al dente because it will finish cooking in the oven. If you boil it to al dente, it will overcook in the oven.

Italian Sausage and Mozzarella Pasta Bake
serves 3 - 4

8 oz. pasta (penne, cellantani, farfalle, campanelle)
2 Italian sausages, removed from casings
1 small onion, finely chopped
2 garlic cloves, minced or pressed
1/4 C red wine
1 14oz. can diced tomatoes, drained
1 8 oz. can tomato sauce
1 tsp Italian herb mix
1/8 tsp sugar
Salt and pepper to taste
2 tsp olive oil
8 oz. mozzarella, cut into 1/2 inch cubes (preferably fresh mozzarella)
1/4 C grated Parmesan


Preheat the oven to 400 degrees F. Bring a pot of water to a rolling boil and boil the pasta to 2 minutes short of the recommended time.

Meanwhile, heat a teaspoon of olive oil in a large saucepan or Dutch oven over medium heat. Add the Italian sausage and break into bite size pieces. When the sausage has browned, remove and set aside. Add the onion and some salt and pepper, and cook over medium heat until the onions have softened, then add the Italian sausage back in. Add the minced garlic and cook until fragrant, about 30 seconds. Add 1/4 C red wine and cook until almost evaporated. Add the drained diced tomatoes, tomato sauce, and herbs, and a little sugar to taste. Simmer until slightly thickened, about 5 minutes. Season with salt and pepper.

Add the pasta to the sauce and toss to combine. Add half of the mozzarella and mix it into the pasta. Transfer to a 2 quart baking dish. Top with the remaining half of mozzerella cubes and grated Parmesan. Bake until bubbly and lightly browned, about 10 to 15 minutes.

Monday, March 10, 2008

Tomatoes and Eggs Stir Fry: Fan Qie Chao Dan

Tomatoes and Egg Stir Fry
I didn't have much of an appetite when I was very young and always had trouble eating. In one of my earliest memories, I was sitting on my uncle’s shoulders on the way home from kindergarten and I proudly told him of my accomplishment that day, that I had finished every last bit of my lunch. Of course my uncle asked me what the school served that day and I enthusiastically told him, “fan qie chao dan (tomatoes and eggs)!” Now, sixteen years later, some things have changed; now I always have quite the appetite but this dish still remains one of my favorites.

For the 8th and final dish of this impromptu Chinese Cooking 100 1/2 series I originally planned to make a dessert but instead, I want to introduce everyone to this relatively unknown but very traditional Chinese dish. You’ll rarely see this dish on the menu at restaurants but scrambled eggs and tomatoes is classic Chinese home cooking and comfort food. Whenever I’m sick and don't feel like eating, this is the dish I make for myself: 1 tomato, 2 eggs, and a bowl of rice. Not only does it bring back fond memories of my childhood but tomatoes and eggs are nutrient powerhouses and the meal provides me with vitamins, proteins, carbs, and most importantly, comfort, everything I need to feel better.

Notes:
- If you’re using smaller roma tomatoes use 1 egg for 1 tomato but if you’re using medium sized tomatoes, use 3 eggs for every 2 tomatoes. If you have really big honking tomatoes, use 2 eggs for 1 tomato.
- I would not recommend using beefsteak tomatoes because they are just too tasteless and mealy and will make the dish too watery. Even though it’s not prime tomato season, I was able to find some pretty decent organic tomatoes on the vine for this dish.

Scrambled Eggs with Tomatoes: Fan Qie Chao Dan

4 tomatoes (see note about tomato to egg ratio)
6 eggs
2 green onions, thinly sliced
Salt
White pepper
Vegtable oil

Cut the tomatoes into 1 inch chunks and set them in a colander to drain.

Beat the eggs in a small bowl.

Heat 1 tablespoon of oil in skillet or wok over high heat. Shake the colander or hit it against the side of the sink to get rid of any excess liquid. Once the pan is very hot and the oil is shimmering, add the thinly sliced green onion and the tomatoes. You should hear a loud sizzle. Season with salt and white pepper, and cook them very briefly, only about 30 seconds. You want the tomatoes to retain their shape, you don’t want tomato sauce. Don’t stir them too violently or you’ll break them up. After about 30 seconds in the pan, transfer the tomatoes to a bowl and set aside.

Add a tablespoon of oil to the wok or skillet again and heat over medium high heat. When the oil is hot, add the beaten eggs. Some liquid should have accumulated in the bowl of the stir fried tomatoes so add that liquid to the eggs. Season the eggs with a little salt. Quickly scramble the eggs until it is almost cooked but still runny, then add the tomatoes and stir fry until the eggs are cooked. Serve with rice.

Friday, March 7, 2008

My Family's Shrimp Stir Fry

Simplest Shrimp Stir Fry

Eating shrimp was a messy affair when I was a kid. My parents always cooked shrimp with the shells on, which meant the sauce would get all over my fingers when I went to peel them. They tried to teach me how to peel shrimp "properly" aka not using my hands, by holding it with chopsticks and using my teeth to slowly nibble the shell off. Didn't happen. I did what any kid would do and went back to using my hands, because let's face it, it was faster and much easier. But having to wipe off my hands before taking a bite was slowing down my eating. So I got to thinking, how can I expedite the eating process and minimize the number of times I have to wipe my hands after peeling. Ah hah! Instead of peeling the shrimp one at a time and wiping my hands before picking up my chopsticks to take a bite, I decided to peel the shrimp all at once, slowly accumulating a small mountain of peeled shrimp on my rice bowl. When I deemed the number to be sufficient, I would wipe off my hands and commence the eating with no interruptions. What can I say, I was an efficient kid. Nowadays, I just peel all of the shrimp before cooking so I can skip the messy process of peeling them afterwards. And this way the sauce clings to the meat and not on the shell. Just be careful to not over cook the shrimp because there's no shell to protect the meat from the heat of the pan.

This is my family's simple shrimp stir fry recipe. It uses only a handful of ingredients and the dish cooks in about 3 minutes. The ginger and green onions flavor the oil as with many Chinese stir fries and the soy sauce, rice wine, and sugar create the sauce for the shrimp.

My Family's Shrimp Stir Fry
1 lb large shrimp, peeled
4 slices of ginger
2 - 3 green onions
1 1/2 Tbsp soy sauce
2 Tbsp Shao Xing rice wine
1/2 tsp sugar
Dash of white pepper

First cut the green onions separating the lower light green and white part from the green tops. The light green/white parts can cooked longer than the more delicate green tops they are added first to the oil. Cut the green/white part in half lengthwise, then into 2 inch segments, this will help to release more flavor into the oil. Then for the remaining green tops, cut them into 2 inch segments. Keep them separate because these will be added a little later. Smash the ginger slices with the side of your knife to bruise them.

After peeling and washing the shrimp, pat them dry. You don't want excess water in the stir fry.

Heat up 1 tablespoon of oil in a wok or skillet over high heat. When the oil is shimmering, almost smoking, add the white part of the green onion and the ginger slices. Cook these in the hot oil to bloom their flavor, for about 30 seconds to a minute. Then add the shrimp and the green part of the green onion and stir fry these together first really quickly, about 20 seconds. Add the soy sauce, wine, sugar, and white pepper, and cook until the shrimp are pink and no longer opaque. The sauce will have reduce and cling to the shrimp.

Wednesday, March 5, 2008

Fried Rice

Chinese Sausage Fried Rice with Vegetables
I love making fried rice because it's quick to cook, which is a definitely plus for a busy weeknight, it's a great way to use up leftovers, but best of all, it's my clever way to sneaking vegetables into Steven's diet. There, I said it! :) If I took carrots, chopped them up, and stir fried them, Steven wouldn't touch that with a ten foot pole. But there are no complaints once the little cubes are tucked into fluffy rice coated with sausage or duck fat. Not only do different vegetables make the rice look bright and colorful, but they make the dish healthier too! See? Win win! It's not an evil plan. Though I think Steven is on to me now! Today I even snuck in some crownless broccoli stems that have been sitting in the veggie drawer for who knows how long. In the past I've added everything from salted mustard greens to corn. Now peas are something I can't get away with because Steven hates them (he hates tomatoes too! *waits for the collective gasp of the audience*). But you know, I think he just hates frozen peas because honestly, those are nasty and mushy, so I'll have to try adding with fresh peas. I don't think anyone can resist the sweetness of fresh peas. Mua hahaha!

Everyone make fried rice a little differently. It's usually made with soy sauce, which provides the salty, savory flavor and brown color. Steven's mom, however, hates dark fried rice so she uses only salt to flavor her rice, but I think this is much too boring. Jaden's secret ingredient is fish sauce, which helps to boost the umami flavor. I like to use oyster sauce for both its umami flavor and the color it gives to the finished dish. It's saltier than soy sauce so you don't need to use as much to flavor the whole dish so the rice ends up being a light golden brown instead of a dark brown.

This time I used Chinese sausage, but in the past I've used leftover ham, Chinese bbq pork, and even shrimp and tofu. For an extra special treat, my favorite fried rice is made with leftover Chinese roast duck and cooked in duck fat. I usually try to add a carrot and today I used some broccoli stems, or as I like to call them, heart of broccoli. Makes them sound so much more attractive don't you think? Like heart of palm. After cutting off the broccoli crowns I know a lot of people throw away the stems but you should save them! If you peel or slice off the tough fiberous outer layer, you get a really tender, crisp, and sweet heart of broccoli. This is good in soups, fried rice, or simply sliced and stir fried.

Fried Rice with Chinese Sausage and Vegetables

2 cups cold leftover rice, broken up into as small chunks.
2 Chinese sausage, sliced in half lengthwise then cut into small slices
2 Eggs, beaten
4 Medium dried shiitake mushrooms or 6 small ones
2 Green onions, thinly sliced
Around 1 Tbsp oyster sauce, more to taste
A small shake or two of ground white pepper
Vegetable oil

Optional vegetables
1 Carrot, peeled and cut into a small dice
3 Broccoli hearts, fibrous layer peeled off and cut into a small dice

Rehydrate the dried mushrooms in warm water. Rinse off any dirt stuck in the gills, and chop them finely.

Making fried rice with Chinese sausage includes an extra step of rendering the fat out of the sausages. If you're using with cooked meats like ham, duck, BBQ pork, it should be added towards the end of cooking to heat through but not dry out.

Heat a wok or a nonstick skillet over medium heat and add the pieces of Chinese sausage. Cook until the fat has rendered out. Add chopped shiitake mushrooms and stir fry for a minute. Then add the green onions and any other vegetables that you are using. Add a little salt to flavor the vegetables. I like my vegetables to have a good bite left so I don't cook them very long. Stir fry the veggies for a minute. You want to keep the vegetables really crunchy because they will continue cooking as they are sitting in a bowl from carryover heat and then cooked again with the rice towards the end.

Transfer the sausage and vegetables to a bowl, keeping any residual fat in the pan. If there's no fat, add 2 teaspoons of vegetable oil. Add the beaten eggs and scramble, cooking until the eggs are half set. Transfer the eggs into a bowl. It's okay to use the bowl you beat them in because you'll finish cooking the eggs fully later (and it's one less bowl to wash).

Add a tablespoon oil to the wok or skillet and heat it over medium high heat. Add the rice and break any chunks into individual grains. I use a spatula and press on the chunks of rice until the grains fall apart. Ideally you want all the grains to be separated to get really fluffy fried rice. It's important to use cold hard leftover rice because if you tried this with hot steamed rice, you'll end up with mush.

Cook until the rice grains are all separated and hot, about 3 to 5 minutes. They will start to pop off your pan. Add the oyster sauce and a dash of white pepper and stir until it's evenly distributed in the rice. Taste the rice and see if you need to add more oyster sauce. From this point you'll want to work quickly because you don't want the vegetables and eggs to over cook. Add the sausage and vegetables that you set aside earlier and mix this evenly into the rice. Clear the center of the pan by pushing the rice away and add the half cooked eggs. Cook them until they are almost set up, then break up any large clumps and stir them into the rice.

Serve piping hot.

Fried rice from my buddies:
Wandering Chopstick made Yang Chow Style Fried Rice, a Chinese restaurant staple.
And Jaden makes awesome Spam Fried Rice. And if you're saying "ewww SPAM", don't hate, it's actually quite tasty!

Saturday, March 1, 2008

Flaky Buttermilk Biscuits and Sausage Gravy

Biscuits and Sausage GravyWe interrupt our regularly schedule program for: The Breakfast of Champions and it definitely ain’t Wheaties.

This is pure Southern comfort food. I’m pretty sure this is as far away from Chinese cooking as you can get. Butter, milk, buttermilk, cheese, yeah… all that gooooood stuff. Did I mention 93% of the Chinese population is lactose intolerant (dude that’s like 1 billion people)? I’m pretty sure I’m mildly lactose intolerant but that doesn’t stop me from devouring ice cream/whipped cream like it’s a major food group, which I’m pretty sure it is (they just call it the milk and yogurt group, psh!).

First the biscuits. If you’re reaching for that tube of biscuits, put it down, step back, and run far, far away. Do you know what they put in that stuff? No? Neither do I. Well, there’s the problem! Who knows what junk goes in there! One biscuit contains close to 1324945 mg of sodium, which is about 139085 times more salt I use in the entire recipe (just an approximation but you get the idea). Then add in the trans fats, preservatives, and weird jiggly doughboy voodoo, and you have processed biscuits. The only thing they have going for it is that *POP* when you open the container, but that fleeting moment of amusement lasts what? 0.183 milliseconds? Okay nuff ragging on Pillsbury because I mean… they still taste good (must be that doughboy voodoo). I won’t hide it, I use to buy them, and yeah… I liked them too.

Until I started making my own biscuits and holy cow they were good. If you don't have much time then make these mile high buttermilk biscuits. They’re pure fluffy deliciousness and really quick to make. But when I used to buy the Pillbury ones, I always reached for the flaky kind. I liked to peel off the layers one by one, so much for not playing with my food. :) Again, it must be the doughboy voodoo because I dunno how they got the layers that perfect. If you have more time, then you can make the flaky biscuits at home too. The method for getting the flaky layers is a little like making puff pastry but nowhere near as complicated so don't be intimidated by the recipe's length, it's actually really simple. Flaky biscuits require more work than fluffy relatives but they're soooo good! They aren't as perfect as factory biscuits but that's because they're homemade. The biscuits are still flaky enough to have distinct layers I can peel off. Yum!

Flaky Buttermilk Biscuits
mmm look at those layers!

Flaky Buttermilk Biscuits
Adapted from Cook’s Illustrated
Makes 9 big fat biscuits

2 1/2 C unbleached all purpose flour
1 Tbsp baking powder
1/2 tsp baking soda
1/2 tsp salt
2 Tbsp shortening
1 stick very cold butter
1 1/4 C very cold buttermilk

Preheat the oven to 450 degrees F and adjust an oven rack to the lower middle position.

In a bowl, whisk together the flour, baking powder, baking soda, and salt. Cut the shortening into 1/2 inch cubes and drop into the flour. Toss in the flour and break them up into pea size chunks.

Cut the stick of butter into 8 1 tablespoon slices. Melt, 1 tablespoon in a small bowl and set it aside for brushing the biscuits later.

For the remaining 7 slices of butter, take one piece of butter and toss in the flour mixture. Press the slice between your fingers, don’t worry if it breaks into small pieces, and press the pieces until they are the thinness and size of a nickel. Continue with the rest of the butter pieces. This will create thin sheets of butter that make the biscuits flaky, kinda like puff pastry.

Freeze the butter and flour mixture in the bowl for 15 minutes. This will chill the butter so it doesn’t melt.

If you have one, work on a silicone baking sheet like a silpat. Lightly flour your work surface.

When the flour has chilled, add all but 2 tablespoons of the buttermilk to the dough. Gently fold the dough together with a spatula, adding more buttermilk if needed. The dough should not have any flour pockets and should not be too sticky.

Transfer the dough to your work surface and pat it into a rough square on the silpat and roll to about 11 by 16 inches or about the size of the silpat. If your silpat is smaller than this then you will need to roll on a larger work surface.

Fold the dough into thirds, brush off any excess flour on the bottom and top of the dough. Rotate the rectangle 90 degrees and roll it out again into a 11 by 16 inch rectangle and repeat the folding process once more.

Roll the twice folded dough into a square or rectangle that’s about an inch thick. Use a 3in round cutter and cut out as many biscuits as you can (I got 6). Do not twist the cutter because that will seal the layers, press the cutter straight down. Dip the cutter in flour between each cut. Gather the scrapes and reroll the dough until it’s 1 inch thick again and cut out as many biscuits as possible. If there’s only a little bit of scrapes left, go ahead and toss them, but if there’s enough for 1 more biscuit, then gather the scrapes into a ball and flatten into a disc and this will be your last biscuit but it wont be as flaky as the rest. I ended up with 9 biscuits.

Brush the tops of the biscuits with the tablespoon of butter you melted earlier. Do not drip any butter down the sides of the biscuit because that will seal the layers.

Bake without opening the oven door until they look golden brown, about 15 – 17 minutes. Cool before serving, if you can wait that long.


Now onto the gravy. Since I’m only cooking for 2, I cut the recipe in half, and fried up the rest of the sausage into patties for the Breakfast of Champions.

Sausage Gravy
1 16 oz. tube of pork sausage (I like Jimmy Dean brand, regular, sage, or hot but maple is a tad weird)
Additional fat if needed: bacon grease or butter
4 Tbsp flour
3 C milk
A little bit of dried herbs (optional)
Salt and pepper to taste

Heat 2 teaspoons of vegetable oil to a cast iron skillet or large saucepan over medium high heat. Add the sausage and break it up into bite size chunks, but don’t break it up too much, you want nice cocoa puff sized chunks. Brown the sausage and get some fond on your pan.

Turn the heat down to medium. Remove the sausage and drain, reserving the fat. Return about 3 to 4 tablespoons of the rendered sausage fat into the pan. If you don’t have enough fat, add a little bacon grease or butter to bring it up. Add the flour and cook while whisking until the roux is golden brown. Keep stirring and slowly pour in your milk, making sure to whisk out all the lumps. If it looks too thin, don’t worry, it’ll thicken once it simmers. If you like your gravy super thick, use less milk (2 or 2 1/2 cups). Once you added all the milk, return the sausage back to the skillet, add herbs if you want to get fancy, and season with salt and plenty of freshly ground pepper. Simmer the gravy until it’s thickened and serve it over your split biscuits.

Here's the most important part:

Don’t be shy.

Smother those biscuits.


Breakfast of Champions
1 split biscuit
Topped with:
1 sausage patty
1 fried egg, yolk still runny with a little more black pepper
Loads of gravy
Shredded cheddar on top

Dig in. Repeat if needed. (Eat it before Wheaties comes knocking on my door for using their slogan)


Now back to our regularly schedule programming: 3 more Chinese recipes to go!

French Bread

French Bread
Did I ever mention that I like to procrastinate? I would be a professional procrastinator if I could but I'm sure the pay is pretty crappy. I figured I would have plenty of opportunities to do the Daring Baker challenge but before I knew it, it’s the last week of February! I'll just blame the fact that February is a super short month. The only day I had time to do the challenge was today, which is technically posting day. Eek! Down to the wire here!


As always, we have lovely hostesses who select our secret recipe and this month, the wonderful duo Mary aka Breadchick, writer of The Sour Dough, and Sara of I Like to Cook chose something that I’ve always wanted to make, French bread! And not just any French bread, Julia Child’s French bread, the bread she devoted 18 pages to in her Mastering the Art of French Cooking Vol 2. If you’ve read her memoir, My Life in France, you will know just how much of Julia loved to bake and how much time and effort she devoted to that one recipe. She made boulangerie style French bread accessible for the home cook!

The day started off beautifully, it was bright and sunny and my kitchen was 68 degrees, perfect dough rising conditions. After a donut and tea for breakfast, I rolled up my sleeves to tackle the dough making. Nothing like feeling the warm morning sun hit your face and hearing the *slap slap slap* of bread dough hitting the side of the KitchenAid bowl. After the machine did most of the work, I kneaded for a few minutes by hand to feel the dough, making sure to give it a good poke to test its springiness. Then back into the bowl, covered with a towel, for a long 5 hour rise. Who wouldn’t like a warm 5 hour long nap?

Then after the dough tripled in size, I gently shaped it for the second rise of 2 hours. It was beautiful after the second rise. The top was smooth and domed and it was absolutely gorgeous. After reading the instruction on how to form a batard, I was afraid I would mess up because it sounded pretty complicated so I decide to just make one large loaf. Then I gently coaxed the dough out of the bowl again and shaped it into a large loaf. It made some funny hissing noises as some of the gas bubbles popped, which made me giggle. Then after shaping the dough into the loaf, I gently placed it on a parchment paper lined cookie sheet for the final nap. It was like my little bread baby, so cute! Then under covers again for the final 2 hour rise.

Finally, I preheated my stone, slashed the loaf with a razor blade, brushed water on the outside, and slid it into the oven.

French Bread
The Results:
After 25 minutes, I checked the internal temperature of the bread with my Thermapen and it was only 160 degrees F. Weird! Either my brand new Thermapen is off or my oven is off. I kept the loaf in the oven for another 5 minutes and took it out because I was afraid of overbaking.

The crust was a beautiful golden brown and shatteringly crisp, it was just gorgeous. Unfortunately, my slashes didn’t serve their purpose, I thought they were deep enough but on the finished loaf, they looked very superficial and they didn’t allow the steam to escape, instead the bread split open near the bottom. Am I suppose to slash a little deeper or should I not have brushed water over them? After cooling for 2 hours, I sliced into it and I was a little disappointed. The crumb was too dense and a little chewy/gummy. Where did I go wrong? I was really careful when I handled the dough but maybe I didn’t let it rise enough the third time. Maybe I should have baked it longer since the crumb was a little gummy, is that because the bread is underbaked and the interior is still too moist? It tasted really good but it was a little yeasty. Did I do something wrong? What should I do differently next time?

All in all, I still give myself a pat on the back for making a pretty decent loaf of French bread. I wish the interior could have been a little airier and fluffier but I’m still happy with how it turned out. I’m really proud of the crust because I’ve never been able to get bread to look that good. The crust was my favorite part, it was so thin and crispy. Yum! Now I can cross French bread off my list but I know this is a recipe I will repeat over and over until I can get it just right.

As for the recipe? Head on over to Mary’s blog for the whole shebang, all 18 pages. Thank you so much Mary and Sara for choosing this wonderful recipe and for taking the time to type up the whole thing! The side notes you gals added were especially helpful!

Recipe here

The recipe is long and the process takes almost all day. I started at around 10 in the morning and finished at 6 or so?

I already ate half my loaf and I bet I’ll finish the other half tomorrow. Here are some idea’s for any leftover bread you may have.

Cover the inside with roasted garlic and butter for roasted garlic bread.

Make sandwiches:
Ham and Butter
Salami, Baby Spinach, and Cream Cheese
Pate and Cornichon

Stale French bread is wonderful on top of French Onion Soup


Make sure to see all the beautiful breads everyone made by heading over to the Daring Baker Blogroll


LinkWithin

Blog Widget by LinkWithin