Friday, July 13, 2007

BBQ Chicken Quesadilla

BBQ Chicken Quesadilla
The last few days have been unbearably hot, with yesterday being one of the top 10 hottest days ever recorded here in Seattle. I was too lethargic to do get up and do anything other than lay on the couch and complain about the heat. Pardon the silence on this blog, as I haven't been cooking much or blogging. But like Jaden, there are so many old recipes I still haven't gotten around to posting, so now is a good time to do so.

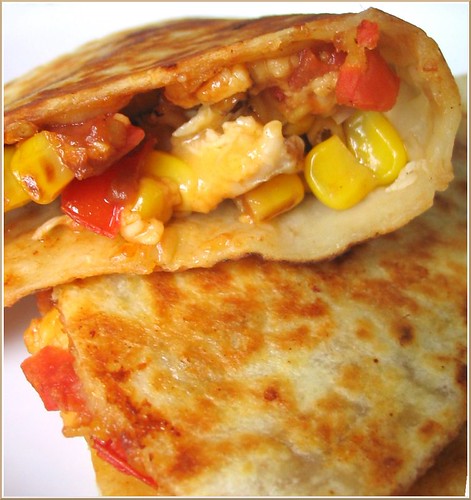
BBQ Chicken Quesadilla was a very popular menu item at my favorite lunch spot near the UW, Honeybee's Cafe (which sadly closed two years ago). It's been a long time since I've had a Honeybee's quesadilla, but from what I can remember, the original quesadilla had grilled chicken, tomatoes, Monterey Jack cheese, tomatoes, green onions, and BBQ sauce in a tomato flour tortilla. This quesadilla is very flexible the only constants are: tortilla, chicken, your favorite BBQ sauce (Cook's Illustrated likes Bull's Eye Original), and cheese. The rest of the ingredients depend on what you have on hand. So here rather than offering an exact recipe, it's just a few tips on making a yummy quesadilla, which I learned from watching America's Test Kitchen.

Barbeque Chicken Quesadilla

Flour Tortillas
Chicken, cut up into large chunks (You can use grilled chicken, leftover roast chicken or bbq chicken, doesn't really matter)
Coarsley grated cheese (Cheddar, Monterey, Pepper Jack, or a combo)
Thinly sliced green onions or red onions
Fresh tomatoes or fresh tomato salsa, drained (if using this then omit the onions)
Corn (frozen is almost as good as fresh)
BBQ Sauce
Freshly ground black pepper
Few dashes of Tabasco if you like it hot
Lime juice, just a little bit (omit if using fresh tomato salsa)

- Toast your corn
Toasting the corn brings out a nice roasted, toasty flavor and evaporates the moisture so it doesn't leak into the quesadilla. This is an essential ingredient in all of my quesadilas now. (Frozen corn also doubles as a handy ice pack if you ever jam your finger in a door like Steven. :( Ouch!)

Heat a small nonstick skillet pan over high or medium high heat (no oil!) and add your corn. Shake the pan occasionally until you see the corn turn a dark brown in spots and pop out of your pan. Yes it will literally jump out of the skillet. Set aside for the filling.

- Make your quesadillas
There's a lot of flexibility here with what goes in so you can be the judge of that. Just don't make them too stuffed otherwise it'll be too hard to flip.

Also, rather than making the quesadilla with one tortilla on the bottom and one on the top and forming a sandwich (this is too hard to flip, stuff will fall out). Add your filling to only half the tortilla (leave a 1/2 in border around the edge) then you flip the other half over and make a half moon shape. This way, less yummy filling falls out. You can also cook two of these in a pan.

- Cooking the quesadilla
If you add the oil directly to the pan it won't evenly distribute to cover the entire quesadilla and sometimes you end up using too much oil leading to overly greasy quesadillas and oily fingers.

So instead, use a pastry brush and brush the tortilla a thin layer of vegetable oil. This ensures that the quesadilla will be evenly covered using the least amount of oil as possible. Optional step: sprinkle a little bit of salt over the oil so it will be even more crisp (I always forget to do this).

Cook the quesadilla over medium heat, oil side down, until the bottoms are crisp and golden brown, it'll will take a few minutes. Then brush the top of the quesadilla with some more oil and carefully flip them over. The second side will take less time because the pan will be hotter.

Slide them out and let it sit for 2 - 3 minutes for the cheese to set. Then cut into wedges and serve.

Links:
I'm not the only Seattleite who can't stand the heat, Pea made an absolutely drool-worthy ice cream.

Monday, July 9, 2007

Cherry Clafouti

Cherry Clafouti

Remember when I said the best thing about living in the Pacific Northwest was the salmon? Well it's a tie between the salmon and the cherries. Washington state is the top cherry grower, producing about 50% of the nation's supply. Oh how I love the cherries; I look forward to them every summer. A few years ago my dad and I bought a bag of the biggest Bing cherries I'd ever seen, they were the size of ping pong balls I want to say (okay maybe a tiny bit smaller than ping pong balls but they were big!), and were soooo sweet. Every summer since then we would talk about those cherries and how we regret only buying one bag. "Hey remember those cherries we got a few years ago?" "Yeah... *wistful sigh*" I have yet to find cherries that big again. Anyways, now that we're in the middle of cherry season, which thankfully is very long (from early June to mid August), Bettina and I pretty much eat, sleep, and breathe cherries. Seriously we sometimes go through about a pound a day, each! The ones that escaped our cherry pillage ended up in clafoutis. Though in the end, I prefer my cherries uncooked but this was a classic French dessert that I wanted to try.

The clafouti is a custard-like dessert that originated in the province of Limousin in central France. Traditionally it's baked with whole, unpitted cherries because the heat releases more complex fruity and almondy notes from the pit. This is Julia Child's recipe (I mean how can you go wrong with a recipe from Julia Child?) with some minor changes. I added some almond extract to enhance the natural almondiness. The main flavor component of cherries comes from benzaldehyde, which is the same chemical as imitation almond extract (okay no more chemistry I promise). The cherries were also very sweet so I cut the sugar amount in half. You can serve clafoutis as dessert or eat them the next morning as breakfast, like Helen's grandfather.


Cherry Clafouti
Adapted from Julia Child
serves 6-8

1 1/4 cups milk, whole milk preferably
1/3 cup sugar
3 eggs
1 tsp vanilla
1/2 tsp almond extract
1/8 teaspoon salt
1/2 cup flour
2 - 3 C cherries (unpitted)
Powdered sugar

Preheat the oven to 350ºF.

Beat the eggs, sugar, salt, and extracts, then add the milk, and finally whisk in the flour. Add some cherries to individual ramekins*, don't crowd them too much, leave a little room for the batter. Depending on the size and height of your ramekins it can make about 5 - 8 servings.

Pour the batter over the cherries, bake the clafoutis until it looks golden brown, somewhat puffy, and the center is set, about 20 - 30 minutes.

Serve warm with powdered sugar dusted on top.

*The ramekins I used ended up being a bit too small, I baked 2 in these oval fluted creme brulee ramekins and 4 in round ramekins with taller sides.

Links:
Helen's Mirabelle Clafoutis
Bea's Chocolate and Cherry Clafoutis (a twist on the Black Forest cake)
Dorie Greenspan's Cherry Clafoutis adapted by Anita

Saturday, July 7, 2007

Sun-dried Tomato and Olive Pesto Pasta Salad

Pasta Salad
(10pm)
"Oh, can you make me something to bring to a potluck?"
"Sure! When is it?"
"Tomorrow"
"..."

Luckily pasta salad is one of my go-to dishes in these situations (ahem Steven, give me a little more warning next time mmkay?). It's quick to make and I can toss in whatever I have in my fridge and pantry. Bettina, Steven's sister, loves pasta salad and was my official guinea pig taste tester for this one and she said it was very good (whew!). I made this a few weeks ago and I swore I wrote down the recipe. A lot of times I just guesstimate quantities but I even made sure I measured everything this time and whatdoya know now I can't find it. So here are the quantities off the top of my head but if anything looks out of the ordinary go ahead and adjust it.

Sun-dried Tomato and Olive Pesto Pasta Salad

1 lb of pasta like farfalle or rotini
1/4 C lightly packed sundried tomatoes, rinsed of excess oil
1/2 C kalamata olives
1/2 C coarsely grated parmesan
1/4 C slivered almonds, toasted
a few sprigs of parsley
1/4 C olive oil
2 - 3 cloves of garlic, minced or pressed
1 Tbsp balsamic vinegar
1 - 2 tsp lemon zest, from half or whole lemon
additional lemon juice to taste
salt and pepper to taste

Boil the pasta in salted water until al dente. Set aside to cool.

Toast the almond slivers in a skillet over medium to medium high heat. Shake the pan frequently until the nuts are golden brown and set aside to cool.

In a food processor, pulse everything except for the lemon juice until it is a fine to coarse chop. When the pasta has cooled a bit, mix in the pesto. Add salt, pepper, and lemon juice to taste.

Serve cold or at room temp.

LinkWithin

Blog Widget by LinkWithin