I can't believe it's been over 3 weeks since my last post. Eek! An update is long overdue and I want to apologize for my sudden disappearance. A combination of things led to my blogging hiatus like looking for an apartment, finally learning how to drive, my still-somewhat-brand-new camera being on the fritz (so sad... sooo very sad) just to name a few. I still have lots of things to take care but I'm back to blogging and I'll be returning emails, responding to comments, and visiting my other food blogging buds again. I'm sooo sorry if I haven't replied to your email, my inbox is a mess! So if you have an unanswered question, please send me another email. I also want to thank everyone who wished me a happy bday (now I'm finally old enough to buy alcohol for cooking!) and for leaving me so many nice comments during my absence. Y'all are so nice. :)
Okay now onto the food! Isn't that what everyone is here for?
I postponed my June Daring Bakers challenge and when I finally completed it, my camera had some issues and I wasn't able to take any pics, which was too bad. But man oh man was it tasty! At first the idea of making a laminated dough scared the crap out of me. I love yeast but working with a "butter block" is way intimidating. That's like the stuff for professional bakers ya know? "Oh god what if the butter spurts out, what if I don't get any flaky layers?!?! Nooooo..." This is when I make a face that looks like that Edvard Munch painting. But I had nothing to worry about because the dough was really easy to work with. Though, it's not something you can rush, so I watched a movie while making it and just paused every 20 minutes or so to take the dough out of the fridge and give it another turn. (Speaking of movies, everyone needs to go see Batman and Wall-E ASAP!) I filled one braid with strawberry jam and cream cheese and another with shredded coconut and cream cheese and made a little Danish roll with leftover dough scraps filled with Nutella. I have to say this was my favorite Daring Bakers Challenge so far. If you have any fears about making a laminated dough, you have to try this recipe, from Sherry Yard's The Secrets of Baking
And now for a recipe too. :)
Every summer I eagerly await the opening of a neighborhood berry stand that have the OMG most amazing strawberries ever... EVER! Washington state's strawberry season was delayed this year due to the chilly weather back in June. People were afraid the berries would start molding on the plant! All that uncertainty, the crappy weather, June was just a sad and gloomy month. I waited, and waited, and waited for my beloved stand to show any signs of opening. Then, one day I saw it! "Strawberries, Coming Soon!" on the window. Summer was finally here! When the stand finally opened, you could smell it a mile away, okay, maybe not a mile, more like 20 feet. There's no resisting the combined fragrance of dozens and dozens of flats filled with 100% ripe organic strawberries. At first the berries look so unassuming, so tiny compared to the monstrous 5-headed strawberries you see in the supermarket (you know the ones I'm talking about, the ones that look like multiple berries somehow got fused together). Just one of these small, ruby red strawberries packs more flavor than a whole carton of totally forgettable supermarket strawberries. I'm guilty of eating a pound or more of berries in one sitting. Mmm... sunshine and ruby red fingers, isn't that what summer is all about!
Oh and if anyone is interested in the berry stand, it's on 35th and NE 80th in the parking lot just north of the post office. I think the stand is selling raspberries now or maybe they've moved onto marionberries and blueberries. They usually sell strawberries in late June to early July then raspberries, then marionberries and blueberries, and finally finish up the summer with blackberries in late August. Come Christmas time, the berry stand becomes a tree farm. Cute huh? :)
Strawberry season may be over but save this recipe for next year.
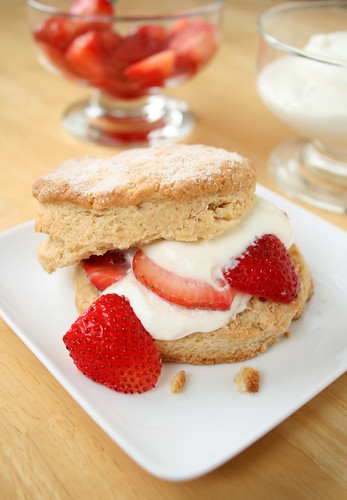
Strawberry Shortcake
Strawberries
Sugar
Sweetened Whipping Cream
Shortcakes (recipe see below)
Wash and hull the strawberries and cut them in half or in slices. Depending on the sweetness of the berries add a few spoonfuls of sugar. Let them sit and macerate at room temperature for 30 minutes to an hour.
Split the shortcake in half and top with a generous scoop of berries and sweetened whipping cream.
Shortcake/Cream Scone
Adapted from Joy of Baking
2 C flour
1/4 C sugar
2 tsp baking powder
1/4 tsp salt
1/4 C (1/2 stick) butter, cold and cut into 8 pieces
1 large egg, lightly beaten
1 tsp vanilla extract
1/2 C cream (both heavy whipping and regular whipping cream will work)
Preheat the oven to 400 degrees F.
In a large bowl, whisk together the flour, sugar, baking powder, and salt. Cut the butter into the dry ingredients with a pastry cutter, two forks, or pulse it a few times in the food processor.
In a separate bowl mix the egg, vanilla, and cream together. Pour this mixture, into the dry ingredients and gently fold the mixture until just combined. Do not overmix.
Turn the dough until a lightly floured work surface and roll the dough out until it is about 3/4 inch thick. Using a 2 1/2 or 3 inch round biscuit or cookie cutter, cut the dough into rounds. You will get about 8 to 10.
Optional: sprinkle some sugar on top of the dough.
Bake at 400 degrees for 12 - 15 minutes, or until a toothpick inserted in the center comes out clean.
Serve these at room temperature or slightly warm for shortcakes.

