Sunday, April 29, 2007
Chinese BBQ Pork - Char Siu
Take a stroll down a street in Chinatown and you’ll often see roast duck and char siu hanging in a store or restaurant window. Char siu, or cha shao, literally translates into “fork roasted” because the meat is suspended from hooks while being roasted in the oven. The most distinguishing feature of char siu is its color. While it is usually a dark red, it can range from a barely-red dark brown to a strange pink. The problem with some char siu is that while the color is attractive and smell tantalizing, more often then not, the meat inside is a bland white, that’s dry and difficult to swallow.
I have made many attempts to try to make char siu at home but homemade char siu is plagued with different problems. The meat is juicy but the taste is nowhere close. In addition, without using red food coloring you can’t achieve the deep red color. Overall the meat tastes decent but it does not look like or taste like true char siu. With each attempt, something was still off and I was close to giving up entirely. Steven told me to “just use the stuff in the packet” like his mom. I’ve tried the char siu his mom made from the packet, it wasn’t bad, don’t get me wrong, but I am vehemently opposed to using any sort of seasoning packet. Then Cook’s Illustrated published their version of the recipe. I was extremely eager to try it. You may notice that many of my recipes are adaptations from Cook’s Illustrated recipes because their recipes are usually really great. Their very scientific methodology of testing a recipe’s multiple variations and permutations really speaks to my inner scientist (though their recipes can end up being a bit labor intensive and over-the-top). On the other hand, I was a tad skeptical because how can their recipe be better than the ones in Chinese dim sum books I’ve looked at in the past. Shouldn’t the recipe in those books be more “authentic”?
All doubts were erased when I tasted the final product, lightly charred on the outside and tender and juicy on the inside. It was fantastic! The flavor was really close (I can’t say it was spot on because I couldn’t do a side by side comparison), but the meat was so flavorful inside and out, I daresay this recipe is better! The recipe did not use food coloring but a deep mahogany reddish brown was achieved by using ketchup. Sure it’s not an authentic ingredient but that’s a minor detail since it tastes so darn good!
The recipe called for pork butt, a cut from the shoulder, but I used country style ribs instead, which worked wonderfully. I also changed a few of the ingredients, for example decreasing the hoisin sauce because I don't like a strong hoisin flavor. Since the recipe calls for around 4 lbs of meat, the original plan was to make some cha shao bao but the meat mysteriously disappeared so quickly that there was hardly any left to make bao. Next time I make this, I promise I’ll have a recipe for cha shao bao.
Char Siu – Chinese BBQ Pork
Adapted from Cook’s Illustrated
4 lbs pork boneless butt cut into slices about 1-in thick, or country style ribs
Marinade
1/4 C sugar
1/2 C soy sauce
1/4 C hoisin sauce
1/4 C Shao Hsing rice wine, or dry sherry
1/4 tsp white pepper
1 tsp five spice powder
2 tsp toasted sesame oil
1 Tbsp freshly grated ginger
2 garlic cloves, minced
Basting
1/4 C ketchup
1/4 C honey
You will need an oven-safe wire rack and tray for this recipe.
Whisk together all the ingredients for the marinade in a bowl. Add the sesame oil, after you whisk everything together, otherwise the oil combines with the five spice and forms clumps that are hard to incorporate. Measure out 1/3 C of the marinade and set aside.
Pierce the pieces of pork 10 – 12 times all over with a fork. Place in a large zipper lock bag or tray and pour the marinade over the pork. Make sure each piece of pork is coated sufficiently with the marinade. Marinate in the fridge for 3 – 5 hours.
For the glaze, combine the reserved 1/3 C of marinade with the ketchup and honey. Cook over medium heat and reduce it until it’s syrupy, about 4 – 6 minutes.
Preheat the oven to 300ºF. Line a tray with foil and set the wire rack over the tray.
Place the pork on the wire rack. Pour about 1/2 C (enough to cover the bottom) of hot water into the bottom of the tray and cover the tray tightly with foil. Roast on the middle rack for 20 minutes.
Remove the foil and roast for another 40 to 45 minutes, until the edges of the meat start to brown.
Turn on the broiler (keeping the rack on the middle rack), and broil the first side of the pork for about 5 minutes. Then brush the pork with half the glaze and broil for another 5 minutes, until the pork is a dark brownish red and evenly caramelized. Flip the meat over and broil the second side for 5 minutes, then brush on the glaze, and broil for another 5 minutes.
Cool, then cut into slices and serve with rice. If you have extra, you can freeze it, add it to soup, ramen, or fried rice.
Friday, April 27, 2007
Green Onion Pancake - Weekend Herb Blogging
This week is my first foray into Weekend Herb Blogging, hosted this week by Glenna of A Fridge Full of Food, and I’m featuring my favorite herb, the green onion. The green onion, also called the scallion or spring onion (or shallot in Australia), is a member of the allium family which includes the onion, garlic, leek, and many others. Technically speaking, scallions are younger and do not have a bulb whereas green onions have a small partially formed bulb, but for the most part, the names are used interchangeably. The green onion is an herb that’s indispensable in Chinese cooking and it’s the one herb I always have in my fridge. The green part is milder in flavor and is much like an herb whereas the white bulb is stronger and more oniony. Green onions are often served raw, but one thing I learned from my dad is to slice and panfry them quickly in a little bit of oil. He calls it “bao,” which means to burst. The flavor of the green onion bursts in hot oil, which changes the flavor and releases the aroma. Raw green onions can be a bit harsh and sometimes soapy tasting, but heating them in oil cuts the harshness, rounds out the flavor, and makes it much more aromatic. You’ll notice a big difference in the smell; raw green onions don’t really smell like anything but after panfrying, it smells amazingly fragrant. The green onions and hot oil is then added on top of foods like tofu or tossed in a salad.
Green onion pancakes (cong you bing) are a breakfast and snack staple in China and Taiwan. Unlike a traditional pancake, it is made with dough instead of batter. The end result is a chewy flatbread. Panfrying the pancakes releases the aroma from the green onion and makes them smell irresistible. Boiling hot water is used to gelatinize some of the gluten in the flour making a chewy pancake. A combination of hot and cold water creates a dual textured, chewy and crispy pancake. Whether you use all hot water or both hot and cold is up to you. Traditionally lard or peanut oil is brush the dough but I used butter instead.
Green Onion Pancake
2 1/2 C AP flour
3/4 C boiling water
1/4 C cold water
1/2 tsp salt
About 3 Tbsp butter, softened
About 3 Tbsp finely chopped green onion, 2 – 3 green onions
Oil for pan frying
Add flour and salt to a bowl, pour in hot water and stir to combine. Let the dough cool down a bit then add the cold water and knead the dough until smooth. You can do this in a standing mixer, food processor, or by hand.
Put the dough in an oiled bowl, cover, and let rest for an hour.
Roll the dough into a snake and divide into 8 pieces. This will yield 6 in pancakes about 1/4-in thick. You can divide the dough into more pieces for smaller, cuter pancakes.
Take one piece of dough, leaving the rest covered, and roll it out into a large and thin circle, the thinner the circle the more layers the pancake will have. Spread a very thin layer of softened butter on the dough, about 1 teaspoon. Sprinkle or spread about a teaspoon of chopped green onions on top of the butter.
Roll up the dough into a tight tube. Then take the tube and form a coil and pinch the seam shut.
Do this to the remaining pieces of dough, so you have 8 rolls. You can chill it in the fridge for a few minutes to solidify the butter or just proceed to rolling them. Roll out each bun into a pancake, depending on the thickness you prefer. For a chewier pancake keep the pancake a little thicker; if you want a crispy thin pancake, roll it out thinner.
You can stack the pancakes in between sheets of plastic wrap and freeze the extras.
Heat some oil in a skillet over medium heat and fry each side of the pancake for a few minutes until it’s crisp and golden brown. Drain on paper towels to blot away excess oil. Cut into wedges and serve with soy sauce or soy paste if desired.
Yields: 8 6-in pancakes about 1/4-in thick.
Weekend Herb Blogging is a wonderful event created by Kalyn of Kalyn’s Kitchen and this week it’s hosted by Glenna of A Fridge Full of Food.
Wednesday, April 25, 2007
Shrimp Scampi
Pasta comes to the rescue a lot around here, especially if we’re looking for a quick meal. Last night I made a simple Shrimp Scampi. It’s a snap to make so it serves as a great weeknight dinner. The interplay of robust garlic, tangy lemon, and fresh parsley with tender succulent shrimp in a delicate white wine sauce is fantastic. A teeny tiny bit of cayenne adds a kick but it’s completely optional. Adding the lemon juice and zest and parsley last helps preserve their bright flavor.
Shrimp Scampi with Linguini
8 oz. large shrimp, peeled and deveined (smaller shrimp can be used but shorten the cooking time)
1 small shallot, finely chopped
3 - 4 cloves garlic, minced
Juice of half a lemon, about 1 to 1 1/2 Tbsp
1/4 to 1/2 tsp lemon zest
1/4 C dry white wine
2 Tbsp parsley, finely chopped
2 tsp olive oil
2 Tbsp butter
Salt and pepper to taste
cayenne, optional
8 oz. linguini (I used spaghetti)
The cooking goes by very quickly so I did my ingredient prep as I was waiting for the water to boil.
Bring a pot of salted water to a boil for the pasta. When you drop the pasta in the water, start cooking the scampi.
Season the shrimp with salt and pepper. Heat 2 tsp of olive oil in a skillet over medium high heat and cook the shrimp until they turn opaque and just pink, about 30 seconds to a minute or so each side. Transfer to a bowl and set aside.
Return the pan to the stove, add 1 tbsp of butter and the shallots. Cook over medium heat until the shallots are translucent and begin to brown around the edges, about 3 to 4 minutes. Add the garlic and cook for 30 seconds until fragrant. Add the white wine and deglaze the pan, scraping up the brown bits from the pan, then add the lemon juice, bring it to a boil then take off heat. (Remember to keep an eye on your pasta)
Off heat, whisk in the remaining tbsp of butter, lemon zest, parsley, and a little bit of cayenne. Add the shrimp and pasta, toss to combine and serve immediately.
Serves 2.
As for the other half of the lemon and remaining zest on the peel, you can juice the half and freeze the juice in an ice cube tray for another day. You can also freeze the peels to save them. Grate the peels while they're still frozen; don't let the peels thaw or they'll be too squishy to zest.
Links:
This will be my entry for Presto Pasta Night. Presto Pasta Night is hosted every week by the wonderful Ruth over at Once Upon a Feast. Be sure to check out this week's roundup on Friday.
Monday, April 23, 2007
Gnocchi
After I read “Heat,"I wanted to pack up my bags, fly to Italy, and learn the techniques passed down from generation to generation for authetic Italian dishes. A girl can dream right? Gnocchi is one dish I wanted to learn how to make. I have never had a really good gnocchi but they’re rumored to be little pillows as light as a cloud that melt in your mouth.
I didn’t expect much to come out of my first attempt because gnocchi is something that takes a long time to get right. There are many factors that can affect the gnocchi. It's easy for them to become chewy and dense but recipes have many tips to help prevent this. Potatoes should be baked rather than boiled to minimize the amount of liquid they absorb. I learned from Elise that older potatoes are drier and better for gnocchi. Although, many recipes call for an egg, it can also contribute to dense gnocchi so eggs should be avoided. You should use as little flour as possible to bring the dough together but enough so the dough isn’t sticky. Knead as lightly and as little as possible, the more you knead, the stickier and denser the dough becomes and the more flour you will have to incorporate. That's a lot to keep in mind for something that only requires 2 ingredients. Oy!
Since gnocchi are so light, they are best accompanied by a light sauce with some (I like a generous amount) grated Parmesan on top. A classic sauce is one of browned butter and sage. A smooth tomato sauce is another good pairing with gnocchi. Gnocchi can be frozen on a tray then in a zipper lock bag and keep for 1 month.
Potato Gnocchi
Adapted from Cook’s Illustrated
2 lbs Russet potatoes, about 4 – 5, washed
1 1/4 C AP flour (you may need to use up to 1 1/2)
1/2 tsp of salt
Poke holes all over the potatoes and bake the potatoes at 400°F until you can pierce them easily with a skewer or knife and feel no resistance, about 45 minutes to an hour. Be sure to bake the potatoes long enough so they lose as much moisture as possible.
When the potatoes can be handled, peel or cut them in half and scoop out the flesh. Put the potatoes through a ricer. A potato ricer is ideal because it keeps the potato fluffy so I might go out and buy one for next time. Alternatively, you can gently break and fluff up the potatoes up with a fork. I read that you can push it through the back of a fine mesh sieve but that didn’t work for me. Smitten Kitchen’s Deb used a grater to grate the potatoes. I have to try this sometime because it sounds like a great idea. Spread the riced potatoes over a baking sheet or large cutting board to allow the potato to dry out some more.
First sprinkle 1 1/4 C of flour and the salt over the riced potatoes, then bring the dough together and gently knead a little until smooth. You only want to incorporate the flour with the potatoes. If the dough is sticky add more flour, up to 1 1/2 C total (I misread this and thought it said additional... oops that's a lot of flour). Be careful not to overwork the dough, the more you knead the stickier the dough will get and the more flour you will end up incorporating (a mistake I made).
Have a pot of simmering water ready. Break off a piece of the dough and form into a gnocchi. Cook this test piece to gauge if you need to add more flour to the dough. The gnocchi is ready when it floats. If it tastes mushy, work in another 2 Tbsp to 1/4 C of flour. It's better to try a piece of the gnocchi than ruin an entire batch.
To make the gnocchi, roll a portion of the dough into a log about 3/4-in diameter and cut into 3/4-in pieces. Roll the piece down the tines of a fork. The grooves from the tines and the indentation from your finger will hold the sauce.
Simmer the gnocchi until they float, about 1 1/2 to 2 minutes (3 minutes for frozen). Serve with sauce and grated parmesan.
I still haven't gotten the hang of rolling them down the tines part. My gnocchi were a bit dense and chewy, probably because I kneaded too much and added way too much flour. It was still fun so I’ll try again soon.
Links:
Elise’s simple recipe for potato gnocchi
Deb is smitten with gnocchi
Saturday, April 21, 2007
5 Yum Yum Sup Sup - Five Favorite Places to Eat in Seattle, WA
I was recently tagged by Tigerfish of Teczcape with a food meme to share my top 5 favorite places to eat in Seattle. Seattle is known for fresh seafood, primarily salmon and lots of it, and coffee (Starbucks anyone?) but there are also many immigrant populations here so there is a wide variety of different cuisines to choose from. I have to admit Steven and I don’t dine out much but there are a few places that we love. We are always on the lookout for “cheap eats" and many of these are close to the University of Washington, where Steven and I spent our days for the last 5 years. So without further ado, here are some of Steven and my favorite places to eat (in no particular order).
1. Le Fournil
This French bakery has a wide assortment of breads, croissants, tarts, and pastries. On sunny summer days Steven and I would take a leisurely walk from the University across the Eastlake Bridge to the bakery for their lunch specials. For $7 (now it’s $8) you get a sandwich (quiche, salad, or soup), a drink, and an individual dessert. Our favorite sandwich is the pate and cornichon sandwich. It features a generous layer of luscious pate, sliced cornichons, and a thin layer of Dijon mustard on a fresh baked baguette. It’s soooo good! As they make our sandwiches Steven and I would stare at the glass display case debating which pastry to try that day (the strawberry tart, chocolate eclair, or cream puff, it’s so hard to decide). They also have a breakfast special: an espresso and croissant (they’re quite big if I remember) for $3, a great way to start your morning.
2. Campagne
Campagne has been around for a long time. Tucked away in Pike Place Market, it is a small intimate restaurant that serves classic French food. Pomme frites ala canard, duck confit, tart tatin, (all so good) the list can go on and on. Steven and I can’t wait to go again though it is fairly pricey. If you live in the Seattle area, give Campagne a try (they participate in the 25 for $25 deal in March and November and occasionally have promotions like $20 buck duck, 2 course duck dinner) or visit their less expensive sister restaurant, Café Campagne that serves bistro fare.
3. Mirak
Korean BBQ is always fun and tasty, just don’t wear your Sunday’s best and leave your coat in the car because you will inevitably leave smelling like oil and smoke. I still remember Steven's parents telling me to wear an old t-shirt. Each table is fitted with a gas grill built into the center of the table. The barbeque menu offers various cuts of meat, beef, chicken, etc. Platters of marinated meat are brought out, along with rice, Romaine lettuce leaves, and an array of small side dishes. You cook for one another, serve one another, then finally talk and relax while sipping corn tea. It’s a very hands-on dining experience and a great place to go for family meals.
4. Thai Tom
There are lots of Thai restaurants on the Ave also known as the University Way. Lined with restaurant after restaurant, it is the epicenter of University District dining. This hole-in-the-wall Thai joint is tiny, you might walk right past it if it wasn't for the line that stretches out the door and onto the sidewalk. Thai Tom is the best thai restaurant in the U-Distict and one of the best in Seattle. It features an open kitchen where you can watch the chef work his magic so the best seats are at the counter, which are the front row seats for the seemingly choreographed show of sauces, ladles, blackened woks, and fire. There will almost always be a line but wait is worth it. Their pad thai is delicious, my only complaint is I wish I get more because I love pad thai.
5. Honeybee’s Cafe
Honeybee’s is gone now but I want to pay tribute to my all time favorite lunch spot that sustained me, Steven, and many of our friends through our college years. The sandwiches were great and the crinkle-cut garlic salted fries were always hot and fresh. A half sandwich and a side of fries was the perfect size lunch for me and it was only $3! The whole sandwich and an even larger side of fries was only $6 to $7. Whenever Steven and I needed an afternoon snack we would order just the side of fries. The menu featured a variety of hot and cold sandwiches including the “Turkey-Bacon-Avocado,” “BBQ Chicken Quesadilla,” “French Dip,” and the sandwich Steven and I would get most often, the “Create Your Own,” with pastrami and salami (and cheddar, pepperjack, and usual sandwich fixins'). We always ordered a side of ranch to dip our fries in and pretty soon we became regulars and the owners knew our order. It was pretty awesome. Honeybee’s was always a popular place but sadly, during my last year of undergrad, it came under new management and was turned into yet another teriyaki joint on the Ave that featured a strange combination of Japanese and Korean food and some sandwiches. While the sandwiches had the same name as the Honeybee's classics, they just weren’t the same. The eccentric music was gone, our beloved owners replaced with unrecognizable new ones, and the adorable name replaced with a cheesy “Udublicious” (then renamed again Yummy Bites). Sadly, Honeybee’s is no more.
5 1/2. Last Bite (or Sip)
Jones Soda Company is based in Seattle, Washington. It features many unconventional soda flavors, my personal favorites are “Crushed Melon” and “Green Apple.” Recently, the company switched from using HFCS to cane sugar. The unique bottle labels are photographs that can be submitted by anyone. During the holiday season they have limited edition collector’s flavors like “Green Bean Casserole” and “Mashed Potatoes with Butter,” which probably tastes as good as it sounds (ick). Anyways, the best part is that Friday afternoons are Free Soda Fridays (I think from 3:30 to 5pm) so you can just walk in and grab your favorite soda from their fridge.
So with that, I’d like to tag other fellow food bloggers around the world to share their favorite places to eat.
1. Add a direct link to your post below the name of the person who tagged you. Include the state and country you’re in.
Nicole (Sydney, Australia)
velverse (Kuala Lumpur, Malaysia)
LB (San Giovanni in Marignano, Italy)
eastcoastlife (East Coast, Singapore)
Tigerfish of Teczcape (California, USA)
Amy of Nook and Pantry (Seattle, WA, USA)
2. List your top 5 favorite places to eat at your location.
3. Tag 5 other people (preferably from other countries/states) ..and let them know they’ve been tagged
I would like to tag:
1. Sig of Live to Eat (Seattle, WA, USA) – I want to know where fellow Seattleite Sig and Siv like to eat.
2. Patricia of Technicolor Kitchen (Sao Paulo, Brazil) – I’ve always wanted to go to Brazil and want to know what to eat so I'm eager to hear what Patricia loves.
3. Melting Wok (Covina, California, USA) – Bettina (Steven’s sister) is down in SoCal for college so I'm eager to know what's good so Steven and I can go when we visit.
4. Anh of Food Lover’s Journey (Melbourne, Victoria, Australia) – Australia is also on my to-visit list and I wanna know what Anh likes to eat.
5. Gattina of Kitchen Unplugged (New Jersey, USA) – I haven't visited the East Coast in a long time so I curious to see what Gattina likes.
If anyone else would like to do this meme, leave me a note so I can link to ya. I’m looking forward to seeing your favorite places to eat (other the delicious food everyone makes at home).
Thursday, April 19, 2007
Waiter There's Something in My... Bread! - Pecan Sticky Buns
“These are really good,” Steven said for the fourth time, as he unrolled and tore off pieces off his sticky bun. Rarely does he give something so much praise but these sticky buns were exceptional. I’m always happy when he likes the food and I was particularly happy and relieved today because the buns took half the day to make. As the buns were baking, Steven went from room to room and opened all the doors. I asked what he was doing. He replied, “I want the whole house to smell good.” They came out of the oven right before dinner time so we officially ruined our appetites.
I was a bit intimated by this month’s WTSIM because I don’t bake bread. My first and only bread was a loaf of no-knead bread. Originally I wanted to try to make a brioche but I really wanted to try this sticky bun recipe. It even has a brioche-like dough so it was perfect! Unfortunately being a total bread novice, I accidentally misread teaspoon as tablespoon and added 3 times more yeast. Yikes! No wonder the dough rose so quickly. So I froze that yeasty abomination, hoping to be able to salvage it someday and started over with a new dough. This time adding the right amount of yeast and everything went swimmingly, sorta (in my rush to remake the dough, a few eggs rolled off the counter... I hope that's not bad luck).
I actually made a 2/3 recipe because I was afraid the whole recipe would have been too much. I also made the mistake of baking a 2/3 recipe in an 8 x 8 pan, which is half the size of a 9 x 13, so the buns were really cramped. So either make a 2/3 recipe in a 9 x 9 pan or make the whole recipe in a 9 x 13. Cutting the recipe in half is really tricky since there are so many ingredients (like the eggs) that are hard to divide in half. But these are so good and if you’re going through all the trouble, it’s probably best to make the whole recipe. You can freeze or give away the extras to friends and family and they’ll love you for it. The original recipe called for corn syrup but I didn’t have any so I used honey instead. Honey is sweeter than corn syrup so I cut back on the sugar. If you choose to use corn syrup you may wish to add a bit more brown sugar. Toasting the pecans separately keeps them crispy and you avoid steaming them underneath the buns. The recipe is a bit labor intensive but oh so worth it. As for the botched dough in the freezer, I’m open to any suggestions as to what to do with it.
Update: I made these again (full recipe) in a pyrex and they were done in under 30 minutes. Even though I didn't use a pizza stone the caramel still cooked pretty evenly. Being able to look at the bottom of the bun was really handy, don't let the caramel get too dark otherwise it'll get hard like candy. If you find that the caramel is cooking too fast move the buns up a rack. But for me lower middle rack worked just fine.
Sticky Buns with Pecans, recipe for a 9 x 13 pan (recipe for 9 x 9 at the end)
Adapted from Cook’s Illustrated
Dough
3 eggs, room temp
3/4 C buttermilk, room temp
3 Tbsp granulated sugar
1 1/4 tsp salt
Package of instant yeast, 2 ¼ tsp
4 to 4 ¼ C AP flour
6 Tbsp melted butter
Caramel Glaze
5 Tbsp butter
1/2 C brown sugar
3 Tbsp honey
1.5 Tbsp milk
Pinch salt
Cinnamon Sugar Filling
1/2 C brown sugar
2 tsp cinnamon
Pinch salt
1 Tbsp butter, melted
Pecan Topping
3 Tbsp butter
3 Tbsp brown sugar
3 Tbsp honey
1 pinch salt
1 tsp vanilla
3/4 C pecans, toasted and chopped
Whisk together the eggs, buttermilk, sugar, salt, and yeast. First add half of the flour and melted butter and stir into a loose batter. Using the dough hook of a stand mixer, add all but 1/4 C of the flour, and knead on low speed for 5 minutes then check the status of the dough. Dough should be moist but not sticky. The dough should be sticking to the bottom of the bowl (the little round divot at the bottom of the bowl) but should not stick to the sides. If it sticks to the sides of the bowl, add more flour. Knead for another 5 minutes. Then turn the dough out to a lightly floured board and knead another minute by hand and bring the dough into a ball. Dough should be smooth and a tiny bit tacky. If you do not have a stand mixer, you can knead by hand but knead twice as long, for 20 minutes.
Transfer the dough to a bowl lightly sprayed with nonstick spray. Then spray the top of the dough so it doesn’t dry out. Cover tightly with plastic wrap and put in a warm, draft-free place until doubled, about 2 to 2 1/2 hours. I use my huge 2 quart pyrex measuring cup to measure dough rise. The markings on the side are perfect for telling me when my dough has doubled.
For the glaze, combine all the ingredients in a small saucepan and whisk together over medium low heat until the butter has melted. Pour into your baking pan and spread the mixture evenly over the bottom of the pan and set aside.
Combine all the ingredients for the cinnamon sugar filling and set aside.
When the dough has doubled, gently turn it out to a lightly floured surface. Roll it out to a rectangle. If using a 9 x 13 pan, roll out into a 16 x 12 rectangle. If using a 9 x 9 pan, roll out into a 12 x 12 rectangle. Melt a tablespoon of butter and brush the dough, leaving a 1/2 in border on the top edge. Using the remaining butter to butter the sides of the baking pan.
Spread the cinnamon sugar evenly over the dough, leaving a 1/2 in border along the top edge. Smooth and gently press the filling on the dough. With the edge closest to you, start rolling the dough into a cylinder; keep the roll very taut and tight. Pinch the seam shut. The log may be thick in the middle and taper out to the sides. Press the ends in and gently roll and stretch out the log until you have a log of uniform thickness, 18 inches if using a 9 x 13 pan or 13 inches if using a 9 x 9 pan. Using a serrated knife, gently saw through the log to cut even rolls, 12 for 9 x 13 or 9 for 9 x 9.
Place each bun, cut/pretty-side down on the filling in the pan. Cover with plastic wrap and let the rolls rise until they are puffy and pressed against each other, about 1 1/2 hours. At this point you can put them in the fridge overnight and bake them the next morning (overnight instructions are at the end).
The original recipe specified to bake these on a pizza stone, but since I was using a Pyrex pan I was a bit wary of putting Pyrex on a hot stone so I didn’t use one. If using a pizza stone, adjust your oven rack to the lowest position and preheat the oven to 350°F while the dough rises. The pizza stone takes a while to warm up. If not using a stone, adjust your oven rack to second lowest position and preheat the oven to 350°F but you don’t need to preheat as early.
Bake the buns for about 25 to 30 minutes, the tops should be golden brown and the center should read 180°F. If you’re using a glass pan, you can sneak a peek at the bottoms to make sure they’re done before you take them out of the oven.
Cool the tray on a wire rack for 10 minutes. While the buns cool, you can toast your pecans in the oven if you haven’t toasted them earlier. Then invert the pan onto a platter or cutting board. Scrape any goo in the pan onto the buns.
Prepare the topping as the buns cool. Heat butter, brown sugar, honey, and salt in a small sauce pan over medium heat whisking occasionally until bubbly. Then off heat, stir in vanilla and toasted chopped pecans. Spoon a dollop over each bun and serve.
Recipe for 9 x 9 pan
Dough
2 eggs, room temp
1/2 C buttermilk, room temp
2 Tbsp sugar
3/4 tsp salt
1.5 tsp instant yeast
2 1/2 to 2 3/4 C flour
4 tbsp butter, melted
Caramel Glaze
3 1/2 Tbsp butter
5 Tbsp brown sugar
2 Tbsp honey
1 Tbsp milk
Pinch salt
Filling
5 Tbsp brown sugar
1.5 tsp cinnamon
Pinch salt
2 tsp butter, melted
Topping
2 Tbsp butter
2 Tbsp brown sugar
2 Tbsp honey
1 pinch salt
3/4 tsp vanilla
1/2 C pecans, toasted and chopped
Overnight Sticky Buns
After shaping the buns, refrigerate overnight. The next morning, place them in a warm water bath for 20 minutes, and then continue with the 1 1/2 hour rise in a warm place. Proceed with the rest of the recipe.
Last bite!
*note to self: I need to find more places to take pictures. My dining table is getting a little boring. :P
Links:
A big thanks to Andy over at Spittoon Extra for hosting this month's WTSIM. :)
Saturday, April 14, 2007
Roast Duck
Last summer when I went to Beijing, I ate Peking duck almost every other day. Being a Shanghai native, my taste buds could not adjust to Beijing cuisine, with the exception of Peking roast duck. I wanted to make Peking duck at home but after reading a few recipes, I was frightened... very frightened. Strange and foreign equipment that do not belong in a kitchen such as a bicycle pump was required. I'm sorry but my bicycle pump is covered in cobwebs in the garage and I’m not venturing into the unknown any time soon to inflate my duck. The next step was to ladle boiling liquid onto the duck with one hand while skillfully suspending the duck over the pot of boiling liquid with another. Pot of boiling water, slippery duck, and clumsy me? That sounds like a recipe for disaster. Then I had to hang the duck for a day to dry out the skin, some people even hang their duck in the bathroom. Can you imagine walking into your bathroom and seeing a duck dangling from the shower rod? That would be quite the sight. Basically "authentic" Peking duck was out of the question. The next best thing was duck with Peking-style flavors that could be done in a day.
The main problem with duck is that it is really fatty so all the fat needs to be rendered out for the skin to be crispy. I wanted a duck with beautifully bronzed crispy skin with succulent meat without devoting my entire weekend to it. This duck was done in about 2 hours. The flavors were really excellent but the skin was not as crispy as I would have liked. Next time I will try Saveur’s 5 hour roast duck recipe.
Roast Duck
Adapted from Tyler Florence’s Chinatown Steamed and Roasted Duck
1 duck
4 green onions
3 (1/4 in) slices of ginger
2 star anise
peel of one orange
2 tsp salt
1 tsp Chinese Five Spice
1/4 tsp ground black pepper
1 Tbsp honey
1 tsp dark soy sauce (light soy can be substituted)
Steaming the duck helps render out some fat. Remove the giblets and cut off excess skin and fat. Stuff the duck with the aromatics: green onion, orange peels, ginger, and star anise. Steam the duck for 30 minutes. I used a large Dutch oven with a steamer insert on the bottom to prop up the duck. You can also use a roasting pan and a v rack, and tightly seal the pan by wrapping it with foil.
Using a fork, bamboo skewer, toothpick, any pointy object, poke holes all over the duck skin but do not pierce the meat. Be sure to poke plenty of holes in the "armpit region" of the duck where there are a lot of fat deposits. Make the dry mix, combine the salt, five spice, and pepper in a bowl. Remove and reserve the stuffing and rub the dry mix all over the inside and outside of the duck. You can steam the duck early in the day and at this point you can let the duck dry in the fridge to roast later.
Stuff the duck with the aromatics again. Baste the duck with the honey soy sauce mixture. Prop up the duck on a rack set on a roasting pan or tray and roast at 375ºF for 30 minutes, breast side down. Flip the duck breast side up and roast for another 30 minutes. Pour off fat from the tray if too much accumulates. Tent the parts that are getting too dark with foil.
Serve with hoisin sauce. Remember to keep the bones to make duck stock.
Tuesday, April 10, 2007
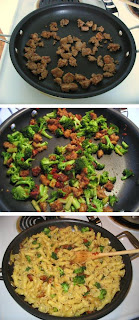
Campanelle with Italian Sausage, Sun-dried Tomatoes, and Broccoli
If I could pick an official pasta for Spring, it would be Campanelle. Shaped like a dainty bell or flower, campanelle is Italian for “little bell” or it is also called gigli meaning “lilies." Not only is it pretty but it's a very functional pasta because the funnel-like shape is perfect for holding a little smidgen of sauce. I'm sure it'd also be lovely for pasta salads because it is just too cute!
I love spontaneously created dishes that turn out surprisingly well. Last night the original plan was to eat leftovers but Steven announced that he wanted pasta. Being the accommodating cook that I am, I poked around in the fridge and we tried to pull together a decent pasta dish. The other day he mentioned how he really liked the sun-dried tomatoes we had, so I got those out of the fridge. Then I gathered a crown of broccoli along with the remainder of some roasted garlic. I dug out some Italian sausages from the freezer and defrosted two. What started out as a random hodgepodge of casually thrown together ingredients transformed into a delicious pasta dish.
I added just a tiny bit of balsamic vinegar at the end to brighten up the flavors and it worked really well. Fresh herbs would have made this dish even better but the Italian herb blend is always a staple in my pantry.
Campanelle with Italian Sausage, Sun-dried Tomatoes, and Broccoli
2 Italian sausages
1 broccoli crown, cut into small florets (about 2 cups)
2 Tbsp sun-dried tomatoes, rinsed of excess oil and minced
3 cloves roasted garlic, pureed or minced (can use regular garlic)
2 Tbsp extra virgin olive oil
1/4 tsp Italian herb blend (fresh herbs would be better)
salt and pepper
1 tsp balsamic vinegar
1/2 C grated Parmesan
8 oz. campanelle
Cut the broccoli crown into small bite size florets. The remaining stem pieces can be cut into small matchstick pieces and cooked with the florets. I like to peel off the outer fibrous layer.
Remove the Italian sausage from the casing. Heat a skillet over medium high heat and brown the sausages, breaking the sausages into small bite size pieces. Lower the heat to medium and fully cook the sausage pieces. Remove and drain on a paper towel lined plate.
Meanwhile, boil a pot of water, and cook campanelle to al dente. Drain when finished.
Wipe the skillet clean, return to stovetop over medium heat, and add 2 Tbsp of extra virgin olive oil. Add broccoli florets, sun-dried tomatoes, roasted garlic, herbs, salt and pepper and saute for about 1 minute. Then add Italian sausage and a tablespoon of water and cook until broccoli is at desired tenderness. Add drained pasta and toss everything together. If the pasta looks too dry add a bit of water, about 1 Tbsp, to loosen it up.
Off heat, drizzle the balsamic vinegar over the pasta and toss to distribute evenly. Add half of the grated parmesan to mix into the pasta then use the remainder to top the pasta.
Serves 2
Links:
This will be my entry for Presto Pasta Night. Be sure to check out this week's roundup on Friday.
Monday, April 9, 2007
Coffee Ice Cream
Sometimes when I'm on the bus commuting to and from work, I like to think about flavor combinations (white chocolate with green tea, almond extract with lychee). Sort of like matching colors or clothes, but instead debating whether certain flavors compliment each other. I spent some time thinking about which ice cream flavor would be best for the Nutella brownie ice cream sandwich. In the end I chose coffee because the chocolate and hazelnut flavors combined with coffee reminded me of a hazelnut mocha.
Most of the coffee ice cream recipes I found called for instant espresso powder so I went out and bought some (I read that Medaglia D’Oro is a good brand). Since I had never made homemade ice cream before, I researched how to make the ice cream base. Some recipes were simply shocking - one called for an alarming 9 yolks! Most recipes used either a 2:1 (resulting ice cream of around 15% milk fat) or 1:1 (20% milk fat) ratio of whole milk to heavy cream and a ratio of 2:1 yolk to liquid. This got me thinking, was it possible to make homemade ice cream taste rich and creamy but use less cream and less yolks? In this recipe, I used only 2 yolks (since I had used 2 whites the day before) and 2 cups half and half, which is a combination of milk and cream that is around 11% milk fat.
I think I skimped too much on the milk fat and yolks in this recipe. The custard did not thicken either because I did not heat it up sufficiently since I didn’t have a thermometer I was afraid of overcooking the custard or because the yolk content is too low. Overall the conclusion from this first experiment is that the ice cream was okay but not perfect. The consistency was not icy but it wasn’t creamy either (unfortunately the photo makes the ice cream look really icy for some reason). Half and half and 2 yolks just isn’t enough for the rich and smooth mouth feel of really excellent ice cream. Next time, I’ll have to use more egg yolks and more cream.
Coffee Ice Cream
2 C half and half
2 egg yolks
1/2 C sugar (it was a little too sweet for me so next time I will use 6 Tbsp instead)
2 tbsp instant espresso powder
1/2 tsp vanilla
Optional: 1/4 C chocolate covered coffee beans, chopped.
Whisk yolks with sugar until the mixture is thick and pale yellow, about 2 to 3 minutes. It should fall from the whisk in ribbons.
In a saucepan heat 1 cup of half and half until 180º (I didn't have a thermometer so I just winged it). While whisking the yolks, slowly drizzle 1/4 cup of the hot half and half into the egg mixture, repeat with another 1/4 cup until the whole cup of the half and half has been added. This tempers the egg yolks and brings them up to a warm temperature without scrambling them. A neat trick is to wrap a damp kitchen towel around the base of your mixing bowl. This prevents the bowl from slipping around on the counter and frees your hand from holding the bowl to both drizzle and whisk.
Whisk in the espresso powder and salt to the custard mixture.
Add the custard mixture back to the saucepan over medium low heat and heat it up to 180º. The custard is supposed to thicken but mine didn’t. To test if it is thickened enough, dip a spoon in the custard and run your finger along the back of it, if the edges remain clean then it's done, if the edges run and blurs then it's not thick enough.
Chill the custard in the fridge for a few hours until cold. After the custard is chilled, whisk in the vanilla extract and the remaining cup of half and half. Freeze in an ice cream machine according to manufacturer’s instructions. A few minutes before the ice cream is done add the chopped chocolate covered coffee beans if using.
Links:
Elise has a great coffee ice cream recipe that uses whole beans (can be made with decaf beans). I’ll have to try making coffee ice cream this way next time.
Saturday, April 7, 2007
Nutella Brownie - Browniebabe of the Month
I’m not a big peanut butter fan but I can eat Nutella by the spoonful. My goal was to make a Nutella-esque brownie by using Nutella in the batter and topping the brownies with hazelnuts. I have to admit, I sometimes use boxed brownie mixes but I found that making them from scratch is almost as simple. The perfect brownie is dense, chewy, fudgy, and devoid of nuts but these brownies are an exception to the nut rule.
Nutella Brownies
6 tbsp butter
3 oz bittersweet chocolate
1/4 C nutella
1/2 C sugar (I used 6 Tbsp)
2 eggs
1/2 C flour
1 tsp vanilla
1/4 tsp salt
1/3 C hazelnut, chopped
Preheat oven to 350ºF and line a square baking pan with 2 sheets of aluminum foil perpendicular to each other. This makes the brownies really easy to lift out. You can also grease the foil but I didn't.
Roughly chop chocolate and cut butter into small pats. Melt butter and chocolate over a double boiler or on low power in the microwave. I used the microwave at 30% power and stirred every minute; it took about 3 minutes.
Whisk in nutella, eggs, sugar, salt, and vanilla. Add flour and mix until just incorporated (do not over mix).
Spread into baking pan and scatter chopped hazelnuts on top of the brownies. Bake for 20 - 25 minutes.**
Start checking the brownies at 20 minutes. A toothpick inserted in the center of the brownies should come out with moist crumbs (if it comes out clean then the brownies have overbaked). It is better to underbake than overbake.
Notes:
*I found that the brownies did not have enough hazelnut flavor so next time I use some hazelnut liqueur, like Frangelico, or extract.
**Because I used a glass baking pan, I lowered the oven temp to 325ºF but I had to bake for almost 30 minutes.
Links:
I'm going to submit this recipe to Myriam for the Browniebabe of the Month Event.
Brownie Ice Cream Sandwich
I really thought I was on to something new by using brownies for ice cream sandwiches. But Google told me I wasn't the first only one who thought of this idea. So much for being the pioneer of a new dessert.
Cut brownies into the desired size of ice cream sandwich. Chill brownies in the freezer for 20 minutes so it is easier to slice. Slice the brownie in half horizontally. Add about 1/4 C ice cream to the bottom half of the brownie and smooth out the top and sides. Add the top half and lightly pat down the sandwich. Chill the sandwich in the freezer for another 20 min before serving.
I used coffee ice cream for the sandwich. The chocolate, hazelnut, and coffee flavors were reminescent of a hazelnut mocha.
Tuesday, April 3, 2007
Pork Katsu
The other day I was playing with Steven’s Nintendo DS and made some (virtual) pork katsu with Cooking Mama. Cooking Mama is a game that allows players to “cook” various meals by performing tasks such as chopping vegetables, pouring batter, kneading dough, etc. using the DS touchpad and stylus. For the pork katsu, the first task was to make slices in the meat. After a few swipes with the stylus, Mama said I did a very good job. Next, I had to tenderize the meat and with a few taps on the touch screen, my pork chop was fully tender. Following that I had to tap on the pork in a tray of flour, flip, tap again, then into the egg, swirl around, and onto another tray. Okay sounds easy enough. The first 3 cutlets went pretty well. But on the fourth cutlet, I couldn't get the pork to flip for the life of me. And there it sat on the tray of flour while I furiously drew on the screen to try to flip it and yelled at the handheld console. Then, I ran out of time. Boo, only 3 out of 4. I breaded the cutlets with panko and fried them until they were golden brown. Finally, I artfully arranged my food on a plate and waited for my score. Only a 91, a silver medal, all because that last cutlet just wouldn’t flip in the flour. I told Steven that cooking in real life isn’t nearly as frustrating as cooking in Cooking Mama (he's better at virtual cooking than I am). In fact, I made (real) pork katsu last night and I had no trouble flipping it in flour.
Pork katsu or tonkatsu is deep fried pork cutlet served with katsu sauce, a Worcestershire-like sauce. According to Wikipedia, it is one of the most popular dishes in Japan. Ironically, pork katsu was originally invented in the late 19th century as a sort of Western style dish to appeal to Japanese tastes, but over the years it has become more and more Japanese and is now served with rice and miso soup. It was one of my favorite lunches during my undergraduate days.
Traditionally, pork katsu is deep fried but I have a confession to make: I, Amy Chen, am scared of deep frying. I love deep fried foods but I’m just too scared to do it at home. I don’t trust my cheap candy/fry thermometer that takes eons to read a temperature (There will be an oil fire before it says the oil is 350 degrees). Purists will be shocked but I panfried the pork instead and it still turned out pretty crunchy.
Pork Katsu
4 boneless pork loin chops
Salt and pepper
Flour (about 1/4 C)
1 Egg, beaten
1 1/2 C panko
Katsu Sauce
1/4 C ketchup
2 Tbsp worchestershire sauce
1 Tbsp soy sauce
1 tsp brown sugar
1 tsp Dijon mustard
I buy bone-in loin chops and debone the chops myself and keep the bones for soup (plus it's cheaper this way).
Make a slice through the fat and silverskin (tough whitish fiberous membrane) that surrounds the outer edge of the chop every 2 inches around the chop. This helps the chops flatten more evenly and prevent them from curling when cooked. Pound each cutlet with a meat mallet until 1/4 in thick. Use the waffle surface (spiky side) to tenderize the meat and the smooth side to pound the chop to a thin even layer (the bottom of a pan also works).
Salt and pepper both sides of the pork chop then dredge the pork cutlet in flour and shake off the excess. Then coat the chop in beaten egg and bread with panko. Repeat for each cutlet.
Heat 1/4 in of oil in a skillet over medium high heat. Place the pork chops in the hot oil and fry each side until golden brown, about 3 to 5 minutes per side. Drain on paper towel and pat off the excess oil.
Cut into bite size pieces before serving. Serve with rice and katsu sauce (optional: miso soup and cabbage)
Serves 4.
Subscribe to:
Posts (Atom)