Pages

Sunday, October 28, 2007

Wilted Spinach Salad with Bacon and Oranges

Wilted Spinach Salad

To be honest, a wilted spinach salad doesn't sound all too appetizing. It conjures up the image of limp and lifeless greens smothered by a heavy dressing. But don't be fooled by the name, this is actually my new favorite salad. Baby spinach leaves are quickly tossed to prevent overwilting in a warm dressing. Add in some crisp bacon, orange segments, red onions and top with toasted nuts and egg slices, what's not to like?

Notes:
- After taking the photos , it occurred to me I forgot to add the egg slices! But I had already eaten my salad and it was too late. But the eggs are really a delicious touch so I wouldn't skip them (unless you hate eggs) :).
- The 6 oz. packages of prewashed baby spinach leaves are really convenient for this recipe.
- Only a small amount of bacon fat is used in the recipe to keep the dressing light.

Wilted Spinach Salad with Bacon and Oranges
3 eggs (can be optional)
6 oz. baby spinach (prewashed)
4 - 6 slices thick cut bacon
1/2 small or medium red onion
1 small clove of garlic, finely minced or pressed
1 orange
3 Tbsp red wine vinegar
Optional:
Some toasted pecans or almonds

Begin by hard boiling your eggs. Place the eggs in a small saucepan and fill with cold water, covering the eggs with an inch of water. Bring the water to a boil over high heat and once it boils, remove the pan from heat. Let the eggs sit in the pan for 10 minutes. If you like the yolks a little creamier, go for 8 or 9 minutes. Then transfer the eggs to cold water to stop the cooking. Peel the eggs. Cut them in half lengthwise then cut each half lengthwise again into thirds.

Transfer the spinach to a salad bowl and set aside.

Cut your bacon into 3/4 in pieces and fry in a skillet over medium heat to render out the fat. Cook until chewy or crisp depending on your preferences, about 10 - 15 minutes. (I like crisp bacon, Steven likes chewy bacon, but since I cook, crisp usually wins out over chewy.)

Meanwhile, slice your red onion into 1/4 in slices. Cut the onion in half and peel away the skin. Then cut the tip and root end off and slice from pole to pole.

Also cut your orange chunks. First cut the top and bottom of the orange off so you can stand it on the cutting board without it rolling away. Then cut the peel off, by cutting down the side with the curve of the orange. Do this all the way around the orange until you have exposed all of the flesh of the orange and cut away any residual pith. Next cut the orange in half then cut into 3/4 in chunks and set aside in a bowl.

When the bacon is done crisping, transfer to a paper towel lined plate. Keep the pan on medium heat. Pour out all of the bacon fat into a bowl. Then measure out 2 tablespoons of bacon fat and add it back to the pan. Add the onions and cook until it is barely softened, about 1 - 2 minutes. Add the garlic and cook until fragrant, about 30 seconds. Next add the oranges and any orange juice that have accumulated in the bowl and the red wine vinegar. The vinegar smell will be very pungent and strong. Quickly scrape up all the bacony browned bits that are stuck to the pan and add a little freshly ground black pepper. You don't want to cook the dressing, only heat it a bit.

Pour the dressing over the spinach and quickly toss the spinach to evenly distribute the dressing. Add the bacon on top and and divide onto servings plates. Add slices of egg and some toasted almond slices or chopped toasted pecans.


Monday, October 22, 2007

Buttermilk Waffles

Buttermilk Waffles
I borrowed a waffle iron from Steven's mom because she never used it... many months ago. I've always wanted to make homemade waffles but they sounded like a hassle since most recipes call for separating one egg and whipping a single egg white. So I kept putting off making waffles for another day and pretty soon, the waffle iron I borrowed from the back of Steven's mom's pantry ended up in the back of my pantry (waffle irons seem to have a tendency to end up back there).

I'm so reliant on my KitchenAid, but it is too big to be effective for one egg white, which ends up swirling around the divot in the bottom of the bowl without getting beaten by the whisk at all. I don't have a hand mixer and I tend to shy away from beating things by hand (what can I say, I'm lazy). But I discovered that beating an egg white is surprisingly easy and quick with a little elbow grease; that is when it's just one, the KitchenAid can beat the dozen if I ever have a hankering for angel food cake. Now that I know how easy waffles are to make, the waffle iron is brought out weekly and is no longer relegated to the back of the pantry. We not only eat them for our weekend breakfast, but I quickly whip some up for an afterwork snack, and the freezer is stocked with a steady supply for a quick breakfast during the week.

These buttermilk waffles are better than anything frozen sold at the grocery store. The outside is so crisp and the inside has that delicious buttermilk tang. The tablespoon of cornmeal is the secret ingredient that really elevates these waffles, adding a subtle crunch to the soft and fluffy interior.

Buttermilk Waffles

Buttermilk Waffles
Adapted from Cook's Illustrated
makes 4 - 6 depending on the size of your iron (makes exactly 6 on mine)

1 C AP flour
1 Tbsp cornmeal
1/8 tsp salt
1/4 tsp baking soda
1 egg separated
1 C buttermilk
2 Tbsp butter, melted and cooled
Nonstick cooking spray

Start preheating your waffle iron. In a mixing bowl, whisk together the flour, cornmeal, salt, and baking soda. In another mixing bowl, whisk the egg yolk with buttermilk and melted butter until combined.

Clean your whisk and beat the egg white to soft peaks.

Fold in the liquid ingredients into the dry ingredients, the batter will be quite thick. Then add the egg whites and gently fold them into the batter.

Spray your waffle iron with some nonstick spray and spread the batter onto the iron. Cook until the waffles are golden brown, about 2 - 5 minutes depending on your machine instructions.

For freezer toaster waffles, leave the waffles golden and slightly underdone. They can be frozen then popped into the toaster for a quick breakfast.

Variations:
Most of the time I prefer my waffles plain with nothing but a generous amount of maple syrup but you can do a variety of things to make them more interesting.
- Dried fruit or fresh fruit: craisins, blueberries, chopped up strawberries, etc.
- Citrus zest: next time I will try adding a little orange zest
- Chocolate chips or butterscotch chips

Thursday, October 18, 2007

Carrot Cupcakes with Maple Cream Cheese Frosting

Carrot Cupcake with Maple Cream Cheese Frosting

With the days becoming increasingly grayer, colder, and wetter (edit: and windy-er! You're so right Pea, how can I forget, we did have that windstorm tonight!), it's the perfect excuse to stay inside and bake. There's really nothing like curling up on the biggest, comfiest chair in the house with a fleece blanket and a good book as the smell of freshly baked goods fills the house and gives everyone a warm cinnamony hug. The autumnal combination of cranberries, maple syrup, and warm spices in these carrot cupcakes is a perfect example of why maybe this season isn't so bad after all.

This recipe uses a technique I read in the Cook's Illustrated carrot cake recipe and differs from most other recipes because the oil is emulsified with the sugar and egg, much like making a mayonnaise. This technique is pure genius and and creates the perfect texture, a lighter, not too dense or soggy, just overall excellent carrot cake. Next time, I will play around with the spices and try adding 1 teaspoon of orange zest to the mix. I love dried cranberries but you can substitute raisins or other chopped dried fruit or omit them entirely. You can also add nuts to the batter but I think nuts lose too much of their crunch when they are baked in batter so I prefer to add them on top as a garnish. This recipe makes 12 cupcakes but it can be doubled for a 9 x 13 sheet cake or 2 to 3 round cakes for a layer cake. Bake at the same temperature but for a longer time, until a toothpick inserted in the center of the cake comes out clean.

The maple cream cheese frosting is the same one I like to use on my cinnamon buns. It's just cream cheese and a generous amount of maple syrup; no additional sugar and butter. This way it lets the tang of the cream cheese and maple flavor really shine without being too rich or cloyingly sweet. And if you frost with a spoon, it's the perfect cook's treat for all your efforts.

Carrot Cupcake with Maple Cream Cheese Frosting
With inspiration from Cook's Illustrated
1 C flour
3/4 tsp baking powder
1/2 tsp baking soda
3/4 tsp cinnamon
1/4 tsp freshly ground nutmeg
1/4 tsp salt
1/3 C granulated sugar
1/3 C packed brown sugar
2 eggs
1/2 C vegetable or canola oil
1 1/2 C lightly packed finely shredded carrots (I used 2 carrots)
1/3 C dried cranberries (or raisins or omit)
(Next time: 1 tsp of orange zest)

Maple Cream Cheese Frosting
1/2 bar of cream cheese (4oz)
1/4 C maple syrup

Optional topping: finely chopped toasted pecans

Preheat the oven to 350 degrees F. Line a muffin tin with paper liners or grease them.

Shred your carrots on a box grater (be careful, mind your knuckles) or in a food processor with a shredding disc, set aside.

In a large mixing bowl, whisk the flour, baking powder, baking soda, cinnamon, nutmeg, and salt together.

In a food processor or blender, blend the granulated and brown sugar with the eggs until throughly combined. With the machine running, slowly pour in the oil and continue to mix until the mixture has lightened in color and is somewhat thicker, about 30 seconds. Pour it into the dry ingredients and add the shredded carrots and dried cranberries and mix until no streaks of flour remain.

Divide the batter into the prepared pan. Bake for about 17 to 23 minutes or until a toothpick inserted in the middle of a cupcake in the center of the pan comes out clean. Rotate the pan halfway into baking time. Remove the cupcakes from the pan and cool on a rack to room temperature.

As the cakes are cooling, take out half a bar of cream cheese and let it soften a little. To make the frosting, simply whisk the cream cheese with the maple syrup until smooth. Frost the cupcakes when they have cooled and top with chopped pecans if preferred.

Makes 12 cupcakes

Sunday, October 14, 2007

Spaghetti Squash with Green Onions

Spaghetti Squash

Weekend Herb Blogging is celebrating its two year anniversary! For this extra special celebration I wanted to make a dish with one of my favorite vegetables and herbs. My all-time favorite vegetable are plump, fresh snap peas but those aren't exactly seasonal right now. But autumn means that it's squash season and this is a special dish that I only make a handful of times each year.


My dad didn't cook much but this is a dish that I learned from him, one he learned from my nai nai (paternal grandmother). When he made it, he would always say nai nai made it better but I thought it was always delicious every time he made it. As a child, it was one of my favorite vegetable dishes. The dish is incredibly easy to make and uses only 2 main ingredients, one vegetable and one herb. The key difference between this recipe and all other spaghetti squash recipe is that the strands of squash are kept crunchy and crisp instead of cooked to soft and tender. It is served cold to maximize the crunch of the strands and is very refreshing. The second ingredient is green onion, which bursts in hot oil releasing its fragrant aroma and that aromatic oil is used to dress the squash. Green onion (tied with thyme as my favorite herb) was the only herb in my house growing up and is indispensable in Chinese cooking. The marriage of the green onion oil with toasted sesame oil makes this dish smell absolutely amazing and mouthwatering.

Notes:
- I've always steamed the squash face up but I realized after I made it last time, that it would make more sense to steam it face down so that more of the squash is in contact with the steam. This will most likely shorten the steaming time so be aware of this.
- The important part about steaming the squash is that you want to steaming for as little time as possible to maximize the crunch. However, steam too short and the squash will still be raw and impossible to scrape out of the shell. Steam too long and it will be too soft and mushy and you'll lose that crunch. So after about 13ish minutes poke the squash with a blunt butter knife. If the knife cannot penetrate the flesh of the squash at all, steam longer. You want the knife to be able to penetrate the squash but still feel resistance. It's a little tricky but don't worry you'll get the hang of it.
- Since this recipe makes a lot (you'd be surprised by how much squash there is after the strands are separated), if you've never steamed squash before, you can steam half of the squash and keep the other half wrapped in plastic wrap in the fridge to steam the next day. This way you can test just how long you need to steam it.

Spaghetti Squash with Green Onions
(makes a lot of squash, serves 4 - 6)
1 spaghetti squash
4 to 5 green onions, thinly sliced try to keep the greens separate from the white parts
1 1/2 to 2 Tbsp of neutral oil like canola
2 tsp to 1 Tbsp toasted sesame oil
Pinch or two of sugar
Salt

Bring water in a steamer to a boil. Cut the squash in half and scoop out as many seeds as possible (you can finish scooping after steaming it).

Steam the squash for about 15 to 20 minutes (steaming face up times, for face down, see note above). After about 13ish minutes poke the squash with a blunt butter knife. If the knife cannot penetrate the flesh of the squash at all, steam longer. You want the knife to be able to penetrate the squash but still feel resistance.

Have a bowl of (ice cold preferably) cold water ready and after the squash has finished steaming, plunk it in the cold water to stop cooking.

As soon as it is cool enough to handle, take it out, dump out the water in the bowl and add more cold water. With a spoon scrape out any remaining seeds and discard, then scrape out the spaghetti strands, keeping the stands intact as much as possible. Scrape the strands into the cold water. This helps each strand to cool down and recrisp.

After you have scraped all the squash, drain it into a colander. Then take your hands and grab a handful of the squash. Squeeze out as much water as possible then place it in a mixing bowl. Continue until you have squeezed all the squash. Alternatively, you can add handfuls of the squash to cheesecloth and squeeze it out that way.

Heat your oil in a wok or skillet (I eyeball it but its about 2 Tbsp) over medium heat. Add the sliced white part of the green onion, you can add it to the cold oil. The white part has more bite so it needs to be cooked a little longer. Let it gently bubble in the oil until you can smell the aroma, do not let them brown. After a few minutes, add the sliced green part and let it infuse into the hot oil for about a minute then take it off the heat. Scrape all of the oil and green onion into the green onions and toss it to evenly distribute. Then drizzle in the sesame oil, add the sugar, sprinkle salt to taste, and mix again. Make sure to really evenly distribute the salt. Chill in the fridge for a few hours and serve cold.


WHB is a wonderful weekly event created by Kalyn of Kalyn's Kitchen where bloggers can blog about vegetables and herbs. Head on over to her blog to check out the Doubly Delish Celebration and Roundup for the Weekend Herb Blogging Two Year Anniversary.


Saturday, October 13, 2007

Blackberry Muffins

Blackberry Muffin
After diligently picking blackberries every other day during last few weeks of summer, there's a huge bag of berries in the freezer just waiting to be used. So I made some blackberry muffins (and barely made a dent in the bag of berries). Being a constant recipe fiddler, what I love most about muffins is their flexibility and the endless number of flavor combinations; you can put whatever you want in them (fruit, nuts, spices, chocolate) or on them (streusel, flavored sugar, glazes, etc). I'm a big fan of quick breads like muffins and coffee cake with baked with sour cream or buttermilk instead of regular milk. The goods baked with sour cream and or buttermilk have a subtle, delicious tang and are more tender and moist than the ones baked with milk. When baking muffins, I always use sour cream or buttermilk and also use less sugar and butter because, as much as I love sugary, buttery breakfast goods like gooey sticky buns, I prefer my muffins a little on the lighter side.

For the raspberry muffins with hazelnut brown sugar streusel, I adapted from a Cook's Illustrated recipe and 1 1/4 cups of sour cream and 2 tablespoons of butter. Since I used regular, not low fat, sour cream, I bet I could have gotten away with skipping the butter all together. The problem with this batter is that it was very, very thick, almost too hard to mix.

Second time around, I used 1 1/4 cups buttermilk instead of sour cream for my almond poppyseed muffins. I also upped the butter to 4 tablespoons since buttermilk has much less fat than sour cream. While the batter was more manageable, it was also a little too lean. For a completely buttermilk batter, I would need 6 tablespoons or one stick of butter.

Third time's the charm and this one was just right. I averaged the two recipes, using sour cream for the richness and body and buttermilk to thin out the batter making it easier to mix, and half a stick of butter for additional flavor and richness. I also used brown sugar to make them moister and replaced 1/2 C of all purpose flour with 1/2 cup of whole wheat for even healthier muffins (shh... Steven didn't even notice). I think I am happy with this recipe, for now... :)

Notes:
- Blackberries are easiest to mix in if they're frozen; fresh blackberries are too delicate and mixing the batter will break them apart. If you have fresh berries freeze them in one layer on a tray until they are solid before mixing them into the batter.
- You can use plain yogurt instead of sour cream or clabbered milk instead of buttermilk (add 2 teaspoons to 1 tablespoon of lemon juice or white vinegar to 1 cup of milk and let it sit at room temperature until thickened or slightly curdled, about 15 minutes).
- If you don't have sour cream and only have buttermilk, use 1 1/4 C of buttermilk and 6 - 8 tablespoons of butter.
- If you don't have buttermilk and only have sour cream, use 3/4 C of sour cream and thin it with 1/2 C of milk.

Blackberry Muffins

2 C AP flour
1 Tbsp baking powder
1/4 tsp salt
1 egg
1/2 C packed brown sugar
1/4 C sugar
1/2 C sour cream
3/4 C buttermilk
4 Tbsp melted butter, cooled
1 1/4 C blackberries

Preheat the oven to 350 degrees F and spray a muffin tin with nonstick spray or use paper liners.

Rinse the frozen berries and let them drain in a sieve.

In a mixing bowl, whisk the flour, baking powder, and salt to evenly distribute. In another bowl, beat the egg, then whisk in the sugar, and sour cream. Whisk until the mixture is throughly combined then add in the buttermilk and melted butter.

Scatter the blackberries in the dry ingredients and then add the wet ingredients. Gently fold to combine, there should not be large pockets of flour but streaks of flour are okay. Do not overmix the batter.

Divide the batter into your muffin tin with a large spoon or ice cream scoop and bake until a toothpick or skewer inserted into the center of the muffins comes out clean, about 20 - 25 minutes. Remove them from the pan and cool on a rack.


More Recipes:
Hidden berry cheesecake inspired by Dorie
Almond poppyseed muffins
Raspberry muffins with hazelnut brown sugar streusel
Sticky buns 2.0
Sticky buns

Saturday, October 6, 2007

Pim's Pad Thai

Pad Thai
Pad thai is my favorite food ever and I almost always order it at Thai restaurants. I can never get enough the fresh-from-the-wok noodles coated in lightly caramelized sauce perfectly balanced with the classic Thai flavor combination of salty, sweet, sour, and spicy. I've tried various disappointing recipes at home resulting in one miserable attempt after another. One reason is because I used ketchup and that is my dirty shameful pad thai past. (I hope you don't read this Pim because I am so embarrassed.) Now that I've tried tamarind in my sauce, I know there is absolutely NO substitute for it because the flavor is irreplaceable and ketchup will never touch my rice noodles ever again.

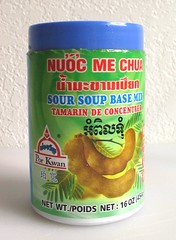
TamarindFinding tamarind was a bit tricky. On my first try, I asked several employees of my local Asiam market where I could find this magical ingredient. Each led me to the different aisle (6, no 9, try 11?, maybe 4!) until finally one employee said the store didn't carry it. Though skeptical, I went home defeated. I bet it would have helped if I had known what it was called in Chinese. The next time, I returned absolutely determined on finding the ever elusive tamarind. I checked every aisle looking up and down the shelves until finally I saw a plastic container that had a picture of the brown knobbly fruit on it. Ah Hah! I found you! I scan the container for English and it says "Sour Fruit Soup Mix." "Hmm... maybe this is the wrong thing," I wondered. I checked the ingredients, which said "Sour Fruit" and water. I took a chance and crossed my fingers that it would be tamarind and not hot and sour soup mix when I opened it. Though I really wanted to find a brick of tamarind paste, this was the best I could do. Thankfully it was the right thing.

As for the recipe? Look no further than Pim's blog because this is the absolute best pad thai recipe ever!

Notes:
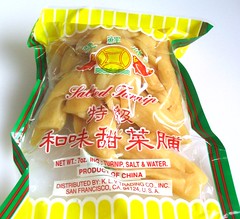
Salted Turnip- You need the tamarind, no ketchup! Don't make the same mistake I did.
- For the sauce, like Pim says, the sourness of your tamarind, the saltiness of your fish sauce, and sweetness of your palm sugar will vary. Start with this base amount and adjust as you go. It should be salty, then sour, sweet, and spicy at the end. I find that Filipino and Thai fish sauces are saltier than Vietnamese fish sauce.
- If you have tamarind paste and need to reconstitute it, look at Pim's notes at the bottom of the recipe here
- You can replace the garlic chives with the green part of scallions/green onions if you can't find the chives.
- Use as much chives/green onions and bean sprouts as you like. I like a lot of both when I use chives and sprouts, I would use less green onions if I had to make the substitute. (pst veggies are good for you)
- If you can't find the preserved turnip and dried shrimp, it's okay since they're optional.
- It's best to make this portion by portion like Pim says. But I don't have a wok so I made the whole thing in a skillet and it turned out great but I bet it'll be even better in a wok made in a smaller portion.

Chez Pim's Pad Thai aka Best Pad Thai Ever (take that Cook's Illustrated)
Serves 2 - 3

Master Sauce
1/2 C tamarind concentrate
1/2 C fish sauce
1/3 C brown sugar (or 1/2 C palm sugar)
Thai chili powder/cayenne to taste

8 oz. rice noodles/sticks
Shrimp (peeled and deveined), chopped extra-firm or pressed tofu, or sliced chicken breast (I used about 8 oz. of shrimp and 4 oz. of tofu)
1 - 2 eggs depending on how much egg you like
2 C of chopped Chinese garlic chives (or green part of green onions but use less)
2 C bean sprouts (mung bean sprouts not soy bean sprouts)
4 Tbsp ground peanuts (minced or grind in a food processor)
Vegetable oil

Optional:
2 Tbsp minced pickled/preserved/salted turnip
2 Tbsp minced dried shrimp or pounded until fluffly with a mortar and pestle
A few cloves of minced or pressed garlic


Start by soaking your rice noodles in warm water if they're the dried kind. You'll only want to soak your noodles until they're pliable not completely soft. If you're using fresh noodles, give them a quick rinse and let them drain.

I also like to soak my dried shrimp in hot water for a few minutes then rinse them off.

Combine all the ingredients for the sauce and simmer until everything is dissolved. The fish sauce will smell sooooo bad (oh-my-goodness-feet-sauce-did-you-turn-on-the-vent bad) when it simmers but it tastes oh so good. Taste and adjust the seasoning of the sauce till you like it. I still haven't gotten it down quite right but the pad thai is still excellent. This will likely make enough sauce for plenty more portions of pad thai. You can keep it in your fridge or freezer (it doesn't freeze in the freezer).

Begin by heating 2 tablespoons of oil in your skillet or wok. Add your tofu and pan fry until golden brown. Then add your shrimp or chicken and cook and stir fry for a bit. Then add a few spoonfuls of your sauce and take out of the wok just before it is cooked through and set aside.

Drain your noodles before cooking. Add some more oil to your wok/skillet (2 tbsp to 1/4C) be generous since you don't want the noodles to stick. Add your noodles, turnip, shrimp, and garlic if using. Then add about 1/4 C (or 1/2 C of sauce if you're making the whole thing at once) and stir fry until the noodles are the edible. If the pan is getting too dry, add some water. Cook until the noodles are edible.

Add your eggs in the middle of the wok or skillet and let it set a bit before tossing it with the noodles.

Add your bean sprouts, garlic chives or green onions, and your protein. Keep on stir frying until the protein is fully cooked and warmed through.

Sprinkle with ground peanuts before serving. Serve with slices of lime and more chili powder.


(Yup I can pretty much eat this whole thing myself)

Wednesday, October 3, 2007

Dried Shrimp

Dried Shrimp

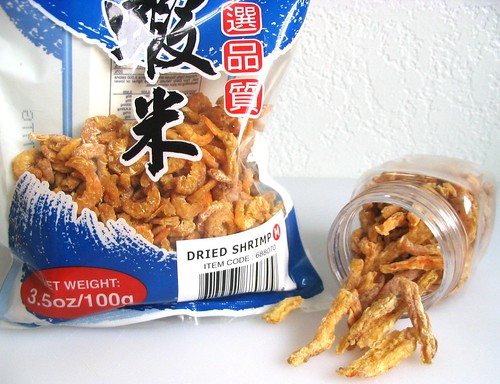
In Chinese, dried shrimp are called xia mi, which literally means shrimp rice, because small shrimp are sun dried resulting in even tinier pieces of dried shrimp. While they are bigger than grains of rice, most dried shrimp are relatively small. There is some variation in size and the bigger the shrimp, the higher the price. The shells are left on because the shrimp are small enough that they don't pose a problem after drying. The shrimp on the left is a bag that I purchased from my local Asian market. The shrimp in the container on the right is my special, super duper, extra large dried shrimp meat that I get from Steven's mom. She gets them imported from Malaysia because you can't find such large dried shrimp here.

Dried shrimp can smell quite fishy but they pack an amazing umami flavor, xian wei. In Chinese cooking, they're used in stir fries, braises, soups, stuffing, and dumpling fillings.

You can find dried shrimp in most Asian markets. Ideally they should be kept refrigerated even if they're unopened. Often times, I find that the storage policies in some markets are a little lax so they can be found in either a refrigerated aisle or at room temperature. Store them in the fridge when you get home just to be safe (but don't worry my parents and grandparents keep it at room temp, I mean it is dried after all, I'm just paranoid). Since the flavor is so concentrated, a little goes a long way. I only use a spoonful or two at a time. Before cooking, soak the shrimp in some hot water. Many people save this water to add back into soups, but I discard it because I think of it as washing the shrimp. Do not leave the shrimp soaking for too long, otherwise all the delicious umami flavor will leech out.

Recipes:
Recently I used these little dried shrimp in Pim's Pad Thai recipe.

I also use them in green bean stir fry and Chinese daikon cake.